
Data recovery on vintage hard drives like the Maxtor 90645D3 starts with identifying the failure type – electronic, firmware, or mechanical. Each requires a different approach, and misdiagnosis can make things worse. Here’s a quick guide to help you assess your situation and decide on the next step.
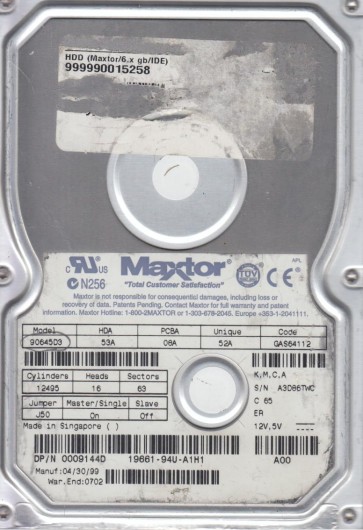
The Maxtor 90645D3 is a vintage 3.5-inch Parallel ATA (PATA) hard disk drive from the late 1990s or early 2000s, with a formatted capacity of approximately 645MB. It uses a standard IDE/ATA interface, a spindle speed likely of 5400 RPM, and employs older technology such as magneto-resistive (MR) heads and a ceramic spindle bearing. This drive is part of Maxtor’s DiamondMax series (often labeled as 90645D3 in the model number, where ‘9’ indicates the family). Given its age, the drive is susceptible to several specific failure modes related to component aging, mechanical wear, and logic board degradation. Important initial steps: do not power the drive on if you suspect a mechanical failure; identify any unusual sounds such as clicking, grinding, or silence.
Identifying Common Failure Types
1. Head Crash / Stiction
Symptoms include a loud clicking, scraping, or screeching sound, or the drive spinning up but failing to be recognized. Causes: Age-related degradation of the head actuator arm bearing, debris on the platter surface due to previous damage, or static friction (stiction) where the heads stick to the platter surface after prolonged inactivity. The drive may also fail to spin up at all, emitting a series of brief attempts.
2. Logic Board / PCB Failure
Symptoms: Drive appears dead (no spin, no detection, or detection but zero capacity). Common failure points include blown TVS diodes (transient voltage suppression) from a power surge, failed spindle motor driver chips, or cold solder joints on the main controller or preamplifier. Also, the firmware stored on the PCB’s EEPROM can become corrupted. A classic sign is a burning smell or visible damage on the PCB.
3. Bad Sectors / Media Degradation
Symptoms: The operating system detects the drive but reports errors, slow performance, constant read/write retries, or files that become corrupted or inaccessible. This is often due to the magnetic media losing its signal over time (bit rot), or physical damage from a shock or head slap. The drive may reallocate sectors but eventually run out of spare sectors.
4. Preamp / Head Amplifier Failure
Symptoms: The drive spins but is detected with a wrong capacity (e.g., 0MB or random value), or produces a high-pitched whine from the preamplifier chip on the flex cable. The drive may also fail to read any data, displaying a “Uncorrectable Error” during access. This is a hardware-level failure inside the sealed chamber, often related to the tiny flex circuit connecting the heads to the preamp.
Potential Recovery Paths
Professional Data Recovery Services (Recommended for mechanical or complex failures): For the Maxtor 90645D3, professional recovery involves opening the drive in a cleanroom (Class 100 or better). A specialist will attempt a head stack replacement (donor heads from a matching drive), a logic board swap (with firmware transplant), or platter transplantation to a donor spindle. This is the only viable method for head crashes, severe clicking, or preamp failure. Costs are high (typically $500-$2000+) but success rates for this era of drive can be moderate to high with proper tools. Ensure the service has experience with vintage PATA drives.
DIY Methods (Only for software/firmware issues): – PCB Swap (with caution): If the drive is completely dead and you are certain it is a PCB failure (no physical damage, no burning smell, no clicking), you can try a donor PCB from an identical model (90645D3) with the same firmware revision. However, many Maxtor drives of this era require the corrupt EEPROM to be swapped from the original board to the donor board. This involves hot-air soldering or de-soldering a small 8-pin or 16-pin chip. Simple PCB replacement without firmware transfer will often result in a “Uncorrectable Error” or “Drive Detection Dead”. – Software Imaging: For bad sectors only, use a Linux tool like ddrescue. Run the command: ddrescue -d -r3 /dev/sdX /mnt/recovery/image.img /mnt/recovery/logfile.log. Replace /dev/sdX with your drive’s identifier. This will attempt to skip bad sectors and retry up to 3 times. Patience is critical; this may take hours or days. – Freezing: (Desperate, last resort) Place the drive in a sealed bag and put it in a freezer for 2-4 hours. Then quickly reconnect it and attempt a single full read with ddrescue. This can temporarily shrink a stuck bearing or reseat a stuck head, but it is risky and may cause condensation damage. Only do this if the drive is already dead and you have no other option.
What Not to Do
– Never open the drive enclosure in a normal room environment. The magnetic platters are extremely sensitive to dust and fingerprints. Opening the drive will almost certainly destroy all recoverable data. – Avoid repeated power-on attempts if the drive is clicking or grinding. Each spin can further damage the platter surface, widening the area of damage. – Do not use Disk Utility, chkdsk, fsck, or any disk repair software on a mechanically suspect drive. These tools write to the drive and can overwrite critical partition tables or further corrupt data areas. – Never rotate or tilt the drive while it is spinning. This can cause the heads to crash into the platter. – Do not use a generic USB-to-IDE adapter for recovery if you suspect PCB issues. Power surges from these adapters are a common cause of TVS diode blowout. If you must, use a high-quality, grounded adapter or a desktop computer’s internal PATA port. – Do not attempt to swap platters between drives yourself. This requires precision tools and a cleanroom. – Do not apply voltage or tap the drive housing. This is an old myth that rarely works and usually causes further damage.
Summary
The Maxtor 90645D3 is an aging PATA drive with failure modes common to its era: mechanical head crash, PCB failure, bad sectors, and preamp failure. For mechanical issues (clicking, grinding, no spin), diagnosis is straightforward but DIY recovery is virtually impossible without professional cleanroom tools. For logical failures (bad sectors), ddrescue on a Linux platform offers a viable software route. For suspected PCB failure, attempt a donor board swap only if you can transfer the original EEPROM chip. The safest and most effective path for critical data is professional recovery. Always prioritize avoiding further operations on a failing drive. Consider cloning the drive to a modern storage medium immediately upon success.