
Data recovery on vintage hard drives like the Hitachi HTS541280H9SA00 starts with identifying the failure type – electronic, firmware, or mechanical. Each requires a different approach, and misdiagnosis can make things worse. Here’s a quick guide to help you assess your situation and decide on the next step.
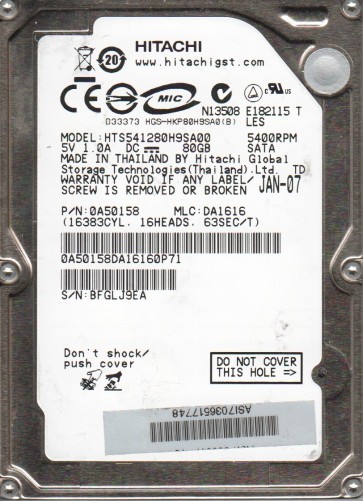
The Hitachi HTS541280H9SA00 is a 2.5-inch, 80GB, 5400 RPM PATA (Parallel ATA) hard drive manufactured by Hitachi Global Storage Technologies (now part of Western Digital). This drive was commonly found in older laptops and portable external enclosures from the mid-2000s. It utilizes a glass platter design and a standard fluid dynamic bearing motor. Key components include the printed circuit board (PCB) underneath the drive, the read/write heads, the voice coil actuator, and the firmware stored on the ROM chip. Due to its age, typical failure modes include mechanical wear, electronic component degradation, and firmware corruption. The drive’s physical size and PATA interface make it less common in modern systems, but recovery techniques remain specific to its older architecture.
Identifying Common Failure Types
1. Mechanical Failure (Head Crash or Stiction)
Symptoms include a clicking, ticking, or screeching sound when powered on. The drive may be detected briefly by the BIOS then disappear, or spin up and immediately stop. This is often caused by damaged read/write heads physically contacting the platters, or by the heads sticking to the platter surface (stiction) due to degraded lubrication or shock. A head crash can cause irreversible damage to the data surface if the drive is repeatedly powered on.
2. Electronic Failure (PCB Issues)
The drive may show no signs of life: no spin-up, no sounds, and no detection in the BIOS. This is frequently due to a failed preamplifier chip, damaged motor controller, or blown TVS (Transient Voltage Suppression) diode on the PCB. Power surges or using an incompatible power adapter can cause this. Often, the platters and heads remain undamaged, making data directly recoverable if the PCB is replaced or repaired.
3. Firmware Corruption
Symptoms include the drive spinning up normally and being detected, but with an incorrect capacity, as “uninitialized,” or producing a “SMART status bad” error. The drive may hang the system during boot or report a “parameter incorrect” error. This can result from bad sectors in the system area, a failed firmware module, or logical corruption from improper shutdowns. It is not a hardware failure of the platters or heads, but requires specialized tools to access and repair the firmware, not standard operating system utilities.
4. Bad Sectors / Degraded Media
The drive spins up, is detected, but exhibits errors when reading files, slow performance, or the operating system reports a “crc error” or “data error (cyclic redundancy check).” This indicates physical damage to the magnetic coating on the platters, often developing from head contact, age-related degradation, or thermal expansion. The drive may attempt to reallocate sectors, but once reallocation thresholds are exceeded, it fails entirely.
Potential Recovery Paths
Professional Recovery Services
For any mechanical failure, firmware corruption, or severe bad sector issues, professional recovery is strongly recommended. Specialists have cleanroom facilities (Class 10 or better) to open the drive safely, replace matching donor heads, or image the platters on specialized hardware. They can also use PC-3000 or similar tools to rebuild firmware modules. Expect costs from $300 to $1500+ depending on severity. Use a reputable service with experience in Hitachi drives and a no-data, no-fee policy.
DIY Methods (Risk Acknowledged)
Warning: DIY recovery is only safe for simple electronic failures or logical issues. Attempting any mechanical or firmware repair without proper tools will almost certainly destroy all data permanently.
1. Check Connections & Power: Try a different PATA cable or an external USB adapter. Ensure the 4-pin power connector is snug. If the drive does not spin, measure 5V and 12V at the connector with a multimeter. Low voltage can prevent spin-up.
2. PCB Replacement (Electronic Failure Only): If the drive is dead silent, locate the exact PCB part number (printed on the board, typically 0A##### or similar). Source an exact matching donor board from the same model and firmware revision. You must transfer the original ROM chip (a small 8-pin IC) from the faulty PCB to the donor board using a hot air rework station. Do not swap the entire PCB without transferring the ROM, as the drive will not initialize or will damage the heads.
3. Imaging with Bad Sectors: For a drive with clicking or bad sectors, do not run chkdsk or format. Use a specialized imaging tool like ddrescue or HDDSuperClone in Linux. Create a disk image to a healthy target drive. Use command: ddrescue -d -r3 /dev/sdb /dev/sdc logfile.log. This will skip unreadable areas first, then retry them. Never use the drive as a boot device during this process.
4. Logical Recovery: If the drive is detected but shows as raw or unformatted, use a read-only data recovery tool like R-Studio or DMDE. Scan the drive and recover files to a separate drive. Do not write anything to the failing drive.
What Not to Do
- Never open the drive enclosure. The internal environment is cleanroom sealed. Dust, smoke, or a single fingerprint will destroy the platters and make professional recovery impossible. Opening it voids any chance of success.
- Do not apply power repeatedly. If the drive makes clicking or grinding noises, turn it off immediately. Each power cycle can physically damage the heads and platters further.
- Avoid using chkdsk, fsck, or any disk repair tools. These programs are designed for fixable file system issues, not physical damage. They can overwrite data or cause the drive to self-destruct by triggering internal reallocation or firmware crashes.
- Do not attempt to swap the PCB without transferring the ROM chip. Simply replacing the whole board will result in no operation or immediate destruction of the heads due to mismatched adaptive parameters stored in the ROM.
- Never freeze the drive. This is a myth from older drives. Condensation will corrode the heads and platters immediately upon thawing.
- Do not use high-voltage tools. Do not apply external voltages beyond 5V and 12V. Using a SATA to PATA power adapter without voltage regulation can fry the motor controller.
Summary
The Hitachi HTS541280H9SA00 is a legacy PATA laptop drive with typical failure modes including mechanical head crashes, electronic PCB failure, firmware corruption, and bad sectors. Professional recovery is mandatory for mechanical or firmware issues due to the need for cleanroom intervention and specialized hardware. For DIY attempts, only pursue PCB replacement with ROM transfer for dead electronics, or read-only imaging with ddrescue for logical or bad-sector problems. Never open the drive, run repair utilities, or apply power to a clicking drive. Prioritize immediate power-off if unusual sounds are heard, and always consult a professional if the data holds any significant value. The key to success is accurate diagnosis and avoiding any action that worsens the condition of the media.