
Data recovery on vintage hard drives like the Maxtor 6B250S0 starts with identifying the failure type – electronic, firmware, or mechanical. Each requires a different approach, and misdiagnosis can make things worse. Here’s a quick guide to help you assess your situation and decide on the next step.
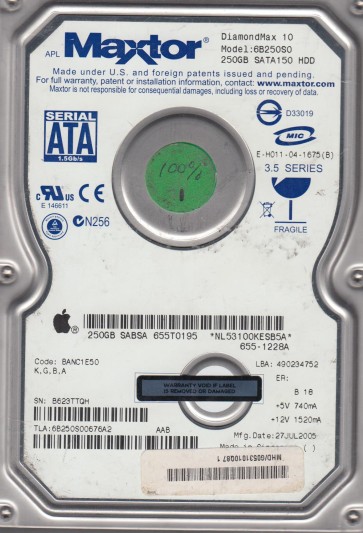
The Maxtor 6B250S0 is a 250GB hard disk drive from the DiamondMax 17 series, utilizing an ATA-133 interface (PATA). It features a spindle speed of 7200 RPM and a 16MB buffer. This generation of Maxtor drives, produced in the mid-2000s, is known for specific failure mechanisms including firmware corruption, head degradation, and bad sector proliferation. The drive uses a Marvell or Agere controller, and its firmware architecture is complex, making it susceptible to module damage. A key vulnerability is the drive’s tendency to generate ample bad sectors as it ages, leading to slow operation, clicking, or complete unresponsiveness. Understanding that this is a parallel ATA drive is critical; you will need an appropriate controller card, not a modern SATA interface, to connect it for recovery attempts.
Identifying Common Failure Types
1. Firmware Corruption (Module Damage)
The Maxtor 6B250S0 stores critical servo information and defect lists in firmware modules on the platters. A sudden power loss, age-related degradation, or impact can corrupt these modules (particularly the ID and defect modules). Symptoms include the drive spinning up normally but clicking a few times, then going idle without being detected in BIOS, or being detected with a zero capacity (e.g., “0 MB” or “LBA 0”). The drive may also make a brief “beep” or chatter on power-up as it fails to load its firmware. This is a hardware-firmware hybrid problem and often requires specialized tools to reprogram the modules or bypass the corrupted region.
2. Head Stack Assembly (HSA) Failure
Mechanical failure of the read/write heads is common in aging Maxtor drives. This manifests as a loud, repetitive clicking sound (the heads failing to land on the correct track), or a “whirring-click” pattern. The drive may also be detected but with extremely slow access or the inability to read a specific area. Head failure is a pure hardware issue. It can be caused by contamination (dust), stiction (heads sticking to the platter), or simply mechanical wear. If the drive is clicking loudly and not being recognized, or if it makes a screeching sound, the heads are likely damaged. This requires a cleanroom environment for replacement.
3. Bad Sector Proliferation and Surface Damage
As the 6B250S0 ages, the magnetic media can develop weak sectors and physical defects (scratches) from head contact. This initially presents as slow file access, file corruption, and clicking during read attempts. You may see “CRC errors” in Windows or hear the drive repeatedly retrying to read a sector (a series of short clicks followed by a pause). If the drive is still accessible but very slow, this is the primary suspect. While a logical issue, the underlying cause is physical damage to the platter. Attempting to force-read with standard software can exacerbate the damage by spreading debris. This often requires a firmware-level read retry adjustment (lowering the threshold) to skip bad areas before full failure.
4. Stiction (Spindle Motor Failure)
The 6B250S0, after extended non-use or due to degraded lubricant, can suffer from stiction where the heads stick to the platter surface, preventing the spindle motor from spinning up. The drive will either not spin at all, or you will hear a faint “tick” from the motor trying to start, followed by silence. If you cannot feel the drive spinning or hear the typical whir of the platters, and the drive is completely dead (no BIOS detection), this is a candidate. This is a mechanical hardware issue requiring professional intervention to unlock the heads and clean the platter surface.
Potential Recovery Paths
DIY Recovery (Software/Logical Issues Only)
CAUTION: DIY methods are only suitable for drives that are recognized by BIOS, make no abnormal sounds, and are merely slow or have corrupt data. NEVER attempt DIY on a clicking or non-detected drive without professional tools.
- Step 1: Imaging with a tool like ddrescue (Linux) or HDDSuperClone (Linux). This is the only safe DIY method. Do not run chkdsk or scandisk. Create a sector-by-sector image of the entire drive to a known-good target drive (e.g., a large SATA disk). Use the `–no-trim` option in ddrescue to avoid forcing reads on bad sectors. This will create a .mapfile to track errors. Maximum image speed: 5-10 MB/s for this old drive. Expect to run for 24-48 hours.
- Step 2: Use the image for recovery. Once the full or partial image is complete (even with errors), connect the target drive to your computer and recover files using file recovery software like Recuva or R-Studio. Do not work on the original drive.
- Step 3: For a perfectly detected drive with slow access, try a low-level ATA command. Using a tool like MHDD (from a bootable DOS USB) can check the SMART data and mark pending sectors. This is risky and may trigger the drive’s full failure. Use only as a last resort.
Professional Recovery Services
For any physical failure (clicking, non-detection, buzzing, stiction) or firmware corruption, professional recovery is the only viable path.
- Firmware Recovery: A specialist uses tools like PC-3000 or MRT Pro to access the Service Area of the Maxtor drive. They can dump damaged firmware modules, rebuild the translator (interpretation tables), and create a clone through the firmware bypass. Cost range: $300-$800 USD based on complexity.
- Head Replacement: Required for a clicking head failure. The process: (1) Cleanroom class 10/100. (2) Locate and acquire a compatible donor drive (exact same model and firmware revision). (3) Remove the original HSA and install the donor’s head stack. (4) Use the hardware to stabilize the platters. (5) Once the drive spins up, firmware-level recovery is attempted. Cost range: $500-$1500 USD.
- Platter Swap: For severe head crash or platter scratches, the platters are physically removed and transplanted into a matching donor chassis. This is an extreme measure and may not succeed if the media is damaged. Cost: $1500-$3000+ USD.
- Stiction Resolution: A professional can gently rotate the spindle motor using a torque tool to free the heads, then carefully clean the platter surface before attempting power-on. Cost: $200-$400 USD.
What Not to Do
- Do not open the drive. The head-to-platter clearance is measured in nanometers. Any dust, smoke, or fingerprint will destroy the media. A single particle can cause a head crash. The drive’s internal cover is not a seal.
- Do not run CHKDSK (Windows) or fsck (Linux) on a failing drive. These tools attempt to fix file system structures by writing to the drive. On a drive with firmware corruption or weak media, this can trigger a cascade of re-reads, head retries, and increase bad sector count, rendering the drive unrecoverable.
- Do not use data recovery software like Recuva or EaseUS on the original drive. These tools are designed for deleted files on healthy drives. On a failing drive, they will cause excessive reads, leading to further head wear and media damage.
- Do not freeze the drive. The “freezer trick” is a myth. Freezing a drive can cause condensation inside the sealed unit, leading to immediate head crash or short circuits. It does not fix head stiction or firmware issues in a controlled manner.
- Do not tap or shake the drive. Tapping can temporarily free a stuck head, but it destroys the alignment of the remaining heads and often causes permanent damage to the media surface.
- Do not try to reflash the firmware with a generic tool. Maxtor firmware is specific to each drive model and revision. Using a wrong firmware will brick the drive and make professional recovery impossible.
Summary
The Maxtor 6B250S0 is a classic PATA drive with a high failure rate due to firmware corruption, head failure, and bad sectors. Self-recovery is only feasible if the drive is fully detected, makes no abnormal noises, and is simply slow. In that case, use a sector-by-sector imaging tool (ddrescue) onto a healthy target drive. For any clicking, non-detection, buzzing, or physical damage, immediate professional intervention is required. The drive’s value for data recovery lies in its non-standard media alignment and complex firmware; do not attempt hardware or firmware-level recovery without specialized equipment. The single most important rule: stop using the drive at the first sign of trouble to preserve the data from further degradation. If in doubt, consult a data recovery specialist. Expect significant time and cost for a successful result, but this remains the only path for critical data.