
Data recovery on vintage hard drives like the Hitachi HUS724030ALE641 starts with identifying the failure type – electronic, firmware, or mechanical. Each requires a different approach, and misdiagnosis can make things worse. Here’s a quick guide to help you assess your situation and decide on the next step.
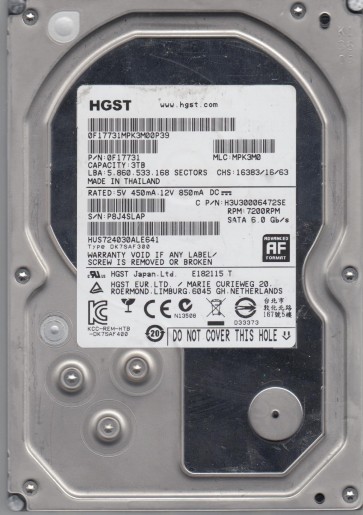
The Hitachi HUS724030ALE641 is a 3TB 3.5-inch enterprise-class hard disk drive (HDD) from the Ultrastar 7K4000 series. It operates at 7200 RPM with a SATA 6Gb/s interface and utilizes Advanced Format (4K native sectors). This drive is known for its high reliability (2M hours MTBF at 100% duty cycle) and robust construction, including rotational vibration sensors for server environments. However, like all mechanical drives, it is susceptible to both hardware and software failures. Key components include the head stack assembly (HSA), spindle motor, drive logic board (PCB), firmware stored in both the PCB and on the platters (SA), and the magnetic media itself. The high density of the platters (typically 4 or 5) makes it sensitive to head crashes and media degradation.
Identifying Common Failure Types
1. Logical / Firmware Corruption
Symptoms: The drive powers on, spins up normally (no unusual sounds), but is not detected by the BIOS or operating system, or reports an incorrect capacity (e.g., 0GB or 32GB). It may click briefly on power-up or click 3-4 times then go silent. This is often due to corrupted Service Area (SA) or Module 02 (translator). Causes include unexpected power loss, improper shutdown, or native firmware bugs. The drive may appear as “Hitachi HUS724030ALE641” with no access.
2. Mechanical Failure – Head Crash or Stiction
Symptoms: The drive emits audible clicking, grinding, scraping, or a continuous “whirring” sound with no spin-up. It may spin up for a few seconds and then click repeatedly (classic “click of death”). This indicates the read/write heads have physically crashed into the platters, or the spindle motor is seized (stiction). This is a physical failure requiring clean room intervention. Data loss is often partial but may be total if heads damage the media surface.
3. Electronic Failure (PCB)
Symptoms: The drive is completely dead – no spin, no sounds, no detection. This is often caused by a failed TVS diode, a blown fuse, a damaged preamplifier (preamp) on the heads, or a failed motor controller IC. A common clue is a burning smell or visible damage on the PCB. Replacing the PCB with a matched donor board is not a simple swap due to firmware adaptation (NVRAM/UBA data).
Potential Recovery Paths
Professional Data Recovery Services (Recommended for Mechanical/Firmware Issues)
For hardware mechanical failures (head crash, motor seizure) or advanced firmware corruption (translator rebuild required), professional intervention is mandatory. These labs possess Class 100 clean rooms, specialized tools (PC-3000, DeepSpar, HRT), and donor drives for head stack replacements. The cost for a Hitachi HUS724030ALE641 typically ranges from $300 to $3000+, depending on the severity (e.g., single head replacement vs. complex media damage). Expect a turnaround time of 1-5 business days for priority cases. Choose a lab with experience in Hitachi/Ultrastar firmware and advanced head transplants.
DIY Methods – Limited to Specific Scenarios
Case 1: Logical Issues (No Physical Damage)
If the drive spins normally, makes no unusual sounds, but is not detected or shows incorrect capacity, you may attempt software recovery. Use a tool like R-Studio or DMDE to create a raw disk image (preferably using a hardware write-blocker on a Linux system with DDRescue/HDDSuperClone). Do not attempt a format, chkdsk, or any write operation. If the drive stops responding during imaging, stop immediately – this indicates worsening media degradation or pending head failure. Do NOT attempt firmware fixes (e.g., flashing ROM or SA) without professional tools.
Case 2: Electronic Failure (PCB Only – No Head or Motor Damage)
If the drive is completely dead with no signs of life, you can locate the TVS diode (often near power connector) and check if it’s shorted. Using a multimeter, measure for short to ground. If a diode is failed, you can remove it only if you are competent with soldering. Replacing the entire PCB is possible but requires transferring the original firmware (24-bit NVRAM) from the old board to a donor board (exact same revision number). This requires a hot air station and proper programming tool. Without the original firmware adaptation, the drive will not spin or will run at wrong parameters. This is NOT recommended for beginners.
What Not to Do
- Do not open the drive enclosure or take it apart. Even a speck of dust can cause a head crash once reassembled.
- Do not apply voltage to a damaged PCB (e.g., wrong power cable) or plug in a drive that smells burnt – short circuits can destroy the motor controller.
- Do not run chkdsk (check disk), format, or any data recovery software on a drive that is clicking, making grinding sounds, or has slow response. This will cause further physical damage.
- Do not freeze the drive. This is an old myth that can cause condensation and kill the heads.
- Do not hit or shake the drive to “free up” stuck heads. This can destroy the platter surfaces.
- Do not attempt to swap the PCB without transferring the firmware (NVRAM) unless you are fully aware that a plain swap almost never works and can corrupt the translator.
Summary
The Hitachi HUS724030ALE641 is a robust enterprise drive but fails via three main paths: logical/firmware corruption, mechanical head crash, or electronic PCB failure. For logical issues (normal spin, no data access), a careful sector-by-sector imaging with a tool like DDRescue is the best DIY approach – but any write operation or interruption can be fatal. For mechanical failures (clicks, grinding) or advanced firmware issues (incorrect capacity, no detection), professional recovery is mandatory before using a clean room for head stack replacement. Electronic failures may be DIY-repairable if limited to the PCB (TVS diode) and you can perform NVRAM transfer, but extreme caution is needed. Always prioritize creating a forensic image of the original drive before any repair attempts. If in doubt, turn off the drive immediately and consult a professional data recovery specialist to avoid permanent data loss.