
Data recovery on vintage hard drives like the Western Digital WD3200AAKX starts with identifying the failure type – electronic, firmware, or mechanical. Each requires a different approach, and misdiagnosis can make things worse. Here’s a quick guide to help you assess your situation and decide on the next step.
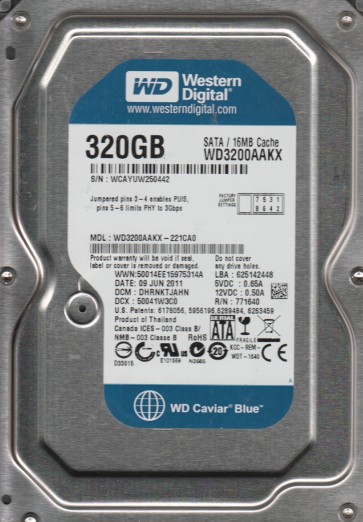
The Western Digital WD3200AAKX is a 3.5-inch, 320GB, 7200 RPM SATA hard disk drive from the WD Caviar Blue series. It utilizes a single 320GB platter and is known for its reliability in desktop computing environments. Key characteristics include a Marvell main controller, a Western Digital read/write head assembly, and firmware stored on the PCB and system tracks (SA region). Understanding this architecture is critical for diagnosing failures, as issues can arise in the mechanical, electronic, or firmware domains.
Common Failure Types
1. Mechanical Failure (Head Crash or Stiction)
Symptoms: Loud clicking, grinding, or screeching noises; drive spins up then stops; BIOS does not detect the drive; system freezes during boot. Cause: Physical contact between the read/write head and the platter surface, often due to shock, contamination, or wear. Stiction occurs when the head sticks to the platter surface.
2. Firmware Corruption (SA Region Issues)
Symptoms: Drive spins up but is not detected; drive is detected with incorrect capacity (e.g., 0GB or 1MB); repetitive clicking (not mechanical in nature); drive shows as “not initialized” in Disk Management. Cause: Corruption of the Service Area (SA) firmware modules, often due to sudden power loss, bad sectors in the SA, or age-related degradation.
3. Logical Damage (File System Corruption)
Symptoms: Drive is detected but shows as RAW, unallocated, or prompts to format; error messages like “The file or directory is corrupted and unreadable”; files disappear; data access is slow. Cause: File system structure damage (MFT, FAT, directory entries) from improper shutdowns, virus attacks, or software errors.
4. Bad Sector Development (Media Degradation)
Symptoms: Slow read/write speeds; frequent CRC errors; system hangs when accessing certain files; S.M.A.R.T. attributes like Reallocated Sectors Count or Current Pending Sector Count increase. Cause: Physical defects on the platter surface (weak media) or head-induced damage over time.
5. PCB (Printed Circuit Board) Failure
Symptoms: Drive is completely dead (no spin, no sound); drive may spin up but not be detected; burning smell or visible component damage (e.g., blown TVS diode). Cause: Power surge, component aging, or physical damage to the board. The controller chip (Marvell) or preamp may also fail.
Potential Recovery Paths
Professional Data Recovery Services
When to use: For all mechanical failures (head crash, stiction), severe firmware corruption, or when the platters need to be transplanted. Process: Engineers disassemble the drive in a cleanroom (Class 100 or better), transplant the platters or heads into a known-good donor drive, and read data using specialized tools (e.g., PC-3000, DeepSpar). Cost: Typically $500-$2500+ depending on complexity. Recommendation: Use a reputable lab with cleanroom facilities and WD-specific experience.
DIY Firmware Repair
When to use: For simple firmware issues (e.g., corrupted modules, translator damage) if you have the right tools. Required tools: A hardware programmer (e.g., PC-3000 UDMA, MRT Ultra, or at minimum, a terminal connection via USB-TTL). Process: Connect to the drive’s terminal port, interrupt the startup sequence, and repair the damaged firmware modules (e.g., modules 02, 05, or the defect list). Risk: Very high; incorrect firmware writes can permanently brick the drive. Only attempt if you have in-depth knowledge of WD firmware architecture.
DIY Bad Sector Handling (Imaging)
When to use: For logical damage or bad sectors without mechanical issues. Required tools: ddrescue (Linux), HDDSuperClone, or R-Studio. Process: Use the tool to create a sector-by-sector image of the drive. ddrescue will skip bad sectors and retry them later. Do not use chkdsk or scandisk before imaging. Output: A compressed disk image file or a clone to a healthy drive.
DIY File System Repair
When to use: For logical damage only (RAW partitions, deleted files). Required tools: TestDisk (for partition recovery), PhotoRec (carving), R-Studio, or DMDE. Process: Use TestDisk to rebuild partition tables or recover boot sectors. For deleted files, use scan-based recovery tools. Warning: Never write changes to the failing drive; always work on a clone or image.
What Not to Do
1. Do not run chkdsk /f or scandisk on a failing drive. These tools attempt to repair file system structures. On a drive with bad sectors or firmware issues, they can cause permanent data loss by writing to damaged areas or triggering a cascade of additional errors.
2. Do not open the drive enclosure. The internal environment is hermetically sealed and filled with filtered air. Even a single dust particle can cause a head crash. Opening the drive will void any chance of professional recovery and often destroys the data.
3. Do not apply power to a drive making clicking or grinding sounds. Continued operation can scratch the platters, making recovery impossible. Immediately disconnect power and consult a professional.
4. Do not attempt PCB swap without consideration of ROM transfer. Many WD drives store unique adaptive data in the external ROM chip. Simply swapping the PCB from a donor drive without transferring the original ROM will result in the drive not being properly recognized or functioning.
5. Do not freeze the drive. This is an old myth. Freezing can cause condensation inside the drive, leading to corrosion and permanent damage. It only rarely helps with stiction and is far more likely to destroy the drive.
Summary
The WD3200AAKX is a robust desktop drive but vulnerable to mechanical head crashes, firmware corruption, logical errors, and bad sectors. For physical or complex firmware failures, professional cleanroom recovery is the only safe option. For logical issues or minor bad sectors, DIY imaging with tools like ddrescue is effective but must be done carefully. Never run repair tools on the original drive, never open it, and never freeze it. Prioritize creating a sector-by-sector image before attempting any repair. The key to success is stopping all writes to the drive and consulting expert advice when the situation exceeds your skill level.