
Data recovery on vintage hard drives like the Western Digital WD800ADFD starts with identifying the failure type – electronic, firmware, or mechanical. Each requires a different approach, and misdiagnosis can make things worse. Here’s a quick guide to help you assess your situation and decide on the next step.
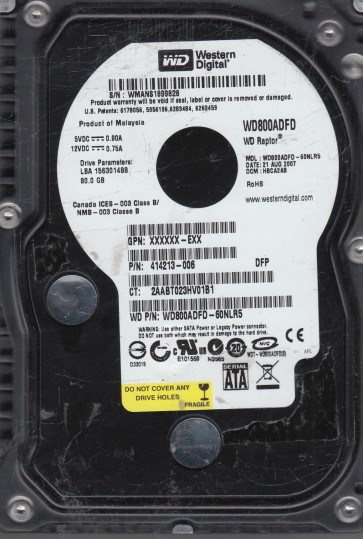
The Western Digital WD800ADFD is an 80GB 7200RPM SATA hard drive from the earlier SATA generation, part of the WD Caviar SE16 family. It features a 16MB cache and a single-platter design, known for relatively quiet operation and moderate performance for its era. Common in desktop PCs and basic external enclosures, its age and mechanical design make it susceptible to specific failure modes, particularly involving the spindle motor and read/write heads.
Common Failure Types
1. Mechanical Head Crash or Stiction
Symptoms: Loud clicking, grinding, or scratching noises. The drive may spin up but fail to be detected, or it makes a repetitive “click of death”. Stiction occurs when the heads stick to the platter surface after a period of inactivity, preventing spin-up.
Causes: Physical shock, aging lubricants, internal contamination from particles, or gradual wear on the head actuator.
2. Spindle Motor Failure (Stuck or Seized)
Symptoms: The drive spins up, produces a whirring sound, but then spins down abruptly (often with a chirp). The drive may fail to spin at all, with no vibration or sound. In some cases, a brief power-on followed by silence indicates a seized motor.
Causes: Bearing wear over time, dried or degraded lubricant, or physical impact damaging the motor assembly.
3. Firmware Corruption or Translator Damage
Symptoms: Drive is detected in BIOS with a generic or incorrect model name (e.g., “ST_M” or “LBA=0”). The drive may spin up perfectly but is stuck in a “Detecting” loop, or it reports a capacity of 0GB. Data access errors (S.M.A.R.T. errors) or immediate “Ready” but no data access are common.
Causes: Sudden power loss during a firmware update, degradation of the SA (Service Area) sectors, electrostatic discharge, or gradual magnetic decay of the firmware modules.
4. Logical Damage and Bad Sector Proliferation
Symptoms: The drive is detected correctly, but the operating system shows file system errors (e.g., “The disk is not formatted”), read/write failures, or extremely slow performance. File browsing halts on certain directories.
Causes: File system corruption due to improper shutdown, virus attacks, or accumulation of weak sectors (p-list or g-list issues) due to age. This often presents as a logical failure but may have an underlying physical cause.
5. PCB (Printed Circuit Board) Failure
Symptoms: The drive does not spin up, no activity sounds at all, but the drive is not electrically dead (no magic smoke). The drive may be detected but gives no data access. Sometimes a burnt component smell is present.
Causes: Power surge, lightning strike, or failure of a voltage regulator diode or TVS (Transient Voltage Suppressor) diode on the board.
Potential Recovery Paths
DIY Methods (Only for non-critical data and after confirming no physical damage)
- PCB Swap (with caution): If the PCB is dead but the motor and heads are intact, you can attempt a donor PCB swap. Critical: You must either transfer the original ROM chip (8-pin serial flash) from the old PCB to the donor PCB or have the donor PCB reprogrammed with the original ROM. A simple same-model swap without ROM transfer will brick the drive. This is an advanced DIY step.
Tools needed: Torx T6 and T8 screwdrivers, hot air rework station or fine soldering iron for ROM swap, anti-static wrist strap. - Imaging with a Soft-Error Handling Tool: For logical damage or bad sectors, use a tool like ddrescue (Linux) or HDDSuperClone. These tools read sectors in reverse order, skip bad sectors, and retry them later. Do not use standard copying tools (like Windows copy/paste or Robocopy) as they will hang on bad sectors. Warning: This method will stress an already failing drive and can cause a head crash if the media is degrading.
- Freezing the Drive (High Risk): A last-resort, controversial method. Place the drive in a sealed bag in a freezer for 2-4 hours, then quickly connect it to try to read data. This can temporarily reduce stiction or slightly relax seized bearings. Do not do this if the drive has been making clicking sounds (head crash). Success rate is very low and can cause condensation damage.
Professional Services (Recommended for mechanical or firmware failures)
- Clean Room Head Swap: For head crashes or stiction, a professional lab in a Class 100 or better clean room will open the drive, replace the head stack assembly (HSA) with a donor part, and then image the platters using specialized hardware (e.g., PC-3000, DeepSpar). This is the only reliable path for mechanical faults.
- Firmware Repair via PC-3000: For firmware corruption (translator issues, service area damage), professional tools like the PC-3000 or a Data Recovery Flash Tool (for ROM issues) can rewrite corrupted firmware modules, rebuild the translator, or replace the SA without damaging platter data. This cannot be done with consumer software.
- Platter Transfer: In extreme cases (seized spindle motor), the platters are removed in a clean room and transferred to a compatible donor drive chassis. This is one of the most expensive procedures (often $1000-$3000+) and requires perfect alignment.
What Not to Do
- Do not power on the drive if you hear clicking, grinding, or scratching. Each second of operation during a head crash is physically destroying the platter surface, making data recovery exponentially more difficult and expensive. Immediately stop any power attempts.
- Do not open the drive’s sealed cover. Hard drives are assembled in class 10 clean rooms. A single speck of dust can cause a head crash. Opening it at home guarantees destruction of the platters. Leave this to professionals.
- Do not run chkdsk /f or any file system repair tool. These tools attempt to fix the file system by writing changes. On a failing drive, this can overwrite critical data, corrupt the file system further, and cause the drive to fail completely mid-operation. Always image first.
- Do not attempt a PCB swap without transferring the ROM chip. Swapping only the PCB from a donor drive will result in the drive not spinning up, wrong model number, or data access failure. The ROM contains drive-specific calibration data. Without it, the drive is unusable.
- Do not apply external heat or freeze the drive repeatedly. Heat can damage the magnetic layer. Freezing can cause condensation leading to corrosion. Use these methods only as a one-time emergency attempt with zero expectations of success.
Summary
The WD800ADFD, like all aging mechanical drives, primarily fails due to mechanical stiction/head crashes, spindle motor seizure, firmware corruption, and logical errors. For critical data, the safest path is to immediately stop all DIY attempts if any noise is present, and contact a professional data recovery lab. For logical-only failures, imaging with ddrescue from a live Linux environment is the best DIY option. Never attempt hardware repairs without proper tools and clean room conditions. The best outcome comes from recognizing the failure type early and choosing the correct recovery method.