
Data recovery on vintage hard drives like the Western Digital WD2500BJKT starts with identifying the failure type – electronic, firmware, or mechanical. Each requires a different approach, and misdiagnosis can make things worse. Here’s a quick guide to help you assess your situation and decide on the next step.
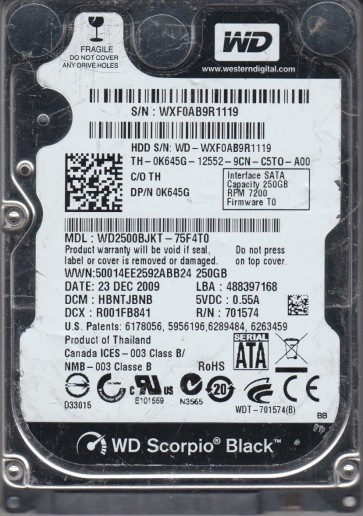
The Western Digital WD2500BJKT is a 2.5-inch 250GB SATA hard drive from the Scorpio Black series, featuring a 7200 RPM spindle speed and a 16MB cache. This drive is designed for high performance in laptops and external enclosures. It utilizes perpendicular magnetic recording (PMR) technology and is known for its relatively robust build, but like all mechanical hard drives, it is susceptible to failure over time. Common failure modes are often linked to mechanical wear, electronic component degradation, and logical corruption from improper shutdowns or aging.
Common Failure Types
1. Mechanical Failure (Head Crash & Motor Seizure)
Symptoms: Loud clicking, grinding, or scraping noises; drive is not detected or spins intermittently; BIOS detection is slow or fails.
Causes: Physical shock (dropping the laptop), manufacturing defects, or age-related wear of the spindle motor bearings. A head crash occurs when the read/write heads make contact with the platter surface, damaging the magnetic layer.
2. Firmware Corruption (Media Cache & SMART Reallocation)
Symptoms: Drive is detected but shows incorrect capacity (e.g., 0GB or 32MB); the operating system hangs or freezes when accessing the drive; frequent bad sectors or a high number of pending sectors reported by SMART attributes (e.g., 05, C5, C6).
Causes: Unexpected power loss during a firmware update, degradation of the media cache (a dedicated area for firmware), or electronic circuit board (PCB) failure corrupting the firmware modules.
3. Logical Damage (File System Corruption & Bad Sector Mapping)
Symptoms: The drive spins up normally and is detected, but partitions are missing or shown as RAW; the system reports “The file or directory is corrupted and unreadable”; slow read/write speeds; frequent CRC (Cyclic Redundancy Check) errors.
Causes: Improper ejection of an external enclosure, virus attacks, file system metadata damage, or a growing number of pending/reallocated sectors due to physical media degradation.
4. PCB Failure (Electronic Component Burnout)
Symptoms: Drive is completely dead (no spin, no sound); no recognition in any computer; visible burning smell or physical damage to the PCB’s controller chip or TVS diodes (Transient Voltage Suppression).
Causes: Power surges, incorrect external power adapters, or overheating. The TVS diode is a common sacrificial component.
5. Preamplifier Failure (Read/Write Amplifier)
Symptoms: Drive spins up but is not detected; there is a faint, high-pitched buzzing from the head assembly; reading attempts yield no data or very slow response.
Causes: Damage to the preamplifier chip located on the head actuator or on the flex cable. This is often a precursor to a head crash and requires specialized tools to access the platters.
Potential Recovery Paths
DIY Methods (For Logical Damage Only)
– Use data recovery software like R-Studio or GetDataBack to create a full disk image to a healthy drive. Do not attempt to repair the original drive directly.
– For file system corruption (RAW partition), you can attempt a sector-by-sector clone using ddrescue (Linux) or HDDSuperClone to bypass bad sectors.
– If the drive is detected but has bad sectors, run a read-only disk scan with SMART monitoring to assess the severity. Do not use tools that attempt to “fix” bad sectors by writing to them (like chkdsk /f or Scandisk).
Professional Services (For Mechanical, Firmware, or PCB Failure)
– Mechanical Failure: requires a cleanroom (Class 100 or better) for head stack replacement or platter transplant. Cost ranges from $300 to $3,000+.
– Firmware Corruption: professional labs have specialized tools (e.g., PC-3000, MRT) to reprogram the ROM or SA (Service Area) without damaging the media.
– PCB Failure: a donor PCB from an identical revision drive is needed, and the original ROM chip (8-pin SOIC) must be transferred to the donor board. This is not a simple swap; the ROM contains unique calibration data.
What Not to Do
1. Do not run chkdsk or fsck on a failing drive ¨C This can force severe head movement across a damaged area, permanently wiping data or causing a head crash.
2. Do not open the hard drive enclosure in a regular environment ¨C Even a single dust particle can land on a platter, causing a head crash and making recovery impossible or vastly more expensive.
3. Do not freeze the drive ¨C This is a persistent myth. Freezing introduces condensation, which leads to corrosion and further mechanical damage, often destroying the platters.
4. Do not repeatedly power cycle the drive ¨C If it is clicking or not detected, each power cycle can further damage the heads or platter surface, especially if a head crash is occurring.
5. Do not attempt to swap the PCB without transferring the ROM chip ¨C Simply swapping the PCB from a donor drive will not work because the original drive’s unique calibration parameters (residing in the ROM) are required for proper firmware execution. The drive will either not spin or will report incorrect geometry.
Summary
The WD2500BJKT is a high-performance 2.5-inch drive that is prone to mechanical failure from shock, firmware corruption from power issues, and logical damage from improper usage. For logical issues (file system corruption, simple bad sectors), DIY software imaging can succeed. For any physical symptoms (clicking, burning smells, no spin), immediate professional intervention is critical. Never run repair utilities on a failing drive, do not open the enclosure, and do not freeze the drive. The most effective recovery path is identifying the failure type accurately and choosing the appropriate method, with professional service being the only safe option for mechanical, firmware, and PCB failures.