Posted in

Top 5 Online Backup Service: Mozy

Mozy Online Backup Serive Mozy is a simple and safe way to back up all the important stuff on your computer. A copy of your data is stored in a secure, remote location for safekeeping, so that in the event of disaster your data is still retrievable.

How Mozy Works?

  1. Sign up for an account.
    Create a MozyHome user account which will allow you to download MozyHome software. Its quick, easy and our step-by-step instructions will guide you through the process.
  2. Download and install software.
    MozyHome downloads in just seconds, and the installation is simple and fast.
  3. Select files to be backed up.
    Simply check the boxes next to the backup sets, or types of files you want to back up, and MozyHome does the rest. In addition to selecting files by backup sets, you also have the option of selecting specific files and directories.

Free to try (Home Users)
No setup fee, no monthly payments, no credit cards, no hassle. Sign Up Now (Hot!)

Customer Reviews:

1. “I prefer Mozy.”

Walter S. Mossberg, The Wall Street Journal

2. “MozyHome is excellent value.”

Ben Pitt, Computer Shopper

3. “Best For Automatic Backup: Mozy”

Mark Spoonauer, Inc.com

4. “The MozyHome Unlimited offering gets a nod for best value”

RickVanover, NotebookReview.com

5. “Since [implementing MozyPro], the solution has saved the school 75 percent in backup costs.”

Bridget McCrea, Campus Technology

Mozy Price:
MozyHome Unlimited is for personal, non-commercial use only. Business users check out MozyPro.

MozyHome: Each computer costs $4.95/month (MozyHome)
MozyPro: Desktop Licenses: $3.95 + $0.50/GB per month
MozyPro: Server Licenses: $6.95 + $0.50/GB per month

Accounts can be billed monthly, annually, or biennially. You can get one month FREE when you sign up for an annual account or three months FREE with a biennial subscription.

Posted in

Backup Now! Free Backup Softwares Roundup

Free Backup Softwares Roundup! Freeware backup software is finally becoming more common — perhaps because of the explosion of large storage devices. Whatever backup option you choose, make sure you choose one and get started early. You can always use another backup method later as your needs grow. The tools below are some of my favorite free backup softwares.

Free Backup Softwares:

  • Autobackup: is considered to be one of the best no-frills freeware tool for backup. You need a create a list of paths that have to be checked and a backup mirrored copy is created of all the files that are found in those files and have been modified since the last backup.
  • TaskZip: is a small little tool that runs as a system agent. It automatically archives all specified files and folders into a single zip file. You can also specify a password for the zip file. Unfortunately, this tool does not provide the feature of restoration.
  • Lou Backup: is a very easy to use backup tool that is meant to backup Visual C source code files but can also be used to backup folder structures. It also supports the backup of multiple projects, directories and provides features of folder exclusion and backup of only modified files.
  • Comparator: is optimized for use on a single computer and provides the feature of folder monitoring and data synchronization. Although the data backup and data restore features are excellent, the amount of input it requires is a little more than desirable.
  • NTI BackupNow: has an excellent user interface when compared to most of the freeware tools. The only drawback of this tool is that you will have to specify the exact location of the files that you need to copy. For example, there is no option of selecting that you need a backup of your emails. You will have to provide the path of your PST or any equivalent file. Further, no encryption is present; hence it may not be suitable for some users.
  • Genie Backup Manager: is a very fast tool that is capable of backing up the Windows registry, favorites, Outlook data and other system files along with all regular data. The latest version of the tool has a disaster recovery option that allows the user to backup and restore the Windows Operating System along with all the data. As per a review that I was reading, there as are so many flexible options available, it ends up confusing the users!
  • SyncBack: is the freeware version of the commercial backup software ‘SyncBackSE’ and does not require installation. This tool can take all kinds of backups and also features a built in FTP engine which can store the backed up data on an FTP site. However, there are few features like network optimization which are disabled due to the fact that this is a freeware.
  • EASEUS Todo Backup: can backup your system partition to quickly get the system up and running in the event of a system crash or hardware failure. It allows you to backup and restore disks or partitions after viruses a attack, unstable software crash, hard drive failure, etc. It is also useful when you want to upgrade an older smaller hard drive without reinstalling the operating system and applications.

One great idea that I think will become commonplace soon is that of remote backup or online backup.

Remote Backup Softwares
Remote backup software work like any regular backup software. The important difference is that instead of storing the backup on a tape drive or a separate location, these softwares send the backup over the Internet or Intranet to online backup servers. The backup can be scheduled during the time frame when the computer is not in use. The entire process is completely automated and most employees do not even realize that such a process is in place. These kinds of backups are usually a part of the disaster recovery plan of large organizations.

Depending on your needs and the needs of your organization, it is very vital that you have a scheduled backup process in place. For some of us, the data that is stored in the computers help us earn our daily bread and water and there is no way to afford the loss of the data. If your organization is a little big in size and can afford a licensed version of a backup software, then it is more advisable as you will also receive all the newer versions and patches when you purchase the software. Backup your data and sleep soundly.

Posted in

Usb Flash Drive Data Recovery

USB Flash Drive Data Recovery USB flash drives have become one of the major sources of data transferring sources since 2000. And along with this, the rate of data failure due to virus attacks and device failures is also increasing day by day. Many data recovering software products are available in the market but due to the lack of knowledge and mishandling even a simple recovery becomes a nightmare for the user.

Many a time we lose important information from the USB flash drive by accident. Find out here how to do a USB Flash Drive Data Recovery by using some simple methods.

Most of us use the USB (Universal Serial Bus) flash drive for storing necessary data that has to be transferred from one system to another. A USB flash drive is an external data storage device that allows the user to store data temporarily. This data can be transferred from one system to another by connecting the flash drive to a particular system’s external hard drive port, i.e. the USB port. A USB flash drive is popularly known as a pen drive. It is a very convenient and handy device but sometimes the USB flash drive fails to operate due to some unknown reasons. Given below are some methods for USB flash drive recovery.

Tips for USB Flash Drive Data Recovery

Many times your USB flash drive does not open when you click on the icon that appears in the windows browser after you connect the USB flash drive to the USB port of the CPU. This may happen if the USB drive is corrupted or if some computer virus has entered the drive. In such cases, the first thing to try is to right click and select Open/Explore.

If neither of the two options work, then try scanning the drive with an antivirus software. If the pen drive is not working due to virus, scanning the pen drive with an effective antivirus is a good option for USB flash drive data recovery and can restore the USB.

If scanning also does not help, the only option left is to format the drive. Formatting will erase all the files from the drive, therefore, before formatting, create a backup of all your important files. To format the drive, right click on the drive icon, select format, select quick format option on the format window, follow the ‘prompt’ messages (something like a warning message saying that ‘if you format your drive, all the data stored in it will be lost’), select OK or Cancel (this will stop the format process). The quick format takes few minutes, depending on the size of the data to be erased. Once the formatting is done, your USB will become as good as new and you can use it as before.

Well, I hope you know how to format your computer ’cause sometimes even this option fails and you have to format the flash drive in a more tedious way. For this method, you will need a bootable CD (compact disk) of your operating system. Restart your desktop computer after you have inserted the bootable operating system CD in the CD drive and let the USB flash drive be connected to the USB port. When the computer is restarting, press F8/F2/Del key (depending on your configuration) immediately. Browse to the booting configuration options and change the first bootable device to your CD drive. Now, save the changes and restart your computer. Your PC will start booting from the CD and the installation process will begin. Follow the ‘prompt’ messages till the point where the window will display the names and sizes of all the existing drives. Here you have to select the drive indicating your USB drive and select format option. The USB will get formatted. Now, if you want to continue with the installation process, go ahead, else repair the existing operating system or you can quit. Be assured your flash drive will be formatted and will work fine.

If the matter is more serious than this, search for the warranty card (hope you can find it and hope the warranty period is not expired) and take the USB flash drive straight to the dealer.
That was a brief about the methods of USB flash drive data recovery. However, to avoid any of the above situations, treat your USB flash drive well. Do not remove the drive without stopping it. Always go to the lower right side of your screen on the taskbar where a green arrow appears after you have connected the USB, click on it and click on your USB flash drive name. Only after the message ‘Remove Drive Safely’ appears, physically remove your USB drive, else go to the icon of the USB drive, right click on it and select ‘Eject’. Also, never remove the USB while some data transfer is going on from a computer to USB or vice-versa. Doing so may corrupt your data. Never leave any file or folder of the USB open when you want to disconnect or remove the USB flash drive. This can also cause some serious problems to the data as well as to the drive.

Hope the above USB flash drive data recovery methods will help you in your attempts at repairing your USB! And if you have any experiences or additional methods of repairing the USB, please feel free to share them here.

Data recovery handled professionally is the best solution for any kind of data loss from your pen drive, hard drive, memory stick or any other storage device. A systematic scan of the damaged device is essential for starting the right type of action for each attempt at data recovery. Depending on your file system combination, the drives operating system and document types there are different ways to handle data loss.

It is always best to consult with expert guidance for scanning and determining your data loss type and severity because even a minor mistake can permanently erase your files and data forever.

Posted in

How to recover and fix corrupt files?

Recover And Fix Corrupt Files When you try to open a particular file and it shows an error displaying ‘cannot open file’ or ‘file data inaccessible’, you need to understand that the file has been corrupted. The file is also corrupted if it is accessible, but the content is displayed as some symbols instead of numbers and alphabets.

Recovering corrupt files is the only way if you want to save your important files which have been corrupted due to some or the other reasons. If you are thinking how to recover corrupt files, the below post will inform you more on the process.

How to Recover and Fix Corrupt Files?
1. Recovery of Word Files
The files which are opened through the MS Word application are known as word files. These files may contain some important or confidential text data, and if they are corrupted their repair is absolutely necessary. If you have a word file that has to be recovered, you need to utilize a word repair application which can easily be downloaded from the Internet. Such software have easy-to-use interfaces and operating instructions, and you will not at all find it difficult to execute the file recovery procedure. Examples of word document repair software are Repair MyWord, Nucleus Kernel Word Document Repair Software, etc. Repair MyWord can be downloaded free of cost and it provides an easy interface for the retrieval of files.

2. Recovery of Media Files
There are many types of media files that we normally store on the hard drive, such as .avi, .dat, .mp4, .mpeg3, etc. As other document, image, and program files; these files may also get corrupted. The typical way of recovering media files is to use certain software. There are many applications which repair corrupted files of all media such as mp3, mp4, avi, dat, wmv, and so on. The operation of these applications is very simple. You just need to open the software, press the browse button, select the corrupted file which is to be repaired, and select the repair option.

3. Recovery of Zip Files
These are compressed forms of files which have huge memory sizes. Files which are very large in memory size are normally compressed using specific software, particularly if they have to be sent via email. If you want to recover the corrupted zip files, the process is the same of using a recovery software application. Zip Repair Software, Zip Repair Tool, and Actual Zip Repair are some of the applications that help in this type of file recovery.

4. Recovery of JPEG/ JPG Files
This type of file contains a photo or a picture. When a JPEG file does not open in any of the default programs such as Paint, Windows Photo Gallery, Fax Viewer, and some others; it is to be considered corrupted. If the file turns corrupt, you are unable to view the picture. You initially need to try retrieving the file by renaming and saving it with a .jpg file extension. If this does not work, the next step would be to take aid of some JPEG image recovery applications. JPEG Recovery and Picture Doctor are some of the applications which can be used in repairing corrupted JPEG files.

5. Recovery of Corrupt Files on PSP

First and foremost, check if the file you are trying to open in your PSP (PlayStation Portable) is compatible with the PSP file format or not. If your PSP does not support the file format, you may have to convert the file to the file format supported by your PSP. A direct method to repair the corrupted file is, to connect the PSP to the computer and run the data recovery software on your PC. Include the files on the PSP in the recovery software and retrieve them. If that is not possible then, put the corrupted files back on your computer, recover the files using a recovery tool for that file format and put it back on the PSP.

When it comes to saving important files, it is always recommended to keep a backup in any data storage device. This will surely enable you to have a copy of the original file which has gone corrupt. Moreover, there are several data recovery software that are available for download on the Internet. If these applications are not free of charge, you always have the option of downloading a free version temporarily just to recover corrupted files.

Some of the data recovery software may not be available free of cost. If they are not freeware then you can download a trial or demo version to repair your files. Also remember, a software that works for someone else may not necessarily work for you. Hence, you may have to employ the trial and error method to check the validity of the software. In case if a virus, you may need to run an antivirus software, after which the corrupted files may open. In case of hardware failure, hard drive data recovery is also possible. Hope the above methods will answer your questions about how to fix corrupt files!


Posted in

Top 5 Online Backup Services

Top 5 Online Backup Services Where’s the best place to keep your data? Online backup services will keep your data safe no matter what sort of disaster strikes your local computers. Online backup services work much like regular backup software. With an online backup service, however, your important data is transmitted over the Internet and securely stored on a server in a professional data center instead of being stored on your own CDs, DVDs, or backup tapes. Most of us still waste time doing this manually which means we often don’t have a backup of our most recent work.

Ten of the top choices for online backup service are:

1. Mozy

Mozy offers reasonably priced unlimited online backup that’s highly configurable, but it could stand some usability improvements.

2. Carbonite

Carbonite tries to make remote backup simple and affordable. Setting it up is a breeze, and restoring a file here or there is also a snap. But restoring a lot of data to a different PC presented some obstacles.

3. SOS Online Backup

This is another backup service that offers a lot of additional features for those users who want to do a lot with the service. It tends to be more user-friendly than IDrive according to most people, though, so you may find that it’s the better of the two choices if you’re just starting out and aren’t quite confident in your own tech-savvy skills. It’s received numerous awards so it’s certainly a good choice.

4. IDrive

There are several reasons that you might enjoy this backup service. It’s got some storage offered entirely for free so it’s great if you’re just starting to figure out whether online backup is even for you or not. It’s also got a lot of great additional features (like advanced search functions and drag-and-drop restoration) that can be used by people who do already like online backup and who want to be able to do more with it.

5. HP Upline

This easy-to-use, reasonably priced online backup service also lets you do local media backups and file sharing, but it lacks important features, like version saving, open-file backup, and the ability to resume interrupted file uploads

The type of online backup service that you want to get is really going to depend a lot on what you need it for. If you’re storing a lot of media then you want a service with a lot of storage. If you’re storing documents that you share with others then you want a backup service that has collaboration features. These five choices are a good place to start in your search for online backup options.

Posted in

The Best Online Backup Service Is The One That Fits Your Needs

Online Backup Service Where’s the best place to keep your backed-up data? Somewhere far, far away. Online backup services will keep your data safe no matter what sort of disaster strikes your local PCs.

Backing up your files online is a safe alternative to using regular backup software. However, finding the best online backup service to use isn’t as easy. This post will help you choose the best online backup provider that will be easy on your pocket book and provide the services you want.

Backing up your computer, or choosing an online backup service, is one of the most important things you do to insure data and files are not compromised or terminally lost during unforeseen “disasters,” which, according to “Murphy,” can, and probably will, happen at some point.

How do you shop for the best online backup service for you? How much space do your files need? How many user accounts do you have? Who can you trust with your data privacy? How much can you afford?

Security
Companies advertising more than one data center offer simultaneous duplicate backups of your data. Look for warnings from companies about your passkey. They will tell you if you lose your passkey, you cannot access your data backup account. This is a good thing! It lets you know that no one can randomly access your backup account without your permission or passkey.

Frequency
More is better. You want to get multiple copies of your data, automatically uploaded on a frequent and regular basis. The more often your data is backed up, the more protection you have in the event of a virus or irreparable corruption.

Space
Do you save lots of pictures, videos, and music? These files consume a lot of space and it might be more efficient to use an external hard drive to backup these. However, external and optical drives do not offer privacy and protection afforded by online (remote) backup services.

Price
“You get what you pay for.” Typically low-cost services take longer to complete the initial backup. They reduce their bandwidth costs by slowing your upload speed, which limits the amount of data that can be backed up, thus taking for, what can seem like forever, when you want to get done with maintenance and resume your processing.

Free Trial
If you have a high-speed Internet connection, and know what you want to back up and where the files are located, there are online backup services that allow you to try their service for free on a trial basis.

The best online backup service is the one that fits your needs and pocketbook.

Posted in

How NTFS File System Works: NTFS Physical Structure (6)

NTFS Physical Structure Last Access Time

Each file and folder on an NTFS volume contains an attribute called Last Access Time. This attribute shows when the file or folder was last accessed, such as when a user performs a folder listing, adds files to a folder, reads a file, or makes changes to a file. The most up-to-date Last Access Time is always stored in memory and is eventually written to disk within two places:

  • The file’s attribute, which is part of its MFT record.
  • A directory entry for the file. The directory entry is stored in the folder that contains the file. Files with multiple hard links have multiple directory entries.

The Last Access Time on disk is not always current because NTFS looks for a one-hour interval before forcing the Last Access Time updates to disk. NTFS also delays writing the Last Access Time to disk when users or programs perform read-only operations on a file or folder, such as listing the folder’s contents or reading (but not changing) a file in the folder. If the Last Access Time is kept current on disk for read operations, all read operations become write operations, which impacts NTFS performance.

Note: File-based queries of Last Access Time are accurate even if all on-disk values are not current. NTFS returns the correct value on queries because the accurate value is stored in memory.

NTFS eventually writes the in-memory Last Access Time to disk as follows.

Within the file’s attribute

NTFS typically updates a file’s attribute on disk if the current Last Access Time in memory differs by more than an hour from the Last Access Time stored on disk, or when all in-memory references to that file are gone, whichever is more recent. For example, if a file’s current Last Access Time is 1:00 P.M., and you read the file at 1:30 P.M., NTFS does not update the Last Access Time. If you read the file again at 2:00 P.M., NTFS updates the Last Access Time in the file’s attribute to reflect 2:00 P.M. because the file’s attribute shows 1:00 P.M. and the in-memory Last Access Time shows 2:00 P.M.

Within a directory entry for a file

NTFS updates the directory entry for a file during the following events:

  • When NTFS updates the file’s Last Access Time and detects that the Last Access Time for the file differs by more than an hour from the Last Access Time stored in the file’s directory entry. This update typically occurs after a program closes the handle used to access a file within the directory. If the program holds the handle open for an extended time, a lag occurs before the change appears in the directory entry.
  • When NTFS updates other file attributes such as Last Modify Time, and a Last Access Time update is pending. In this case, NTFS updates the Last Access Time along with the other updates without additional performance impact.

Note: NTFS does not update a file’s directory entry when all in-memory references to that file are gone.

If you have an NTFS volume with a high number of folders or files, and a program is running that briefly accesses each of these in turn, the I/O bandwidth used to generate the Last Access Time updates can be a significant percentage of the overall I/O bandwidth.

Multiple Data Streams

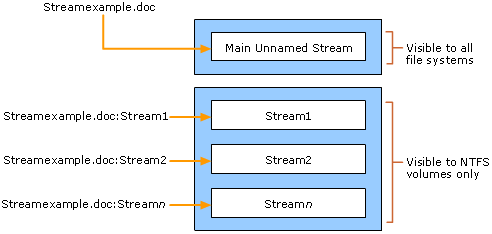
A data stream is a sequence of bytes. An application populates the stream by writing data at specific offsets within the stream. The application can then read the data by reading the same offsets in the read path. Every file has a main, unnamed stream associated with it, regardless of the file system used.

However, NTFS supports additional named data streams in which each data stream is an alternate sequence of bytes as illustrated in the figure Unnamed and Named Streams. Applications can create additional named streams and access the streams by referring to their names. This feature permits related data to be managed as a single unit. For example, a graphics program can store a thumbnail image of bitmap in a named data stream within the NTFS file containing the image.

Unnamed and Named Streams

NTFS File System

FAT volumes support only the main, unnamed stream, so if you try to copy or move Streamexample.doc to a FAT volume or floppy disk, you receive an error message.

Posted in

How NTFS File System Works: NTFS Physical Structure (5)

NTFS File Record Attributes

Every allocated sector on an NTFS volume belongs to a file. Even the file system metadata is part of a file. NTFS views each file (or folder) as a set of file attributes. File elements such as its name, its security information, and even its data are file attributes. Each attribute is identified by an attribute type code and an optional attribute name.

File and folder records are 1 KB each and are stored in the MFT, the attributes of which are written to the allocated space in the MFT. Besides file attributes, each file record contains information about the position of the file record in the MFT.

When a file’s attributes can fit within the MFT file record for that file, they are called resident attributes. Attributes such as file name and time stamp are always resident. When the amount of information for a file does not fit in its MFT file record, some file attributes become nonresident. Nonresident attributes are allocated one or more clusters of disk space. A portion of the nonresident attribute remains in the MFT and points to the external clusters. NTFS creates the Attribute List attribute to describe the location of all attribute records. The table NTFS File Attribute Types lists the file attributes currently defined by NTFS.

NTFS File Attribute Types

Attribute TypeDescription
Standard InformationInformation such as access mode (read-only, read/write, and so forth) timestamp, and link count.
Attribute ListLocations of all attribute records that do not fit in the MFT record.
File NameA repeatable attribute for both long and short file names. The long name of the file can be up to 255 Unicode characters. The short name is the 8.3, case-insensitive name for the file. Additional names, or hard links, required by POSIX can be included as additional file name attributes.
DataFile data. NTFS supports multiple data attributes per file. Each file typically has one unnamed data attribute. A file can also have one or more named data attributes.
Object IDA volume-unique file identifier. Used by the distributed link tracking service. Not all files have object identifiers.
Logged Tool StreamSimilar to a data stream, but operations are logged to the NTFS log file just like NTFS metadata changes. This attribute is used by EFS.
Reparse PointUsed for mounted drives. This is also used by Installable File System (IFS) filter drivers to mark certain files as special to that driver.
Index RootUsed to implement folders and other indexes.
Index AllocationUsed to implement the B-tree structure for large folders and other large indexes.
BitmapUsed to implement the B-tree structure for large folders and other large indexes.
Volume InformationUsed only in the $Volume system file. Contains the volume version.

NTFS creates a file record for each file and a folder record for each folder created on an NTFS volume. The MFT includes a separate file record for the MFT itself. These file and folder records are 1 KB each and are stored in the MFT. The attributes of the file are written to the allocated space in the MFT. Besides file attributes, each file record contains information about the position of the file record in the MFT. The figure MFT Entry with Resident Record shows the contents of an MFT record for a small file or folder. Small files and folders (typically, 900 bytes or smaller) are entirely contained within the file’s MFT record.

MFT Entry with Resident Record

image

Typically, each file uses one file record. However, if a file has a large number of attributes or becomes highly fragmented, it might need more than one file record. If this is the case, the first record for the file, the base file record, stores the location of the other file records required by the file.

Folder records contain index information. Small folder records reside entirely within the MFT structure, while large folders are organized B-tree structures and have records with pointers to external clusters that contain folder entries that cannot be contained within the MFT structure.

The benefit of using B-tree structures is evident when NTFS enumerates files in a large folder. The B-tree structure allows NTFS to group, or index, similar file names and then search only the group that contains the file, minimizing the number of disk accesses needed to find a particular file, especially for large folders. Because of the B-tree structure, NTFS outperforms FAT for large folders because FAT must scan all file names in a large folder before listing all of the files.

Posted in

How NTFS File System Works: NTFS Physical Structure (4)

Master File Table

When you format a volume with NTFS, Windows Server 2003 creates an MFT and metadata files on the partition. The MFT is a relational database that consists of rows of file records and columns of file attributes. It contains at least one entry for every file on an NTFS volume, including the MFT itself.

The MFT stores the information required to retrieve files from the NTFS partition.

MFT and Metadata Files

Because the MFT stores information about itself, NTFS reserves the first 16 records of the MFT for metadata files (approximately 16 KB), which are used to describe the MFT. Metadata files that begin with a dollar sign ($) are described in the table Metadata Files Stored in the MFT. The remaining records of the MFT contain the file and folder records for each file and folder on the volume.

Metadata Files Stored in the MFT

System FileFile NameMFT RecordPurpose of the File
Master file table$Mft0Contains one base file record for each file and folder on an NTFS volume. If the allocation information for a file or folder is too large to fit within a single record, other file records are allocated as well.
Master file table mirror$MftMirr1Guarantees access to the MFT in case of a single-sector failure. It is a duplicate image of the first four records of the MFT.
Log file$LogFile2Contains information used by NTFS for faster recoverability. The log file is used by Windows Server 2003 to restore metadata consistency to NTFS after a system failure. The size of the log file depends on the size of the volume, but you can increase the size of the log file by using the Chkdsk command.
Volume$Volume3Contains information about the volume, such as the volume label and the volume version.
Attribute definitions$AttrDef4Lists attribute names, numbers, and descriptions.
Root file name index.5The root folder.
Cluster bitmap$Bitmap6Represents the volume by showing free and unused clusters.
Boot sector$Boot7Includes the BPB used to mount the volume and additional bootstrap loader code used if the volume is bootable.
Bad cluster file$BadClus8Contains bad clusters for a volume.
Security file$Secure9Contains unique security descriptors for all files within a volume.
Upcase table$Upcase10Converts lowercase characters to matching Unicode uppercase characters.
NTFS extension file$Extend11Used for various optional extensions such as quotas, reparse point data, and object identifiers.
12–15Reserved for future use.

The data segment locations for both the MFT and the backup MFT, $Mft and $MftMirr, respectively, are recorded in the boot sector. The $MftMirr is a duplicate image of either the first four records of the $Mft or the first cluster of the $Mft, whichever is larger. If any MFT records in the mirrored range are corrupted or unreadable, NTFS reads the boot sector to find the location of the $MftMirr. NTFS then reads the $MftMirr and uses the information in $MftMirr instead of the information in the MFT. If possible, the correct data from the $MftMirr is written back to the corresponding location in the $Mft.

MFT Zone

To prevent the MFT from becoming fragmented, NTFS reserves 12.5 percent of volume by default for exclusive use of the MFT. This space, known as the MFT zone, is not used to store data unless the remainder of the volume becomes full.

Depending on the average file size and other variables, as the volume fills to capacity, either the MFT zone or the unreserved space on the volume becomes full first.

  • Volumes that have a small number of large files exhaust the unreserved space first.
  • Volumes with a large number of small files exhaust the MFT zone space first.

In either case, fragmentation of the MFT occurs when one region or the other becomes full. You can change the size of the MFT zone for newly created volumes by to correspond to a percentage of the volume to be used as the MFT zone. The MFT zone sizes follow:

  • Setting 1, the default, reserves approximately 12.5 percent of the volume.
  • Setting 2 reserves approximately 25 percent.
  • Setting 3 reserves approximately 37.5 percent.
  • Setting 4 reserves approximately 50 percent.

In most computers, the default setting of 1 is adequate. The default setting accommodates volumes with an average file size of 8 KB. Storing a large number of smaller files might necessitate that you increase the size of the MFT zone for new volumes.

After you increase the size of the MFT zone, NTFS does not immediately allocate space to accommodate the size of the new MFT zone. Instead, NTFS exhausts the original reserved space before increasing the size of the MFT zone. When the original space is exhausted, NTFS looks for the next contiguous space large enough to hold the additional MFT zone, which can cause the MFT to become fragmented. You can adjust the zone size for the MFT if the defaults do not fit your needs.

Posted in

How NTFS File System Works: NTFS Physical Structure (3)

NTFS Boot Sector

The table Boot Sector Sections on an NTFS Volume describes the boot sector of a volume that is formatted with NTFS. When you format an NTFS volume, the format program allocates the first 16 sectors for the boot sector and the bootstrap code.

Boot Sector Sections on an NTFS Volume

Byte OffsetField LengthField Name
0x003 bytesJump instruction
0x038 bytesOEM ID
0x0B25 bytesBPB
0x2448 bytesExtended BPB
0x54426 bytesBootstrap code
0x01FE2 bytesEnd of sector marker

On NTFS volumes, the data fields that follow the BPB form an extended BPB. The data in these fields enables Ntldr to find the MFT during startup. On NTFS volumes, the MFT is not located in a predefined sector. For this reason, NTFS can move the MFT if there is a bad sector in the current location of the MFT. However, if the data is corrupted, the MFT cannot be located, and Windows Server 2003 assumes that the volume has not been formatted.

The following example illustrates the boot sector of an NTFS volume that is formatted by using Windows Server 2003. The printout is formatted in three sections:

  • Bytes 0x00– 0x0A are the jump instruction and the OEM ID (shown in bold print).
  • Bytes 0x0B–0x53 are the BPB and the extended BPB.
  • The remaining code is the bootstrap code and the end of sector marker (shown in bold print).

image

The table BPB and Extended BPB Fields on NTFS Volumes describes the fields in the BPB and the extended BPB on NTFS volumes. The fields starting at 0x0B, 0x0D, 0x15, 0x18, 0x1A, and 0x1C match those on FAT16 and FAT32 volumes. The sample values correspond to the data in this example.

Byte OffsetField LengthSample ValueField Name and Definition
0x0B2 bytes00 02Bytes Per Sector. The size of a hardware sector. For most disks used in the United States, the value of this field is 512.
0x0D1 byte08Sectors Per Cluster.The number of sectors in a cluster.
0x0E2 bytes00 00Reserved Sectors. Always 0 because NTFS places the boot sector at the beginning of the partition. If the value is not 0, NTFS fails to mount the volume.
0x103 bytes00 00 00Value must be 0 or NTFS fails to mount the volume.
0x132 bytes00 00Value must be 0 or NTFS fails to mount the volume.
0x151 byteF8Media Descriptor. Provides information about the media being used. A value of F8 indicates a hard disk and F0 indicates a high-density 3.5-inch floppy disk. Media descriptor entries are a legacy of MS-DOS FAT16 disks and are not used in Windows Server 2003.
0x162 bytes00 00Value must be 0 or NTFS fails to mount the volume.
0x182 bytes3F 00Not used or checked by NTFS.
0x1A2 bytesFF 00Not used or checked by NTFS.
0x1C4 bytes3F 00 00 00Not used or checked by NTFS.
0x204 bytes00 00 00 00The value must be 0 or NTFS fails to mount the volume.
0x244 bytes80 00 80 00Not used or checked by NTFS.
0x288 bytes1C 91 11 01 00 00 00 00Total Sectors. The total number of sectors on the hard disk.
0x308 bytes00 00 04 00 00 00 00 00Logical Cluster Number for the File $MFT. Identifies the location of the MFT by using its logical cluster number.
0x388 bytes11 19 11 00 00 00 00 00Logical Cluster Number for the File $MFTMirr. Identifies the location of the mirrored copy of the MFT by using its logical cluster number.
0x401 byteF6Clusters Per MFT Record. The size of each record. NTFS creates a file record for each file and a folder record for each folder that is created on an NTFS volume. Files and folders smaller than this size are contained within the MFT. If this number is positive (up to 7F), then it represents clusters per MFT record. If the number is negative (80 to FF), then the size of the file record is 2 raised to the absolute value of this number.
0x413 bytes00 00 00Not used by NTFS.
0x441 byte01Clusters Per Index Buffer. The size of each index buffer, which is used to allocate space for directories. If this number is positive (up to 7F), then it represents clusters per MFT record. If the number is negative (80 to FF), then the size of the file record is 2 raised to the absolute value of this number.
0x453 bytes00 00 00Not used by NTFS.
0x488 bytes3A B2 7B 82 CD 7B 82 14Volume Serial Number. The volume’s serial number.
0x504 bytes00 00 00 00Not used by NTFS.