
Data recovery on vintage hard drives like the Seagate ST9160310AS starts with identifying the failure type – electronic, firmware, or mechanical. Each requires a different approach, and misdiagnosis can make things worse. Here’s a quick guide to help you assess your situation and decide on the next step.
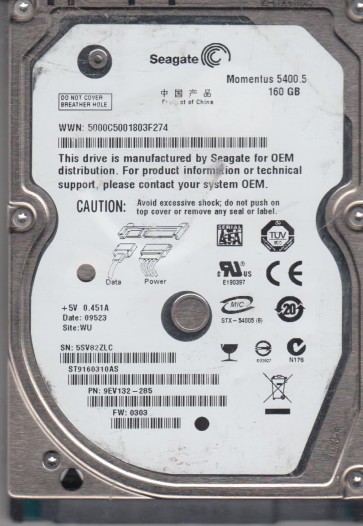
The Seagate ST9160310AS is a 2.5-inch 160GB SATA hard disk drive, part of the Momentus 5400.6 series. It utilizes a 5400 RPM spindle speed and typically employs perpendicular magnetic recording (PMR) technology with a single platter. This drive is commonly found in older laptops and external enclosures. Key components include the Main Controller Chip (MCU), the Preamp on the Head Stack Assembly (HSA), the Voice Coil Motor (VCM), and the SATA interface connector. Firmware is stored on the system area of the platters and partially on an SPI flash memory chip. Understanding these components is critical because failures can be mechanical, electrical, or logical in nature. The drive supports SATA II interface but is backward compatible with SATA I.
Identifying Common Failure Types
1. Clicking or Ticking Sounds (Mechanical Head Crash)
The most common failure in this model is a read/write head crash or a seized spindle motor. Symptoms include repetitive clicking or ticking sounds as the actuator arm attempts to find the servo pattern on the platters but fails. This is often preceded by a slowdown or strange noises. This is a classic hardware failure caused by physical damage to the head or platter surface. It can be triggered by drops, shocks, or age-related degradation of the head parking ramp or pivot bearing.
2. Drive Not Detected or Spins Down (Electronic Failure)
A drive that powers on but is not detected by BIOS or spins up only briefly before spinning down may have a failed PCB (Printed Circuit Board) or firmware corruption. The PCB may suffer from a damaged TVS diode (Transient Voltage Suppression), failing SATA bridge chip, or blown capacitor. On the ST9160310AS, the 5V TVS diode often shorts if a power surge occurs, preventing the drive from powering on properly. Firmware corruption, where the drive’s internal code becomes damaged, can also cause the drive to appear dead or fail to spin up correctly while the motor hums.
3. Slow Performance or Bad Sectors (Logical/Media Damage)
If the drive is detected but runs extremely slowly, hangs during file access, or produces I/O errors, it may have developed bad sectors or a degraded media surface. This is often indicated by the operating system attempting to read a file and freezing, or by S.M.A.R.T. (Self-Monitoring, Analysis, and Reporting Technology) attributes showing a high Reallocated Sector Count or Current Pending Sector Count. While this can be a logical issue caused by file system corruption, it frequently stems from subtle physical damage to the platter coating, often due to heat or contamination, leading to head touchdowns.
4. S.M.A.R.T. Errors Without Obvious Noise
Some drives will report S.M.A.R.T. errors in the BIOS or via diagnostic software without any mechanical clicking. This indicates that the drive’s internal health monitor has detected a combination of bad sectors, servo errors, or ECC read issues. While the drive may continue to operate, data integrity is compromised, and immediate backup is critical. This can be a precursor to a complete head failure or rapid degradation of the magnetic layer.
Potential Recovery Paths
Professional Recovery (Recommended for Hardware Failure)
For any mechanical sound (clicking), severe degradation, or a non-detectable drive, the only safe path is professional data recovery. A cleanroom lab (Class 100 or better) is required to open the drive. The technician will typically perform a head stack replacement (replacing the HSA) with a matched donor part. For firmware corruption on the ST9160310AS, tools like PC-3000 or MRT are used to rewrite the System Area (SA) or replace the ROM. Costs range from $300 to $2000+ depending on severity. Success rates are above 80% for head swaps on this model if performed correctly and before the platters are damaged by further head contact.
DIY Recovery (For Logical Issues Only)
If the drive is spinning quietly, detected by BIOS, and not making abnormal noises, you can attempt software-based recovery. Use a tool like ddrescue (Linux) or Disk Drill (Windows) in read-only mode to clone the drive to a healthy disk. Run the scan in manual mode, skip tracks that cause freezing, and avoid the drive’s write heads. Never run chkdsk, fsck, or defragmentation on a failing drive; these can write to the drive, worsening bad sectors and corrupting data. For logical file system issues (accidental deletion), tools like Recuva or PhotoRec can be effective after the disk is successfully cloned.
Electronic Repair (Specific Cases)
If the drive is dead (no spin) and you have electronic repair skills, you can check for a shorted TVS diode. Locate the diode near the power connector (often labeled D1). If it is visibly cracked or showing a dead short (0 ohms) on the 5V line, removing it may bring the drive to life temporarily. This is a high-risk procedure, as removing a protection diode leaves the drive unprotected against future power surges. Never attempt to swap PCBs directly unless the drive’s original ROM (8-pin chip) is transferred to the donor PCB, as the ROM contains drive-specific calibration data.
What Not to Do
- Never open the drive in a non-cleanroom environment. Even a tiny dust particle can permanently scratch the platter surface, making data unrecoverable. The ST9160310AS has a single platter that is extremely sensitive.
- Avoid powering up a clicking drive repeatedly. Each start-up attempt can cause the heads to scrape against the platter, destroying both the heads and the media. Stop immediately after hearing a click.
- Do not run Check Disk (chkdsk /f) or Disk Utility First Aid. These tools attempt to repair file system errors by writing to the failed sectors, which can destroy the remaining data and make recovery harder.
- Do not freeze the drive. This old myth can cause condensation inside the sealed drive, leading to corrosion of the heads and platters. It does not fix electronic or mechanical issues.
- Do not use software recovery directly on a failing drive. Always create a byte-by-byte clone first. Running scanning software directly on a weak drive can kill it mid-scan.
- Never swap the PCB with a random donor board. The firmware (ROM) is unique to each drive. An incorrect PCB swap will likely destroy the drive’s system area or cause head damage.
Summary
The Seagate ST9160310AS is a relatively common 2.5-inch SATA drive that is prone to head crashes, PCB failures from power surges, and logical media degradation. Key diagnostic steps involve listening for unusual sounds (clicking), confirming BIOS detection, and checking S.M.A.R.T. status. For mechanical or complex electronic failures, professional recovery in a cleanroom is the only viable solution. For logical failures or slow performance without noise, a verified read-only clone using ddrescue is the recommended DIY approach. Avoid any writing operations, self-swapping PCBs, or opening the drive without proper equipment. Immediate action after recognizing a failure pattern will maximize the chance of a successful recovery.