
Data recovery on vintage hard drives like the HGST HUA722010CLA331 starts with identifying the failure type – electronic, firmware, or mechanical. Each requires a different approach, and misdiagnosis can make things worse. Here’s a quick guide to help you assess your situation and decide on the next step.
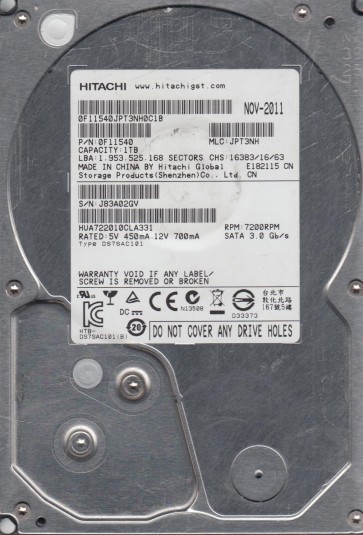
The HGST HUA722010CLA331 is a 1TB 3.5-inch SATA hard disk drive from the 7K2000 series, manufactured by Hitachi Global Storage Technologies (now part of Western Digital). It operates at a spindle speed of 7200 RPM and uses a single 1TB platter with advanced recording technology. This model is commonly found in desktop computers and external enclosures. It features a standard SATA 3.0 Gb/s interface and a 32MB cache buffer. The drive is known for its reliability in consumer applications but can experience failures typical of mechanical hard drives due to age, environmental factors, or manufacturing variances.
Identifying Common Failure Types
Mechanical Failure (Head Crash or Motor Lock)
Symptoms: Loud clicking, grinding, or whirring noises; drive not spinning up; repeated power cycling. The drive may be detected by BIOS but shows no data access. This is often caused by a physical shock that damages the read/write heads or a seized spindle motor bearing. Data recovery requires cleanroom intervention to replace heads or replace the motor assembly.
Electronic Failure (PCB Failure)
Symptoms: Drive appears completely dead:no power-up, no spin, no noise. The circuit board may show visible damage like burned components or a blown TVS diode (a protection component against power surges). Electronic failures can sometimes be resolved by replacing the PCB with a compatible donor board from an identical drive, or by repairing specific components on the original board. This is a software-accessible failure if the electronics are the only issue.
Logical Failure (File System Corruption)
Symptoms: Drive spins normally, is detected by the operating system, but shows errors such as “Disk not formatted,” “CHKDSK not available,” or access is very slow. This can be caused by bad sectors, directory corruption, accidental deletion, or virus attacks. Data is still present but the file system structure is compromised. Professional software or DIY tools may recover data if the physical condition is good, but further use can worsen the state.
Firmware Failure (Media Access or Translator Issues)
Symptoms: Drive is detected but has incorrect capacity (e.g., 0GB or 1GB), cannot initialize, or freezes during identification. This occurs when firmware modules stored on the platters are corrupted or the adaptive parameters (translator) are damaged. Professional recovery tools are required to rebuild or reprogram the firmware via a direct SATA interface. DIY attempts can brick the drive.
Potential Recovery Paths
Professional Data Recovery Services
For mechanical, firmware, or complex electronic failures, contact a certified data recovery lab. They have cleanrooms (Class 100 or better) for head replacement, Tektronix oscilloscopes for PCB diagnostics, and PC-3000 or DeepSpar tools for firmware recovery. Typical cost is $300 to $2000+ depending on severity. Ensure the lab offers a no-data-no-fee evaluation. For the HGST HUA722010CLA331, the single-platter design makes head replacement more delicate due to the close proximity of heads to the platter surface. Choose a lab with specific HGST experience.
DIY: Electronic Repair
If you suspect a PCB failure (no spin, no power), you can attempt to replace the PCB with a compatible donor board from the same model and firmware version. Steps: 1) Find a donor drive with identical model number and PCB rev. 2) Swap the original ROM chip (8-pin serial flash) from the failed PCB to the donor board using a hot air station. This is critical because the ROM contains unique calibration data. 3) Test the drive with a USB-to-SATA adapter on another computer. Warning: Doing this without a clean environment risks electrostatic discharge damage. If the drive makes clicking noises after PCB swap, it indicates a mechanical problem:stop immediately.
DIY: Logical Recovery
For logical failures (e.g., accidental deletion, file system corruption), use a data recovery tool like R-Studio, DMDE, or TestDisk. 1) Connect the drive via a dedicated SATA port (not USB) to a healthy computer. 2) Do not format or run chkdsk. 3) Image the entire drive to a separate healthy drive using the tool’s byte-to-byte imaging feature (e.g., in R-Studio: “Create a Disk Image”). 4) Recover files from the image. This prevents further damage to bad sectors. For bad sectors, use a tool that can skip unreadable sectors (like dd_rescue on Linux or HDD Raw Copy Tool). Do not attempt if the drive makes unusual noises:disconnect immediately.
What Not to Do
- Do not open the hard drive enclosure in a non-cleanroom environment. Even a single dust particle can crash the heads and destroy data permanently.
- Do not apply power to a drive that shows signs of mechanical failure (clicking or grinding) more than once. Each spin-up can scratch the platters.
- Do not use disk repair utilities like CHKDSK (chkdsk /f) or fsck on a failing drive:they can corrupt directory structures and overwrite data in bad sectors.
- Do not freeze the drive (common myth). Thermal stress can cause head gimbal assembly warping or platter damage. This method rarely works and often destroys the drive.
- Do not attempt to write data back to the failed drive during recovery. Always recover to a separate storage device.
- Do not use strong magnets or metal tools near the drive’s interior. The platters are coated with a fragile magnetic layer and can be scratched easily.
Summary
The HGST HUA722010CLA331 is a reliable but mechanical device prone to head, electronic, logical, and firmware failures. For audible mechanical issues (clicking, grinding), immediate professional cleanroom recovery is mandatory:DIY will cause irreversible damage. For silent electronic failures (no spin), PCB replacement with ROM transfer is a viable DIY step if you have soldering skills. For logical errors (corrupted files), imaging with specialized software is safest. Never use disk repair tools or open the drive. If the data is critical, prioritize professional evaluation over any risky DIY attempt. Always power off the drive at the first sign of trouble to maximize recovery chances.