
Data recovery on vintage hard drives like the Hitachi HDT722516DLA380 starts with identifying the failure type – electronic, firmware, or mechanical. Each requires a different approach, and misdiagnosis can make things worse. Here’s a quick guide to help you assess your situation and decide on the next step.
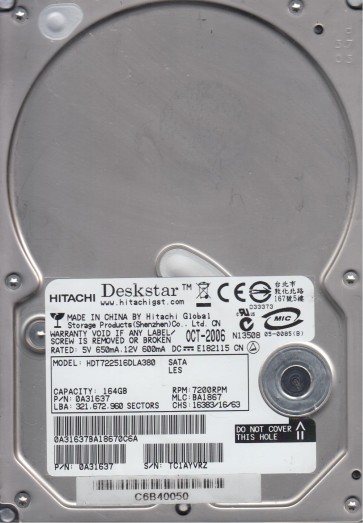
The Hitachi HDT722516DLA380 is a 250GB 3.5-inch SATA hard drive from the Deskstar 7K250 series. It features a 7200 RPM spindle speed, an 8MB cache buffer, and uses an MR (Magneto-Resistive) head technology on a glass substrate platter. This generation of Hitachi drives, while generally reliable, is known for specific failure mechanisms related to their fluid dynamic bearings (FDB) and the aging of the preamplifier IC on the head stack assembly. The drive employs a Marvell 88i6540 controller chip and a Hitachi specific firmware architecture. Data is stored using a perpendicular magnetic recording technique on a single or dual platter configuration. The SATA interface is a native SATA 1.5Gbps or 3.0Gbps implementation. Understanding that this is a legacy drive (manufactured circa 2005-2008) means age-related degradation is a primary concern. The PCB (Printed Circuit Board) is inverted and exposed, making it susceptible to physical damage from mishandling or static discharge.
Identifying Common Failure Types
1. Mechanical Failure (Head Crash or Stiction): The most critical failure type for the HDT722516DLA380 is a head crash. Symptoms include a loud clicking, scraping, or grinding noise. The drive may spin up and then rapidly park the heads repeatedly (click of death). This is often caused by degraded lubricant in the FDB motor, making the spindle motor sticky or causing uneven rotation, which causes the read/write head to contact the platter surface. Alternatively, a sudden shock or power loss can cause the head to land on the data area. Another mechanical issue is stiction, where the head becomes stuck on the platter surface due to static charge or degraded lubricant, preventing the drive from spinning up at all.
2. Electronic Failure (PCB or Preamplifier): The drive’s PCB is a common failure point. Power surges, voltage spikes, or simple component aging can cause damage to the TVS (Transient Voltage Suppression) diodes, the motor controller IC (e.g., a Smooth L7251 or similar), or the Marvell main controller. A classic symptom is a dead drive that shows no sign of life (no spin, no sound) or spins up but is not detected by the BIOS. The preamplifier chip located on the head assembly can also fail, leading to symptoms like the drive powering up, making normal sounds, but never being detected or reporting a very small capacity (e.g., 0GB or 1.7GB). This particular drive family is also prone to “fuse” failure (a surface mount fuse that opens due to excessive current, often from a TVS diode shorting).
3. Firmware Corruption (Media Cache or Translator): This drive uses a sophisticated firmware stored on the platters in a system area. Bad sectors on the system tracks can corrupt the translator module (which maps logical to physical sectors) or the media cache data. Symptoms include the drive being detected with an incorrect model number (e.g., “Hitachi HDT722516DLA38” or garbled text), a “stuck” spin-up with no ready status, or a drive that is detected but shows a capacity of 0GB or unsupported size. The drive may also repeatedly try to calibrate heads (sounds like a repeated “tick-click” followed by a long pause). This is often misdiagnosed as a mechanical failure. Access to the serial port (UART) on the PCB and specific Hitachi utility tools are required for analysis.
4. Bad Sectors/Media Degradation: Over time, the magnetic coating on the platters can degrade. This leads to developing bad sectors. The HDT722516DLA380, like many desktop drives, can develop “weak” sectors that read very slowly, causing the system to hang or freeze. The drive may produce a clicking sound only when trying to read a specific block of data. S.M.A.R.T. data may show a high Raw Read Error Rate, Reallocated Sector Count, or Current Pending Sector Count. While often a software-accessible issue, severe media degradation can lead to head damage over time if the heads are forced to read over damaged areas repeatedly.
Potential Recovery Paths
DIY Methods (for non-critical data and specific conditions):
Case 1: Electronic Failure (TVS Diode or Fuse). If the drive is completely dead (no spin, no sound after a power surge), you can diagnose by examining the PCB. Look for a bulging or shorted TVS diode (usually a small black component near the power connector). A multimeter can check continuity. If a TVS diode is shorted, removing it may allow the drive to function temporarily, but this leaves the drive unprotected. A more advanced DIY step involves replacing the PCB. You must transfer the original 8-pin serial flash ROM (U12 on many models) from the old board to a matching donor PCB (same HDA code and firmware suffix). This is critical as the flash contains unique calibration data. Using a mismatched board without swapping the ROM will result in a “no detect” condition or a drive that sounds normal but is inaccessible.
Case 2: Firmware Corruption (Incorrect capacity). If the drive is detected with zero capacity or a garbled model string, you can attempt recovery using specific Hitachi utility software (like Victoria or HDAT2) in a DOS environment. Using a direct SATA connection (avoid USB adapters), you can issue a low-level command to attempt to reload the loader or translator module. This requires advanced knowledge and specific tools. A simpler check: boot from a live Linux USB and use the “smartctl” command to query S.M.A.R.T. and see if the drive responds. If it does, but the capacity is wrong, it is likely a translator issue which a professional tool can attempt to rebuild.
Case 3: Bad Sectors (Software accessible). If the drive has bad sectors but is otherwise mechanically healthy (no clicking, normal spin), you can attempt a software imaging tool like ddrescue (Linux) or HDDSuperClone. Boot from a live Linux ISO (e.g., SystemRescue). Identify the drive (e.g., /dev/sdb). Run: ddrescue -d -f -r3 /dev/sdb /mnt/usb/image.img /mnt/usb/mapfile.log. This will create an image, skipping bad areas and retrying them later. This is a low-risk DIY step for data that is not critically time-sensitive. Do not run CHKDSK or any write operations on the failing drive.
Professional Services:
For any mechanical failure (head crash, stiction, grinding), any severe firmware corruption (no detection, wrong model), or if the data is critical (business, legal, irreplaceable personal data), professional recovery is mandatory. A data recovery lab will perform the following steps in a cleanroom (Class 10 or better):
1.Diagnosis: Evaluate the drive’s condition using specialized diagnostics and serial port log analysis.
2.Head Stack Replacement: In a cleanroom, the drive is opened carefully. The original head stack assembly is removed and replaced with a matched donor head stack from an identical drive (same model, firmware, and manufacturing date batch). The donor drive must be carefully selected to have similar characteristics.
3.Media Preparation: If the platters are damaged, they may be transferred to a new chassis. For stiction, the heads are carefully released using a specialized tool.
4.Firmware Repair: Using professional tools (e.g., PC-3000, MRT), the technician accesses the firmware system area via serial port. They can rebuild the translator module, repair the media cache, or rewrite corrupted modules from a donor drive’s firmware backup, adapting it to the original drive’s unique calibration data.
5.Data Extraction: Once the drive is functional at the hardware level, a sector-by-sector image is created using advanced algorithms that handle bad sectors intelligently, often using head-specific head maps to avoid damaged zones. The recovered data is then verified and delivered on a new drive or cloud storage.
What Not to Do
DO NOT attempt to open the hard drive yourself. The internal platters are extremely sensitive to dust and particulates. Even a single fingerprint or dust particle can destroy the platter surface, making recovery impossible or drastically more expensive. Opening the drive outside a certified cleanroom will permanently damage the data.
DO NOT apply power repeatedly. If you hear a clicking or scraping noise, immediately turn off the device. Each power cycle risks further damage to the platter surface. If the drive does not spin, trying to spin the platters by hand or shaking the drive is catastrophic.
DO NOT run antivirus scans, CHKDSK (check disk), defragmentation, or any write operations. These software tools can write to the drive, potentially overwriting the exact bad sector that contains a critical file system entry or a piece of the data you need. Running CHKDSK on a drive with firmware issues can destroy the translator module permanently.
DO NOT use a PCB replacement without swapping the firmware ROM. Simply buying a “matching” PCB from eBay and connecting it will almost never work for this drive. The unique calibration data on the original ROM is essential. Using a mismatched PCB can cause the drive to burn up the preamplifier or spindle motor, leading to a completely unrecoverable state.
DO NOT freeze the drive. The “freezer trick” is a dangerous myth. It can cause condensation inside the drive, which will cause catastrophic short circuits and corrosion on the platters. It may temporarily mask certain mechanical issues, but it will ultimately accelerate head damage and destroy the data. This technique is only a last resort for extremely desperate situations and is not recommended for any Hitachi Deskstar model.
DO NOT attempt to use the drive as a secondary device while the operating system is running. If the drive is failing, it may cause the system to hang or cause the motherboard’s SATA controller to drop the connection entirely, which can lead to corruption on other drives in the system.
Summary
The Hitachi HDT722516DLA380 is a hard drive susceptible to age-related failures including head crashes, PCB electronic damage (especially TVS diodes and fuses), firmware corruption, and media degradation. For DIY recovery, only consider cases of simple electronic failure (e.g., a blown TVS diode on the PCB with a known test method) or software-accessible bad sectors using a read-only imaging tool like ddrescue. Never attempt firmware repair, head replacement, or PCB swapping without firmware transfer at home. For any audible mechanical noise, power-on failures, or if the drive is detected with a wrong capacity, the recovery path requires professional intervention in a cleanroom environment with specialized tools (e.g., PC-3000 or MRT). The highest risk actions are opening the drive, running CHKDSK, freezing it, or repeated power cycling. Prioritize professional data recovery for any data of value to ensure the best chance of a successful outcome without permanent damage.