
Data recovery on vintage hard drives like the Seagate ST3300622A starts with identifying the failure type – electronic, firmware, or mechanical. Each requires a different approach, and misdiagnosis can make things worse. Here’s a quick guide to help you assess your situation and decide on the next step.
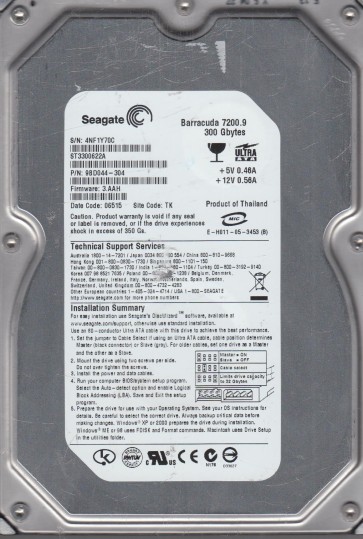
The Seagate ST3300622A is a 3.5-inch, 300GB Parallel ATA (PATA) hard drive from the mid-2000s. It typically features a 7200 RPM spindle speed and an 8MB cache buffer. As an older PATA drive, it relies on a 40-pin IDE connector and a standard 4-pin Molex power connector. The recorded media uses longitudinal recording technology. This drive is known to be susceptible to specific mechanical and electronic failure modes due to its age and interface type. When recovering data from this model, understanding its underlying architecture:particularly the controller chip (often an Agile or Texas Instruments based system-on-chip) and the head stack assembly:is critical. It is a single-platter or dual-platter design depending on the exact firmware version. The drive’s firmware is stored on the platters and partially on a serial flash ROM chip on the PCB (Printed Circuit Board).
Identifying Common Failure Types
1. Mechanical Failure – Head Crash or Stiction
This is a prevalent failure in this era of drive. Symptoms include a clicking, grinding, or whirring sound, or the drive failing to spin up at all (stiction). A head crash occurs when the read/write head physically contacts the platter surface, damaging the magnetic media. Stiction (static friction) occurs when the heads stick to the platter surface after the drive has been powered off for an extended period, preventing the spindle motor from rotating. This model’s Ramp Load/Unload technology is less sophisticated than modern drives, making stiction more common.
2. Electronic Failure – PCB Burnout or Component Failure
The PCB is vulnerable to power surges, failed voltage regulators, or damaged TVS (Transient Voltage Suppression) diodes. Symptoms include the drive being completely dead (no spin, no sound) or detecting incorrectly in the BIOS (e.g., wrong capacity or model name). A common failure is the 12V or 5V TVS diode shorting to ground, which can blow a fuse on the PCB. Capacitor leakage or swelling is also seen in older units. You may also identify a burnt smell or visible scorch marks on the PCB.
3. Firmware Corruption – Functional Failure
The drive powers on and spins up, but is not recognized by the computer, or reports an incorrect size (e.g., 300GB shown as 0GB or LBA0). It may click a few times then go silent, or constantly reset. This is often due to corrupted module 37 (ATA password) or module 0 (SA surface defects). This is a logical failure at the firmware level, not a mechanical one. The drive may also report a “SMART command failed” error immediately.
4. Logical Failure – File System or Bad Sectors
Unlike hardware failures, the drive mechanically and electronically appears healthy (spins up, no abnormal sounds). However, the operating system reports errors like “The disk is not formatted”, “RAW file system”, or “I/O device error”. This can be due to a large number of pending or reallocated bad sectors on the platter surface, or a corrupted Master Boot Record (MBR) or NTFS/FAT32 file system. The drive may be readable in a low-level disk editor but not mountable in an OS.
Potential Recovery Paths
Professional Data Recovery Services
For mechanical failures (head crash, stiction, motor seizure) and complex firmware issues, professional intervention is strongly recommended. A typical service for the ST3300622A involves: 1) Cleanroom disassembly (Class 100 or better) to replace the head stack assembly with a matched donor head set. 2) Firmware repair using specialized tools like PC-3000 UDMA or Data Extractor, which can read the firmware modules from a damaged drive and rebuild the translator. 3) For severe media damage, magnetic force microscopy or advanced imaging may be used. Expect costs from $300 to $1500+ depending on the complexity and required parts. Choose a lab with experience in PATA/IDE drives, as many modern labs focus on SATA/NVMe.
DIY Recovery Attempts (with significant risk)
Disclaimer: DIY attempts are risky and can permanently destroy data. Only proceed if data is non-critical and you accept full responsibility.
For Electronic Failure (PCB burnout): If the drive doesn’t spin and you suspect a bad PCB, you can attempt to swap the PCB with a donor PCB from an identical model (same firmware prefix, such as [Firmware version], e.g., 3.AAE vs 3.AAF). However, the drive’s unique adaptive data (including head maps, servo parameters, and bad sector lists) is stored on the ROM chip on the original PCB. You MUST desolder the original 8-pin or 16-pin serial flash ROM from the donor PCB and transfer it to the donor board. Simply swapping the board without ROM transfer will result in the drive not being recognized or not spinning due to mismatched parameters. Use a hot air rework station with a fine tip, but this is advanced soldering.
For Logical Failure (bad sectors): Use cloning software like DDRescue (Unix/Linux) or HDDSuperClone to create a sector-by-sector image of the drive onto a healthy drive. Important: Do not use CHKDSK or fsck directly on the failing drive. Run the clone command with a low block size (e.g., 512 bytes) and automatic retries disabled or limited. For example in Linux: ddrescue -f -n /dev/sdX /dev/sdY /root/rescue.log. Then use a second pass with -r3 to retry bad sectors. After cloning, attempt file system recovery using tools like TestDisk or R-Studio on the cloned image, never on the original drive.
For Firmware Corruption: This is difficult without professional tools. If the drive spins but is not detected, you can try a “near donor” method where you use a donor PCB (with its ROM) if you can find a drive with identical firmware. Use specialized software like MRT or PC-3000 on the DIY level only if you have significant technical expertise. Avoid running any “factory reset” or “repair” wizards on commercial tools without understanding the consequences for this specific model.
What Not to Do
- Do not open the hard drive enclosure. The interior of a hard drive is a Class 100 cleanroom environment. Even a single speck of dust can cause a head crash when the platters spin at 7200 RPM. Opening it in a normal room will likely destroy the data.
- Do not apply power to a drive that is making abnormal sounds (clicking, grinding). Continuing to power on a mechanically failing drive can cause the heads to scrape the platters, increasing the damage area and making professional recovery impossible or far more expensive.
- Do not use CHKDSK (Windows chkdsk /f) or fsck on a drive with suspected bad sectors or firmware issues. These tools will attempt to read and repair file system structures. On a failing drive, they can lock up the heads, cause further media damage, and corrupt the file system beyond repair. Always clone first.
- Do not freeze the drive. This is a dangerous and outdated myth. Freezing can cause condensation inside the drive, leading to corrosion and head stiction. It does not fix a mechanical or firmware problem.
- Do not attempt to swap the PCB without transferring the original ROM chip. This is a common mistake. Without the unique adaptive data stored in the ROM, the new board will not align the heads correctly, often causing the drive to click or spin but never be ready.
- Do not use data recovery software that writes back to the failing drive. Tools like “final data recovery” or “recover my files” that scan and write changes to the source drive can cause irreversible damage. Always work on a clone or a read-only image.
Summary
The Seagate ST3300622A is an aging PATA hard drive with well-documented failure modes. For data recovery, the primary distinction is between mechanical/electronic hardware failures and firmware/logical errors. Mechanical failures (clicking, stiction) and complex firmware corruption require professional cleanroom intervention and specialized tools like PC-3000. Electronic PCB failures can sometimes be addressed cautiously via a matched donor PCB with ROM transfer, but this is a high-skill DIY task. Logical issues like bad sectors are best handled through controlled cloning (DDRescue) followed by file system recovery on the clone. The cardinal rule is to never force the drive to operate, never open it, and never write to the failing drive. Prioritizing a clone before any repair attempt is the most critical step to preserving the original data. Given the age and value of potential data, professional recovery is the safest and most reliable path for any critical data.