
Data recovery on vintage hard drives like the Western Digital WD40NPZZ starts with identifying the failure type – electronic, firmware, or mechanical. Each requires a different approach, and misdiagnosis can make things worse. Here’s a quick guide to help you assess your situation and decide on the next step.
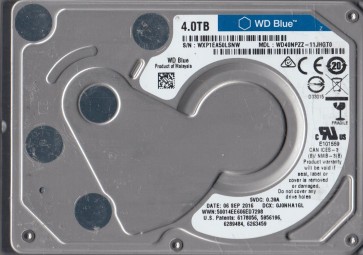
The Western Digital WD40NPZZ is a 4TB 2.5-inch portable hard drive, typically part of the My Passport series. It utilizes SMR (Shingled Magnetic Recording) technology to achieve high storage density in a slim form factor. This drive features a USB 3.0 interface integrated directly onto the mainboard, making the interface inseparable from the drive’s internal electronics. Its architecture, including a delicate read/write head assembly and a complex system-on-a-chip (SoC) controller, makes it susceptible to specific failure modes distinct from desktop drives.
Common Failure Types
1. Mechanical Head Crash
Symptoms: Loud clicking, screeching, or grinding noises. Drive is not detected or is detected with a very small or zero capacity. The drive may spin up but fail to initialize.
Causes: Physical shock, dropping the drive while in operation, age-related wear on the actuator arm pivot, or contamination from internal particles. The heads have made contact with the platter surface, damaging the magnetic coating.
2. Stuck or Seized Spindle Motor
Symptoms: Drive does not spin up at all upon power connection. No vibration or sound of platters rotating. The computer may detect the USB bridge but reports “No Media” or a device descriptor request failed.
Causes: Bearing lubrication failure over time, internal corrosion, or a seized motor due to thermal expansion or physical impact. The platters are physically unable to rotate.
3. Firmware Corruption / Bad Sector Overload
Symptoms: Drive spins up, is detected, but becomes extremely slow, unresponsive, or freezes when accessing data. Windows may prompt “You need to format the disk”. The drive may click a few times then go silent. Reading files results in I/O errors or CRC checksum failures. The drive may exhibit a large number of reallocated or pending sectors in S.M.A.R.T. data (e.g., C5, 05 attributes).
Causes: The SMR firmware translator, which manages the write cache and shingle mapping, becomes corrupted. This can occur from a power failure during a background shingle rewrite operation, or from the drive encountering an overwhelming number of physically degraded sectors that the firmware cannot map out in real-time.
4. Logical File System Corruption
Symptoms: Drive is detected in Disk Management with the correct capacity, but shows as “RAW” or “Unallocated”. No physical noise issues. Data appears missing or files are accessible but corrupted. File and folder names become garbled (e.g., YYYY-???.txt).
Causes: Improper ejection, sudden power loss during a write operation, virus infection, or partition table damage. The file system structure (MFT on NTFS, FAT table on exFAT) is damaged, but the underlying platter surface and mechanism are healthy.
5. USB Bridge / Interface Failure
Symptoms: Drive is not recognized by any computer. No LED activity, or LED stays solid without a drive mount. The USB connector may feel loose or wobbly. When connecting, Windows reports “USB Device Not Recognized”. The drive itself may spin up normally but cannot communicate over the bus.
Causes: Physical damage to the micro-USB or USB-C port, static discharge damaging the bridge chip, or circuit board component failure (e.g., a failed voltage regulator or crystal oscillator). This is a common issue due to the integrated USB interface on the PCB.
Potential Recovery Paths
DIY Methods (For Logical and Interface Issues Only)
For Logical Corruption (Failure #4): Use data recovery software like R-Studio, DMDE, or GetDataBack. Connect the drive to a computer via a known-good USB cable (do not use the original faulty cable if the port is suspect). Scan the drive in ‘RAW’ or ‘Full Scan’ mode to locate lost partitions and recover files to a different healthy drive. Do not write any data to the failing drive.
For USB Bridge Failure (Failure #5): Attempt to shuck the drive from its enclosure (this voids the warranty and usually requires carefully prying open the plastic case). Identify the internal SATA connector on the drive’s PCB. Connect this internal SATA interface directly to a desktop computer’s SATA port or a quality external SATA-to-USB adapter. This bypasses the faulty USB bridge on the original PCB. Do not attempt this if the drive has physical noise.
For S.M.A.R.T. Overload (Failure #3): Do not run chkdsk /f or any disk repair tool. They can cause further damage. If the drive is extremely slow but still accessible, use ddrescue (Linux) or HDDSuperClone to create a sector-by-sector image of the drive to a stable target hard drive. This tool will skip unreadable sectors and retry them later, minimizing stress on the fragile heads. This method can take days for a 4TB drive.
Professional Services (For Mechanical and Complex Firmware Issues)
For Mechanical Failures (Failures #1 and #2): Physical recovery in a cleanroom (Class 10 or better) is required. The process involves: 1. Opening the drive in a cleanroom. 2. Replacing the damaged read/write heads with a matched donor head assembly from an identical WD40NPZZ or closely compatible donor drive. 3. For a seized spindle, transplanting the platters into a new, working drive chassis. The firmware modules (SA) must be re-read or patched to align with the new head geometry. This is extremely complex and can cost between $500 and $3000+.
For Firmware Corruption (Failure #3): Professional tools like PC-3000, DeepSpar, or MRT are used to access the drive’s service area (SA) or firmware zone. The technician can: 1. Re-read or rebuild the translator module. 2. Set a firmware flag to skip or ignore physically failing sectors temporarily to extract data. 3. Perform a head map adjustment to disable a problematic head if only one head is failing. This is not a simple software fix and requires deep knowledge of Western Digital’s SMR firmware architecture.
For USB Bridge Failure (Failure #5) if DIY fails: A professional can perform a direct rework, such as micro-soldering a new USB port or bridge chip onto the original PCB, or extracting the NAND flash memory that stores the USB bridge’s configuration if the PCB is completely shorted.
What Not to Do
1. Do not run chkdsk /f or fsck: On any drive making physical noise or exhibiting extreme slowness. This forces the drive to attempt to fix logical structure errors, which causes extreme head movement over failing platter areas, often leading to a complete head crash. The only safe command is chkdsk /r, which reads without writing, but even that is risky on a mechanical failure.
2. Do not open the drive enclosure yourself: The internal platter chamber is sealed and filtered. Opening it in a non-cleanroom environment introduces microscopic dust particles that will cause an immediate head crash when the drive spins up. Even a single fingerprint can destroy the magnetic layer.
3. Do not apply power repeatedly to a clicking or non-spinning drive: Each power cycle on a drive with a seized spindle or damaged heads can further damage the platter surface. Repeated power cycling can also burn out the pre-amplifier chip on the head stack assembly, making recovery much harder.
4. Do not use freezing, tapping, or DIY shock methods: These are urban legends. Freezing a drive causes condensation, which leads to corrosion and head stiction. Tapping or shaking a stuck drive can physically warp the platters or damage the actuator pivot. These methods have a very high probability of causing total and irreversible data loss.
5. Do not attempt to recover data to the same failing drive: Never save recovered files back to the drive you are trying to rescue. This can overwrite the very data you are trying to retrieve. Always use a separate, known-good target drive of sufficient capacity.
Summary
The Western Digital WD40NPZZ is a high-density slim portable drive that is vulnerable to physical shock (head crash, seized motor), complex SMR firmware corruption, logical file system damage, and USB interface failure. For logical and interface issues, DIY recovery with imaging software (ddrescue) or shucking the drive can be attempted if there are no physical noises. For any mechanical symptoms (clicking, grinding, no spin) or severe firmware corruption, the only safe path is professional cleanroom recovery. The single most critical rule is to stop the drive at the first sign of unusual noise or behavior to prevent permanent destruction of the data layer.