Seagate (including Maxtor)
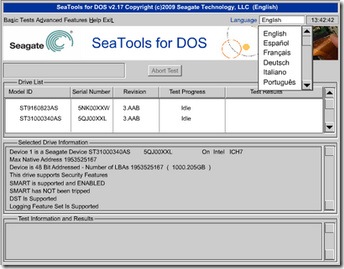
SeaTools for DOS
Use Full Erase to zero-fill your hard disk.
Western Digital
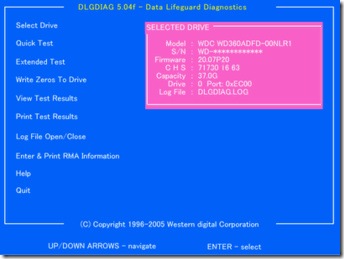
Data Lifeguard Diagnostics
Use Write Zeros to drive to zero-fill your hard disk
1. Determine the brand and model of hard disk you want to overwrite.
2. Download a CD ISO image or a floppy disk image (depending upon your equipment) and use the image to create bootable media. The floppy disk image is self-contained: run it, insert a blank floppy disk when prompted, and the image is created on the disk. You will need to use a CD burning program that works with ISO images to convert the ISO image into a bootable CD.
3. Restart your computer with the bootable media you created in Step 2.
4. Select the hard disk to zero-fill when prompted.
5. Choose the option to zero-fill the hard disk.
6. When the program is finished, follow the on-screen instructions to shut down or restart your computer.
7. Remove the wiped hard disk; you can now reuse or recycle the hard disk.
Secure Wiping a Hard Disk
Secure wiping goes beyond zero-fill operations, and provides an extra level of security. Most secure wiping programs are designed to meet DoD 5220 standards, which require three passes of overwriting with a special numeric pattern and verification. More information about this and other secure standards are available from the DataErasure website.
(Note that the 2007 revision of the Defense Security Service, Updated DSS Clearing and Sanitization Matrix (June 28, 2007) (PDF) now recommends degaussing or drive destruction for maximum protection.
Stanford University’s Disk and Data Sanitization Policy and Guidelines, a must-read for understanding data wiping issues, recommends Darik’s Boot and Nuke (DBAN) for secure hard disk wiping.
Secure Wiping a Hard Disk with DBAN
Time Needed: several hours (varies with size and speed of drive)
Software: Darik’s Boot and Nuke (DBAN);
Available from http://www.dban.org/
Media: blank CD (all versions) or floppy disk (version 1.0.7 and older versions)
1. Download the DBAN boot image ZIP file (we used version 1.0.7 and beta version 2.0 for this article); we downloaded the ISO image for CD burning, but a floppy disk builder is also available
2. Extract the contents of the compressed file.
3. Burn the ISO image file extracted in Step 2 to CD; or use the built-in ISO CD image burning support in Windows 7. If you downloaded the floppy image builder, run the program to create a bootable floppy disk.
4. Restart the computer using the CD or floppy disk created in Step 3.
5. Press Enter to run DBAN in interactive mode.
6. Use up and down arrow keys to highlight the drive to wipe.
7. Press the space bar to select the drive.
8. Press M to select the wiping method.
9. Press F10 to begin the wipe process.
10. At the end of the process, shut down the system. You can reuse or recycle the wiped hard disk.
Note: if DBAN is unable to recognize your SATA hard disks, configure your system BIOS to use IDE mode rather than AHCI mode.
Wiping Flash Memory Cards and USB Drives
Programs such as DBAN or vendor-supplied hard disk utilities are limited in the devices they support: they are designed to work with internal ATA/IDE or SATA hard disks only. Programs that work with flash memory cards and USB flash drives often support hard disks as well, enabling you to use a single program for all disk wiping processes. Roadkil’s DataWipe can be used with any hard disk, floppy disk, or flash drive that has a drive letter.
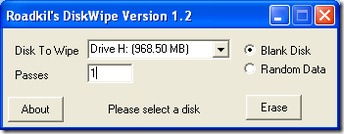
Wiping Flash Memory Cards with Roadkil’s DiskWipe
Time Needed: Varies; from a few minutes to several hours, depending upon size and speed of drive and computer
Software: Roadkil’s DiskWipe
Available from http://www.roadkil.net
Media: Can be run from Windows desktop
1. Download Roadkil’s DiskWipe.
2. Extract the contents of the compressed file.
3. Open DiskWipe. If you are running Windows Vista or Windows 7, right-click the program icon and select Run as Administrator.
4. Select the drive to wipe.
5. Select the type of wipe to perform; DiskWipe can zero-fill the disk or write random data.
6. Enter the number of passes.
7. Click Erase to start the process.
8. At the end of the process, close the program. You can reuse the wiped disk.
Wiping SSDs
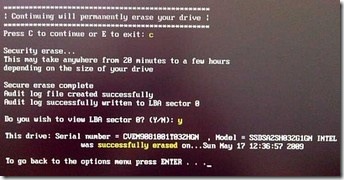
To solve write performance problems on drives that don’t support TRIM (check with your drive vendor for firmware upgrades) is to use wiper.exe (included with some SSDs) or to run the Secure Erase feature supported in most recent ATA/IDE and SATA drives. The Secure Erase feature can be activated on many systems by running Secure Erase 4.0 (HDDerase.exe), available from http://cmrr.ucsd.edu/people/Hughes/SecureErase.shtml. Version 4.0 works with most recent ATA/IDE and SATA hard disks and SSDs, but if you use an Intel X-25M, X-25E, or X-18M SSD, follow this link to download Secure Erase 3.3 http://www.iishacks.com/index.php/2009/06/30/how-to-secure-erase-reset-an-intel-solid-state-drive-ssd/ . Note that it is no longer being developed, and we were unable to use it on a system running an AMD 690 chipset.


