Articles

What Do the Mac System Beep Code Mean?

If a fault is detected during the test, you will not hear a normal startup chime. Instead, the system will beep as explained below. If you experience one of these beeps, you should call your Apple-authorized service provider for additional troubleshooting assistance.

1 beep = No RAM installed/detected
2 beeps = Incompatible RAM type installed (for example, EDO)
3 beeps = No RAM banks passed memory testing
4 beeps = Bad checksum for the remainder of the boot ROM
5 beeps = Bad checksum for the ROM boot block

What Do the Mac System Beep Code Mean? Read More »

UNMOUNTABLE_BOOT_VOLUME Error Message

UNMOUNTABLE_BOOT_VOLUME After installing or upgrading Windows XP from Windows 95 or 98 an error message:
STOP 0x000000ED (0x aaaaaaaa ,0x bbbbbbbb ,0x cccccccc ,0x dddddddd ) UNMOUNTABLE_BOOT_VOLUME appears when Windows tries to load.

This error is generated by design through Microsoft to prevent any data loss during operation. By design this error can incur when:

  • A 40-wire cable is used to connect an Ultra ATA hard drive to an Ultra ATA hard disk controller.
  • Improper BIOS settings
  • A file system may be damaged and cannot be mounted.

To resolve this issue:

  1. Replace the 40-wire cable with an 80-wire Ultra ATA Cable
  2. In the BIOS load the “Fail Safe Default Settings”.
  3. Restart the computer. If it doesn’t correct the problem a file system may be damaged.

Repairing a Damaged File System

  1. Restart the computer with the XP install disk.
  2. Press R to select the Repair Option at the “Welcome to Setup” screen.
  3. Enter administrator password if prompted to do so.
  4. At the next prompt press 1 and Enter .
  5. This should bring you to the command prompt “C:\” or “C:\Windows”.
  6. Type chkdsk /r and press enter. This will scan the disk and repair any errors.
  7. Type fixboot X: where “X” is the drive that you are installing the operating system on.
  8. Restart the system. If Windows still errors repeat steps 1 thru 5.
  9. Type fixmbr at the command prompt.

If all the above steps fail you may run a low-level format on the drive using SeaTools. Run the Write Disk Pack. This process may take several hours depending on the size of the drive.

UNMOUNTABLE_BOOT_VOLUME Error Message Read More »

After switching master/slave roles, the drives still will not work together

After switching master/slave roles, the drives still will not work together… what else can can be done?

At this point, it is recommended that the user separate the hard drives and connect them individually to the different interface ports of the system. If the system does NOT have a Secondary IDE interface, it is recommended that the user install an Ultra ATA PCI Adapter card. By doing this, each drive would then be able to individually communicate with the system. Ultra ATA PCI cards benefit your system by adding support for large capacity drives and enhanced support for data transfer rates by Ultra ATA devices.

After switching master/slave roles, the drives still will not work together Read More »

Data Recovery Wizard Free Edition 5.0.1

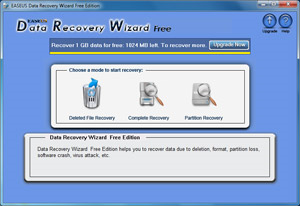
Data Recovery Wizard Free Edition 5.0.1 Data Recovery Wizard Free Edition is a comprehensive file recovery freeware which can recover deleted files or folders even when they have been emptied from Recycle Bin, recover data due to format, lost partition, system crash, and virus attack. Compare with other data recovery freeware, it can restore files from formatted disk, dynamic disk, deleted or lost partition with original file names & storage paths.

Publisher: Easeus.com

Key Features:

  • Recover deleted or lost files emptied from the Recycle Bin.
  • Recover from lost/deleted partitions.
  • Recover files from Dynamic Disk.
  • Recover from Linux file system under Windows.
  • Recovers from formatted partitions with original file names & storage paths.
  • Compatible with Windows 2000, XP, 2003, Vista, 2008, 7

Note: Data Recovery Wizard Free edition 5.0.1 only allows you to recover less than 1 GB of file.

Data Recovery Wizard Free Edition 5.0.1 Read More »

No drive letter assigned after installing a new hard drive

Disk Manager Why is my new drive recognized in the system BIOS but has no drive letter assigned to it in Windows?

Before the operating system can recognize the drive and assign it a drive letter, you must partition and format the drive. New hard drives are rarely pre-partitioned by the manufacturer. There are three options to formatting and partitioning the drive:

  • Disk Management is compatible Windows NT, 2000, and xp.
  • FDISK is compatible with Windows 9x, Me. Please refer to Microsoft’s knowledge base article Q255867 for instructions on FDISK.
  • Seagate’s MaxBlast and DiscWizard utilities are compatible with all Window operating systems. The MaxBlast and DiscWizard utilities are fast and easy ways to format a drive.

No drive letter assigned after installing a new hard drive Read More »

Seagate announced the world’s fastest 2.5-inch laptop PC hard drive

May 24, 2010 – Seagate announced channel and OEM shipments of the Momentus ® XT hard drive, the world’s fastest 2.5-inch laptop PC hard drive, combining SSD-like performance with the massive capacity and much lower cost of HDDs. The Momentus XT drive also features Adaptive Memory™ – a groundbreaking new technology from Seagate that learns and optimizes the drive’s performance to each user by moving frequently used information into the flash memory for faster access. The Momentus XT solid state hybrid drive boots up to 100 percent faster than traditional 5400RPM drives, the mainstream spin speed for laptop PCs, and sets new benchmarks for real-world system performance for laptops and gaming systems.

Today’s high-performance SSDs for mobile computing cost as much as 10 times more than hard disk drives of the same capacity, with the price of a 250GB SSD outstripping even the cost of many laptop PCs. As a result, most consumers and system builders are unwilling or unable to pay the high price for the greater speed and quiet operations of SSDs. Additionally, SSDs offer fewer capacity options than hard disk drives.

Momentus XT, 2.5-inch Solid State Hybrid Drive

The Momentus XT drive is a best-of-both-worlds solution that combines a 7200RPM spin speed, 4GB of solid state memory and Seagate’s Adaptive Memory technology to deliver unprecedented hard drive performance. The unique Adaptive Memory technology works by identifying patterns in how often certain digital data is used, and then moving the most frequently used information to the embedded solid state memory for faster access – effectively tailoring hard drive performance to each user and their applications.

“For notebook PC users looking forward to faster PC performance without sacrificing storage capacity or affordability, now there’s an option, Seagate’s new Momentus ® XT drive is the first storage device for notebook PCs that raises the bar for affordable capacity and performance.” according to John Rydning, IDC’s research director for hard disk drives.

“We see the Momentus ® XT drive as a game changer, a product heralding a new generation of hard drives that combine SSD and HDD capabilities so that laptop users don’t have to make trade-offs on speed, cost or capacity, The feedback we’ve received from customers, industry experts and early reviews has been overwhelmingly positive, and Seagate will continue to drive innovation that provides more value and a better computing experience to consumers.” said Dave Mosley, Seagate executive vice president of Sales, Marketing and Product Line Management.

Momentus ® XT Drive Brings Unprecedented Speed to New ASUS Gaming Laptop PC
ASUS has also announced that it will offer the Momentus XT drive as an upgrade option for its new Republic of Gamers (ROG) G73Jh notebook. The system is powered by an Intel i7 720Qm quad-core processor, 8GB of DDR3 memory, and DX11 capable ATI Radeon Mobility HD 5870.

“With the Momentus ® XT drive, ASUS gives gaming customers who prefer the ASUS ROG G73 the capacity they need and the performance they crave, Seagate’s innovative solid state hybrid drive hands down delivers the best value, capacity and SSD-like performance to a wide audience.”  said PC Wang, vice president of the ASUS Systems Business Group.

The Momentus XT drive installs as easily as a traditional 9.5mm-high notebook drive for new systems or laptop upgrades and, unlike early hybrid drives, operates independently of the operating system and the motherboard chipset.

ASUS and Seagate Unveil the Momentus ® XT Drive and the ROG G73JH with a Live Webcast
On Wednesday, May 26, Seagate and OEM customer ASUS will co-sponsor a live webcast unveiling not only the new Momentus XT solid state hybrid drive, but also featuring the new ASUS ROG G73JH system with two Momentus XT drives. Three lucky attendees of this webcast will win a new G73 system just for attending*. Special guest speakers will provide an in-depth look at how this drive will transform high-performance computing.

For more information visit the Momentus XT drive product page.

Seagate announced the world’s fastest 2.5-inch laptop PC hard drive Read More »

How to Restore Factory Capacity of Hard Drive?

How to restore factory capacity of hard drive This post is a complete guide on recovering your hard drive’s factory capacity.

Reasons why hard drive might lose some megabytes or even gigabytes:

  • Your Operating System does not support LBA48 addressing mode
  • You are mixing binary and decimal gigabytes
  • Your motherboard has created a hidden area on your hard drive to store a backup of the BIOS binaries
  • Your PC/Laptop manufacturer has created a hidden area on your hard drive to store a backup of the Operating System installation files (needed for automatic restore functionality)
  • You have used some software that sets HPA (Host Protected Area), messes with DCO (Device Configuration Overlay), or switches off LBA48 support
  • You have misplaced a jumper on the drive
  • There was Magic involved

Solutions to Restore Hard Drive Factory Capacity :

  1. Check jumpers. Consult with manufacturer’s instructions and set jumpers to the proper position.
  2. Check your OS, does it have all updates installed?
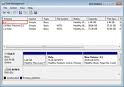
  3. Check disk partitions. Run Windows Disk Management console and see if there is any free space that is not used by any partition.
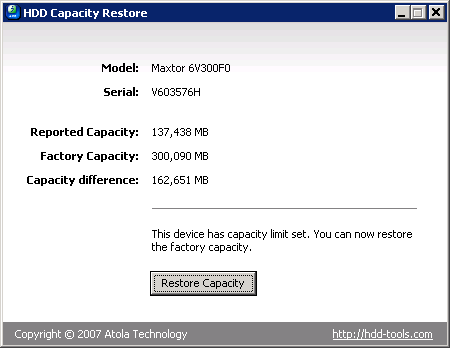
  4. If steps 1—3 did not help, then we have a very cool tool that analyzes your hard drive’s LBA48, HPA and DCO status and recovers factory settings

Useful Tool: HDD Capacity Restore v1.2

License: Freeware
Author: Atola Technology
Supported hard drives: all hard drives
Supported OS: 32-bit versions of Windows XP/Vista/2003

HDD Capacity Restore Tool allows you to restore factory capacity of any hard drive. It does everything automatically: it extracts the factory capacity; then it restores the factory LBA48, HPA and DCO settings.

In some cases this program allows to actually increase the capacity of a hard drive (if it was limited by the distributor; for example, Hewlett-Packard sometimes sells 80-GB hard drives but sets a 40-GB limit. You can restore the full 80-GB capacity in this case).

Download Now: HDD Capacity Restore V1.2

How to Restore Factory Capacity of Hard Drive? Read More »

Cables for Ultra ATA/66 to Ultra ATA/133 Drive Users

Ultra ATA/66 to Ultra ATA/133 Drive Cables Why must I use this type of cable?

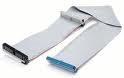
The faster timing requirements of Ultra ATA/66 and above require the use of an 80-conductor cable. This is necessary for proper operation of UDMA modes 3 and greater. The 80-conductor cable is used with the same connector configuration as the standard 40-conductor cable. The 40 additional conductors are used as ground paths and are all connected to the 7 original ground conductors. These additional ground conductors serve to improve the overall signal quality (signal-to-noise ratio) of the ATA cable. 80-conductor Ultra ATA cables are also limited to a maximum cable length of 18 inches.

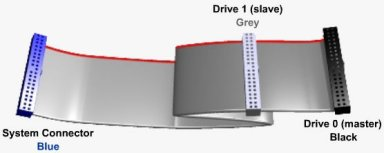
If the drive was purchased in a retail kit and not as a “bare” drive, the kit includes an Ultra ATA cable as described here. If not Ultra ATA cables can be purchased from your system vendor or reseller and are fully backward compatible for operation on all standard/legacy ATA devices and hosts. However, these cables will typically utilize the cable select (CS) configuration on ATA drives for defining a master or slave device (drive 0 or drive 1). The drive placement convention used on an 80-conductor cable is also different from the previous generation of cable select type cables. The 80-conductor Ultra ATA cables require the master drive (drive 0) to be installed at the end of the cable and the slave drive (drive 1) to be installed on the middle connector.

The connectors on 80-conductor cables are also color-coded to help ensure proper drive placement and attachment to the host (system). Typical color-coding is as follows: blue for attachment to the host (system), black is for device 0 (master) and gray is for device 1 (slave).

Ultra ATA/66 to Ultra ATA/133 Drive Cables

This post applies to all Seagate, Maxtor, Quantum ATA 66, ATA 100, and ATA 133 drives.

Cables for Ultra ATA/66 to Ultra ATA/133 Drive Users Read More »

How to burn a disaster recovery CD?

How to burn a disaster recovery cd The most popular CD Burning Softwares, detailing how to burn a disaster recovery CD from the image file saved by Retrospect.

1. Nero Burning Rom (Ahead Software):

Start Nero and close the new compilation window, file browser window, and any wizard that appears. Choose Burn Image from the File menu. In the file selection dialog, change the shown file type to All Files, navigate to the disaster recovery ISO image, select it, and click Open. Click OK if Nero informs you it does not recognize the format of the image file. Nero presents its Foreign image settings dialog, which should have default settings of Data Mode 1, block size 2048 bytes, other values zero, and boxes unchecked. Click OK to work with these settings for the ISO image. Nero presents the Write CD window. Click Write to begin recording your disc.

2. Easy CD Creator (Adaptec/Roxio):

Start Easy CD Creator and cancel any wizard that appears. From the File menu, choose Open CD Layout. In the file selection dialog, change the shown file type from Easy CD Creator to All Files, navigate to the disaster recovery ISO image, select it, and click Open. In the CD Creation Setup window which appears, select your desired CD recorder, leave the write speed and options as they are, and click OK to begin recording your disc.

3. CD Extreme (Sony):

Start CD Extreme. At the default CD Starter window, click on the CD Extreme button/combo box in the lower right to go into the full application. From the File menu’s New Job submenu, choose Global-Image or Other Image. Click the ’…’ button at the far right of the Disk Image File area. In the file selection dialog, change the shown file type to Other Image, navigate to the disaster recovery ISO image, select it, and click Open. Click the Burn button to begin recording your disc.

4. B’s Recorder GOLD (B.H.A.):

Start B’s Recorder GOLD and close or cancel any assistant or wizard that appears. In the main window, drag the disaster recovery ISO image to the lowest of the three panes (which says it accepts Image files). Click Record at the top of the window to start burning the CD.

5. MyCD Pro (Sonic)

MyCD does not have the ability to record discs from ISO image files, but MyCD Pro does. Start MyCD Pro and close the Starter window to get to the main screen. Click the New Global-Image or Other Image button on the toolbar. A Global Image Job Setup window appears in the Job Setup pane. Highlight your CD-R drive in the Drive Status pane and select it by clicking the Select/Deselect as Recorder button on the toolbar. A red arrow appears on the drive icon to indicate it is selected. Click the Browse button from the Job Setup window. In the file selection dialog, change the shown file type to Other Image, navigate to the disaster recovery ISO image, select it, and click Open. (The path to your image file appears in the Job Setup pane.) Click the Record button to begin recording your disc. (The MyCD Pro online help includes icons in its instructions and the icons may help you better understand the steps to burn a CD from an image. Follow the help’s links from Using MyCD Pro to Global-Image Job and scroll down to Recording a CD from a Global-Image File.)

6. Macintosh OSX Disk Utility (Apple)

Open Disk Utility, which can be found in the Utilities folder. Click on Images on the menu bar and select Burn… In the Open window, browse to the ISO image file you want to burn, select the file, and click on the Open button. In the Burn Disk In: drop-down menu, select the CD burner drive that you will be burning the CD-ROM in. Click on the Burn button in the lower right hand corner. A Progress window will open that will show the progress of your CD being burned.

How to burn a disaster recovery CD? Read More »

Serial ATA (SATA) Native Command Queuing (NCQ)

Serial ATA (SATA) Native Command Queuing (NCQ) What is native command queuing?

Native command queuing is arguably the most significant advancements in the Serial ATA II specification. NCQ allows the host to issue multiple commands to the device (up to 32 commands) without having to wait for the device to complete any commands. Queuing of commands allows the drive to look ahead at what data has been requested or needs to be written, thereby allowing the drive to optimize the order of the commands and maximize data throughput efficiency, providing significant performance improvement.

To enable Native Command Queuing, the Serial ATA II standard defines a method of allowing an HDD to control the order of command execution and data transfer. Using special SATA commands, READ FPDMA QUEUED or WRITE FPDMA QUEUED, the host will issue each command an identifier, or tag. The specification of Native Command Queuing allows for up to 32 tags (0 to 31). In order to avoid collisions and mishandled data, the HDD will only release a tag after the associated command is complete and the data has been returned to the host.

The concept of command queuing means that a drive does not need to return the data in the same order that the commands are requested (tags 0 to 31 can be executed in any order and data packets for those commands can be returned to the host in any order). For example, the commands may be issued in numerical order: 1, 2, 3, 4, and the data for those commands may be returned to the host in a different order: 4, 2, 1, 3 (or any other order). This allows a drive to use rotational position optimization to maximize the efficiency and overall performance of the drive.

Native command queuing FAQs:

1. What are the Native Command Queuing requirements?

In order to take full advantage of Native Command Queuing, you must have the following:

  • NCQ supported hard drive
  • Motherboards or PCI controllers with NCQ support
    Verify NCQ support through your motherboard and host adapter manufacturer
  • Multi-threading software

2. What is multi-threading software?

Multi-threading is the ability of a program or an operating system process to manage its use by more than one user at a time and manage multiple requests by the same user without having to have multiple copies of the program running in the computer.

3. What are the advantages of using NCQ?

Some of the advantages of using NCQ supported hard drives are:

  • Improved endurance of the hard drive due to less mechanical wear
  • Higher performance when utilizing multiple command workloads

4. Will I notice a big performance increase when using a NCQ supported hard drive?

Each hard drive model will have its own product specification which you should use to determine performance. You will not see a big performance increase when using applications that do not utilize multi-threading technology. Performance increase is more noticeable when utilizing transactional workloads.

5. How do I enable NCQ?

Native Command Queuing is enabled at the firmware level of the hard drive and cannot be altered by the end user, which means you have support as long as all the other requirements are met. If all requirements are not met, NCQ will not be utilized.

6. Can I use my NCQ supported hard drive with a non NCQ supported controller or motherboard?

Yes. The NCQ supported hard drives will work just fine with non-NCQ supported controllers or motherboards. However you will not be able to take advantage of the NCQ features.

7. What Seagate model numbers support NCQ?

Since late 2004, most new SATA drive families have supported NCQ.  The following Seagate model numbers drive familes support NCQ:

  • Barracuda 7200.8, 7200.9, 7200.10, 7200.11 (SATA) and later
  • Barracuda NL35, NL35.2, ES, ES+, ES.2 (SATA) and later
  • Momentus 5400.2, 5400.3 (SATA) and later
  • Momentus 7200.1, 7200.2 (SATA) and later
  • Momentus 5400 PSD and later
  • Momentus 5400 FDE.2 and later

The difference between Native Command Queuing & Tagged Command Queuing:

The difference between NCQ (Native Command Queuing) and TCQ (Tagged Command Queuing) for the SCSI-2 and later specification is that TCQ supports 3 modes of queuing:

Simple – specifies that the command is to be placed in the drive’s command task set (queue). If several commands are present, the drive may reorder them to increase overall throughput.

Head of queue – directs the drive to place the command at the beginning of the queue, to be executed next. Consecutive commands with Head of Queue specified are executed in last-in-first-out order. Queue is 64.

Ordered – specifies that commands in the drive’s task set are to be executed in the order received (FIFO).

Serial ATA (SATA) Native Command Queuing (NCQ) Read More »

Scroll to Top