Articles

Common blue screen error messages in windows

Blue Screen Error Messages Blue Screen stop messages provide diagnostic information, such as Stop codes and driver names, that you can use to resolve the problem. However, this information disappears when you restart your computer. Therefore, it is important to record the information displayed for future reference.

The following are a list of the more common stop codes and potential resolutions in windows:

  1. Stop 0x0000000A or IRQL_NOT_LESS_OR_EQUAL
  2. Stop 0x0000001E or KMODE_EXCEPTION_NOT_HANDLED
  3. Stop 0x00000024 or NTFS_FILE_SYSTEM
  4. Stop 0x0000002E or DATA_BUS_ERROR
  5. Stop 0x0000003F or NO_MORE_SYSTEM_PTES
  6. Stop 0x00000050 or PAGE_FAULT_IN_NONPAGED_AREA
  7. Stop 0x00000077 or KERNEL_STACK_INPAGE_ERROR
  8. Stop 0x00000079 or MISMATCHED_HAL
  9. Stop 0x0000007A or KERNEL_DATA_INPAGE_ERROR
  10. Stop 0x0000007B or INACCESSIBLE_BOOT_DEVICE
  11. Stop 0x0000007F or UNEXPECTED_KERNEL_MODE_TRAP
  12. Stop 0x0000009F or DRIVER_POWER_STATE_FAILURE
  13. Stop 0xBE or ATTEMPTED_WRITE_TO_READONLY_MEMORY
  14. Stop 0xC2 or BAD_POOL_CALLER
  15. Stop 0x000000CE or DRIVER_UNLOADED_WITHOUT_CANCELLING_PENDING_OPERATIONS
  16. Stop 0x000000D1 or DRIVER_IRQL_NOT_LESS_OR_EQUAL
  17. Stop 0x000000D8 or DRIVER_USED_EXCESSIVE_PTES
  18. Stop 0x000000EA or THREAD_STUCK_IN_DEVICE_DRIVER
  19. Stop 0x000000ED or UNMOUNTABLE_BOOT_VOLUME
  20. Stop 0x000000F2 or HARDWARE_INTERRUPT_STORM
  21. Stop 0xC000021A or STATUS_SYSTEM_PROCESS_TERMINATED
  22. Stop 0xC0000221 or STATUS_IMAGE_CHECKSUM_MISMATCH

Error Messages Related to Disks and File Systems:

These messages can provide more information for determining the cause of the Stop message. More specifically file system errors, viruses, hard disk corruption, or controller problems can cause the following Stop messages:

1. Stop 0x00000024 or NTFS_FILE_SYSTEM
This Stop message, also known as Stop 0x24, indicates that a problem occurred within Ntfs.sys, which is the driver file that allows the system to read and write to NTFS volumes.

2. Stop 0x00000050 or PAGE_FAULT_IN_NONPAGED_AREA
This Stop message, also known as Stop 0x50, occurs when requested data is not found in memory. The system generates a fault, which indicates that invalid system memory has been referenced. This fault can occur due to a variety of error conditions, such as bugs in antivirus software, a corrupted NTFS volume, or faulty hardware (typically related to defective RAM, be it main memory, L2 RAM cache, or video RAM).

3. Stop 0x00000077 or KERNEL_STACK_INPAGE_ERROR
This Stop message, also known as Stop 0x77, indicates that the requested page of kernel data from the paging file could not be read into memory. Stop 0x77 can be caused by a number of problems, such as:

  • Bad sectors on the hard disk.
  • Defective or loose cabling, improper SCSI termination, or the controller not seeing the hard disk.
  • Another device is causing a resource conflict with the storage controller.
  • Failing RAM.

4. Stop 0x0000007A or KERNEL_DATA_INPAGE_ERROR
This Stop message, also known as Stop 0x7A, indicates that the requested page of kernel data from the paging file could not be read into memory.

One of the following conditions usually causes a Stop 0x7A: a bad sector in a paging file, a virus, a disk controller error, defective hardware, or failing RAM. In rare cases, a Stop 0x7A occurs when nonpaged pool resources run out.

5. Stop 0x0000007B or INACCESSIBLE_BOOT_DEVICE
This Stop message, also known as Stop 0x7B, indicates that Windows XP Professional lost access to the system volume or boot volume during the startup process. This error always occurs while the system is starting and is often caused by one of the following:

  • Hardware problems
  • Corrupted or incompatible storage drivers
  • File system problems
  • Boot sector viruses
  • Outdated firmware

During I/O system initialization, this error can occur when:

  • The controller or driver for the startup device (typically the hard disk) failed to initialize the necessary hardware.
  • File system initialization failed because the system did not recognize the data on the boot device.

Common blue screen error messages in windows Read More »

What should I do for a noisy hard disc drive?

noisy hard disc drive All of our new Parallel ATA (PATA) hard drives and new Serial ATA (SATA) hard drives are optimized for performance, we do not have a utility that can quiet them down.

While modern drives are extremely quiet, every disc drive makes a certain amount of noise while running. Normally, the faster the drive motor spins, the higher pitched the resulting sound will be.

It is also normal for the drive to make sort of a “chattering” or “clicking” sound while it is reading and writing data.

However, if the sound coming from the area around your drive has recently changed or is an excessive grinding or clanking noise, this may indicate a physical problem with the drive.

Noise from the cooling fans in the power supply are often mistaken as hard drive noise.  To isolate whether the noise is coming from the drive or one of the fans, you can issue a “spin down” command through software.  The Seagate SeaTools for DOS diagnostic has an acoustical spin down test.

If the sound goes away, then the sound was produced by the drive.  If the sound remains, then the drive is not the cause of the sound.

What should I do for a noisy hard disc drive? Read More »

BIOS Limitation/BIOS Capacity Barrier

BIOS Limitation/BIOS Capacity Barrier The BIOS limitation or BIOS capacity barrier is the computer’s inability to recognize hard drive capacities larger than allowed by the hard-coded programming contained in your system BIOS. For example, your system BIOS might only be capable of understanding a hard drive capacity of up to 32 GB. If you then attempt to install and auto-detect a 40 GB hard drive, the system will freeze because the BIOS is not capable of understanding the capacity reported by the hard drive. In short, that particular BIOS cannot count past 32 GB.

Seven Major BIOS Limitations:

  • Systems with BIOS dated prior to July 1994 (504 MB Limitation).
    Typically these BIOS will have a 504 megabyte (1,024 cylinders) limitation. Prior to this date, most manufacturers’ BIOS did not provide the Logical Block Address (LBA) feature needed for proper translation. Some BIOS had LBA mode in the setup, but the feature did not work properly.
  • Systems with BIOS dated after July of 1994 (2.048 GB Limitation).
    Typically, these BIOS provide support for hard drives with capacities larger than 504 megabytes. However, depending on the manufacturer’s release date and version number, different limitations may be encountered. The major limitation that surfaces is the 4,093-4,096 cylinder limitation. This barrier is derived from the fact that some BIOS manufacturers implemented Logical Block Addressing (LBA) translation in their BIOS with a 4,093 – 4,096 cylinder limitation. System hangs would occur when the cylinder limitation threshold is exceeded. A system hang is defined when the operating system hangs during initial loading, either from floppy diskette or existing hard drives. If these symptoms of system hang occur or there are questions whether the system BIOS will support the drive, contact the system or motherboard manufacturer for assistance.
  • 4.2 GB Limitation.
    The maximum parameters at the 4.2 GB barrier are 8,190 cylinders, 16 heads and 63 sectors for a capacity of 4.2 GB. A system hang is defined when the operating system stops responding during initial loading, either from floppy diskette or existing hard drives. This can be caused by the BIOS reporting the number of heads to the operating system as 256 (100h). The register size DOS/Windows 95 uses for the head count has a capacity of two hex digits. This is equivalent to decimal values 255. If these symptoms of system hang occur or there are questions whether the system BIOS will support the drive, contact the system or motherboard manufacturer for assistance.
  • 8.4 GB limitation.
    The maximum parameters at the 8.4 GB barrier are 16,383 cylinders, 16 heads and 63 sectors for a capacity of 8.455 GB. To go beyond this boundary, a new extended INT 13 function is needed from the BIOS as a support feature for the drives. The BIOS listed below are all “CORE” BIOS that will support drives larger than 8.4 GB. Even though a BIOS is dated correctly or is the current version, it may not be able to support extended interrupt 13 because of modification done to the “CORE” of the BIOS from the motherboard manufacturer.
  • 32 GB limitation.
    This condition is caused by the Award BIOS inability to address hard drives greater than 32GB. Award has been made aware of this issue and has fixed their “core” BIOS as of 6/99. They are passing this information along to the motherboard manufacturers’ that use their BIOS. Updates for the BIOS should be available soon from individual motherboard manufacturers’ to correct this problem.
  • 64 GB Limitation
    There is no 64GB BIOS Capacity Barrier. If you use FDISK to format a drive that is larger than 64 GB, FDISK will report the incorrect disk size.
  • 137 GB Limitation
    Some system BIOSes are limited to 137 GB because they can only support 28 bit Logical Block Addressing (LBA).

Procedure on how to overcome the BIOS capacity limitation:

  • Check with the system or motherboard manufacturer for any BIOS upgrades for the system. If there are no BIOS updates from the manufacturer you can visit www.esupport.com for a BIOS update.
  • (Recommended) Purchase a PCI ATA controller card that will support the capacity of the drive. The two benefits of ATA controller cards are:
    1. the ability to support large capacity drives
    2. the ability to support the faster transfer rates of the drive.
BIOS Limitation/BIOS Capacity Barrier Read More »

How to low-level format a Mac hard drive using Drive Setup?

Low-Level format Mac Hard Drive To low-level format a hard drive using Drive Setup, follow these steps:


  1. Start by selecting the hard drive you wish to low-level format.
  2. Under the Function menu select Initialization Options
  3. Select Low Level Format (a check mark will appear) and click OK.
  4. Click Initialize at the bottom of the main screen.
  5. Again click Initialize.

Drive Setup will low-level format the drive and prepare it for use with the Mac OS, after which it can be loaded with software.

Note:

  • Low-level formatting a hard drive will destroy all data on the drive and destroy any chance of data recovery. We suggest you make a reliable back up of all data before attempting this.
  • Canceling a low-level format of a SCSI hard drive before it has completed can render the drive permanently inoperable.
  • Low-level formatting can take several hours depending on the drive.

How to low-level format a Mac hard drive using Drive Setup? Read More »

Maxtor & Quantum ATA Hard Disk Drive Jumper Settings

If your drive came with two jumpers and your setting only calls for one,
you can place the extra jumper horizontally accross the top row for storage.

Maxtor CrystalMax 1080
Maxtor Fireball 531DX Ultra ATA 100
Maxtor DiamondMax 16
Maxtor DiamondMax 1750 Ultra ATA 33
Maxtor DiamondMax 1750A Ultra ATA
Maxtor DiamondMax 17 VL Ultra ATA 66
Maxtor DiamondMax 20 VL Ultra ATA 66
Maxtor DiamondMax 2160 Ultra ATA
Maxtor DiamondMax 2880 Ultra ATA
Maxtor DiamondMax 30 VL Ultra ATA 100
Maxtor DiamondMax 30 VL Ultra ATA 66
Maxtor DiamondMax 3400 Ultra ATA
Maxtor DiamondMax 36 ATA 66
Maxtor DiamondMax 40 ATA 66
Maxtor DiamondMax 40 VL Ultra ATA 100
Maxtor DiamondMax 4320 Ultra ATA
Maxtor DiamondMax 536DX
Maxtor DiamondMax 60 ATA 100
Maxtor DiamondMax 60 ATA 66
Maxtor DiamondMax 6800 Ultra ATA
Maxtor DiamondMax 80 ATA 100
Maxtor DiamondMax D540X-4D
Maxtor DiamondMax D540X-4G
Maxtor DiamondMax Plus 2500 Ultra ATA
Maxtor DiamondMax Plus 40 Ultra ATA 100
Maxtor DiamondMax Plus 40 Ultra ATA 66
Maxtor DiamondMax Plus 45 Ultra ATA 100
Maxtor DiamondMax Plus 5120 Ultra ATA 33
Maxtor DiamondMax Plus 5120 Ultra ATA 66
Maxtor DiamondMax Plus 60 Ultra ATA 100
Maxtor DiamondMax Plus 6800 Ultra ATA 66
Maxtor DiamondMax Ultra ATA

Maxtor & Quantum ATA Hard Disk Drive Jumper Settings

Maxtor DiamondMax Plus 8
Maxtor DiamondMax D540X_4K
Maxtor DiamondMax D540X_4L
Maxtor DiamondMax D740X

Maxtor Fireball 541DX
Maxtor Fireball LCT20

Quantum Fireball CR
Quantum Fireball CX
Quantum Fireball EL
Quantum Fireball EX
Quantum Fireball LCT08
Quantum Fireball LCT10
Quantum Fireball LCT15
Quantum Fireball Plus KA
Quantum Fireball Plus KX
Quantum Fireball SE
Quantum Fireball ST
Quantum Fireball LM
Quantum Fireball AS

Maxtor & Quantum ATA Hard Disk Drive Jumper Settings

Maxtor DiamondMax Plus 9
Maxtor DiamondMax 10
Maxtor DiamondMax 11
Maxtor DiamondMax 17

Maxtor & Quantum ATA Hard Disk Drive Jumper Settings

Maxtor DiamondMax 20Maxtor DiamondMax 21

Maxtor & Quantum ATA Hard Disk Drive Jumper Settings

Maxtor & Quantum ATA Hard Disk Drive Jumper Settings Read More »

How do I install a hard drive in a laptop or notebook computer?

Install hard disk drive Most laptop computers are designed to give the owner the ability to replace the internal hard disc drive. The computer usually has an access cover or door on the bottom side of the system.  There are systems that are not designed for user access.  Sometimes these systems have warnings about voiding the system warranty.  Be sure to study your system’s documentation to learn about upgrade policies and methods.
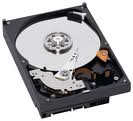
Like desktop computers, laptop computers have one of two possible hard disc drive interface: SATA and ATA (also called IDE or PATA).  The type of hard drive you select must match the system because they are not interchangeable.

Electrostatic discharge is a risk to electronic components.  To help prevent static discharge, observe the following precautions:

  • Before handling any components, put on a grounded wrist strap.
  • Use antistatic padding on all work surfaces.
  • Avoid static-inducing carpeted areas.
  • Keep the drive in its static-shielded bag until you are ready to complete the installation. Do not attach any cables to the drive while it is in its static-shielded bag.
  • Handle the drive by its edges or frame.
  • Do not touch the I/O connector pins or the circuit board.

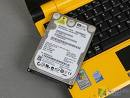
Laptop hard disc drives are thin and delicate.  For this reason, always hold the drive on the sides.  Do not apply pressure to the top or squeeze the drive.

Some laptop motherboards use a small adapter part to connect the disc drive to the system.  If an old drive was removed, be sure to check if an adapter is still attached to the drive.  If so, carefully remove and transfer the adapter to the new drive.  Make sure that the pins and connectors are properly aligned when mounting the drive to the motherboard.

If your system design uses screws to mount the hard drive, be sure not to over tighten the screws.  Fingertip tight on the screwdriver is all that is necessary to secure the drive.  Too much screw pressure can cause the disc drive to go out of alignment and possibly ruin the drive.

You will need to boot from the Operating System Setup CD when preparing a new installation of the OS.  Many laptop computers are brand name systems with recommended OS recovery procedures.  Again, consult your system documentation for more information.  Otherwise, the OS installation procedure is the same as for any other computer.

Note: It is important to install the OS while connected to AC power.  Battery depletion during the OS setup is known to corrupt the installation.

After the installation is complete, please practice safe handling of your system and hard disc drive.  First, always provide clear and open access to the air-cooling vents and fan.  Laptop computers depend on the cooling vents for the overall health of the system and disc drive.  Second, using the disc activity LED as a guide, try not moving the computer when the hard disc is highly active.  If you must move the computer during this time, go easy and set the system down softly.  While mobile hard drive are designed with much higher G-Force ratings while operating, protective habits are a good idea.

How do I install a hard drive in a laptop or notebook computer? Read More »

Electronic noise and how it can affect your system

Due to the increased speed, size and quantity of devices in many PCs the system can be very vulnerable to electronic noise on the data lines. This may in fact be the cause of your particular problem. Symptoms of electronic noise can include the following:

  • Slow performance.
  • Drive not detected in BIOS.
  • Drive detected incorrectly in BIOS, with nonsense (garbage) figures (e.g. $0&*?%2).
  • Drive shown on boot up with an engineering name instead of model number (e.g. Millennium).
  • You may receive invalid error codes with the SeaTools diagnostics utility.

In order to overcome problems with electronic noise please try the following:

  1. Make sure the PCI clock speed is not above 33Mhz (this would usually correspond to a 66Mhz Bus speed, or 100Mhz on newer BX chipsets). This is achieved by checking the jumpers on the motherboard. The information on the jumper settings should be explained in the motherboard documentation.
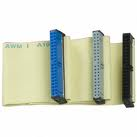
  2. Using a shielded IDE / ATA (40-pin, 80-conductor) cable will most certainly help improve your system’s performance. The secure cable has grounding lines running between the signal lines, which ensure a clearer signal to all devices. You should also attach the master drive to the middle connector on the cable and not the end, so that there is as short a distance as possible between the drive and the motherboard.
  3. One simple way of checking if there are noise issues in your system is to reduce the mode to PIO mode 2 in your BIOS as a test. You should also try disabling the UDMA mode of your BIOS.
  4. In some IBM PCs the hard drive is fixed in the bracket by means of 4 rubber grommets with screws through them so the drive has no hard grounding. This can cause problems with electronic noise but they can be resolved by putting a hard ground fixing into the drive through one of the available top holes. Another possible cause of electronic noise/interference is that on some systems the IDE cable is tucked slightly under the drive (presumably as a cable neatness measure). If the cable is re-routed slightly (no particular direction) from this position it should help but it is important to make sure that the cable does not come loose from the drives or motherboard when you move it.
  5. A power supply fluctuation within the system can also create the same type of symptoms. To try and identify a malfunctioning power connector, make sure the drive is installed alone on a power cable. You should also try connecting the drive to a different power connector.

Electronic noise and how it can affect your system Read More »

How to upgrade my computer to a larger capacity drive?

When upgrading to a larger capacity drive, the main thing to consider is whether or not your computer is capable of addressing the extra capacity provided by the larger drive. If the system is several years old this is especially true.

Here are some common thresholds for capacity limitations:

  • 2.1 GigaBytes
  • 8.4 GigaBytes
  • 32 GigaBytes
  • 137 GigaBytes
  • 2 Terabytes

As an example, if you have an 80 GigaByte (GB) drive, and are considering upgrading to a 160 GB drive, it would be wise to verify that your system BIOS (Basic Input/Output System) is capable of addressing capacities above 137GB before purchasing one. If it is, you can safely use drives up to 2 Terabytes in capacity.

To check system BIOS compatibility, contact either the system vendor (HP, Gateway, Dell etc.) or the system mainboard manufacturer. Mainboard manufacturers usually have capacity limitations listed in the specifications on their website.

ATA Controller Cards

A workaround for a capacity issue with a Parallel ATA drive is to install an ATA controller card into a PCI slot in your system.  Drivers will be provided by the card manufacturer to be loaded into Windows or MacOS.  The larger capacity drive would be connected to the card instead of the mainboard so that the card can provide the addressing to the drive and enable larger capacities.  A modern ATA-133 controller card would support up to 2TB in capacity per drive (usually up to 4 drives per controller card).

Serial ATA

For Serial ATA (SATA) drives, all Serial ATA controllers are capable of up to 2TB in capacity so it is safe to assume that when you are upgrading a Serial ATA drive to a large capacity one, it will be compatible with your system.

You can also purchase a SATA-150 or SATA-300 controller to install into a free PCI slot that will enable compatibility with a Serial ATA drive for up to 2TB in capacity (usually up to 2 drives per controller card, commonly up to 4).

External and Networking Products

When upgrading to larger External and Network drive products, the extra capacity is handled by the operating system, so doesn’t rely on BIOS addressing.  It is safe to assume that if you are upgrading to a larger capacity External drive product, the same system would be able to handle the extra capacity if your older drive is already supported by the Operating System.

Controller Vendors

Here is a list of ATA and SATA controller vendors.

How to upgrade my computer to a larger capacity drive? Read More »

Unable to delete a partition or logical DOS drive using FDISK

When you attempt to remove a partition using the FDISK utility that is included with Microsoft Windows 95, Windows 98, Windows 98 Second Edition, or Windows Me, you may receive the error message “Cannot delete Extended DOS Partition while logical drives exist“.

However, when you attempt to remove a logical drive in the extended DOS partition from within the FDISK utility, you may receive the error message “No Logical Drives defined“.
This behavior occurs if the extended DOS partition is an NTFS partition. This behavior can also occur if the partition has been created with a third-party operating system such as BeOS, Linux, or versions of UNIX.

To remove this partition, use SeaTools for DOS’ 0-fill option.

Note: 0-filling a drive is data destructive. All data will be lost.

Unable to delete a partition or logical DOS drive using FDISK Read More »

How do I determine what type of hard drive you have?

Hard Drive Type The following methods can help determine what kind of hard disk you have inside your computer.
1. Seatools For Windows

Seatools for Windows can detect all hard drives connected to your computer.

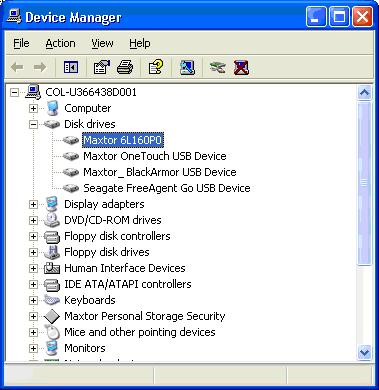
2. Device Manager

a) Users running Microsoft 2000, XP, or Vista

Microsoft Windows users can easily determine the type of hard drive that is currently installed in their computer by following the below steps.

  1. Right click on “My Computer”.
  2. Select “Manage”.
  3. Click on “Device Manager” in the list on the left.
  4. Select the “Disk Drives” entry.

Note: This will not show the serial number of the drive, just the model number.

Hard Drive Type

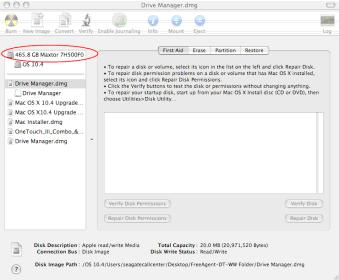
b) Users running Apple’s Mac OS X

Follow these steps to open Disk Utility.

  1. Open a Finder window
  2. Open “Applications” (if necessary).
  3. Open “Utilities”.
  4. Once Disk Utility is open, it will show all of the connected hard drives on the left. It will show capacity and model number.

Hard Drive Type

c) IBM-compatible users

Users of IBM-compatible machines can usually enter the computer’s CMOS to view additional information about their hard disk drive. Commonly, the CMOS will list the drive’s serial number and/or model number, cylinders, heads, sectors, and/or the size of the drive.

If the CMOS is not configured to auto-detect the drive, it is important to note that the drive values may not be correct. All modern drives should be set for automatic detection.

3. Disk utilities

Many disk utilities designed to setup the hard disk drive will properly detect and setup a drive; in addition, they may also provide the user with some basic additional information about the drive.

For example, using the FDISK utility, you can display additional information about the size of the hard drive and partition information.

4. Other methods of determining the type of hard disk drive

One of the best methods for determining additional information about a hard drive is to check the sticker or label on the drive’s top.  The majority of hard drive labels will list not only the RPM of the hard drive but other useful information, usually including the model, kit, serial, and/or part number(s).  Turn off the computer and physically open it to see if this information is visible on the drive label.  If you are unable to locate the information you need through software, it is recommended you open the case and remove the drive to get the information you need.

Determining the speed or RPM of a hard disk drive

To determine the speed or RPM of a hard drive, you must first determine the manufacturer and model of the drive. Once you’ve determined this information, you can lookup the drive on the manufacturer’s website to determine its RPM.

How do I determine what type of hard drive you have? Read More »

Scroll to Top