Data Recovery User Guide – Through Data Recovery Software

Data Recovery User Guide According to Murphy’s Law of Data Loss, “The probabilities of a hard disk crash increase with the number of days since the drive was last backed up.” No hard disk drive is ever completely safe from crashing, and losing all the important data on it.

A disk drive can be damaged due to a number of causes such as virus attack, voltage glitches, software malfunction, hard disk format, accidental file/directory deletion, human error or even sabotage. Such events cause corruption or damage to the disk drive, and make the data completely inaccessible to the user.

Data Recovery comes into play when your storage stops responding to your request. This is the most critical time for your data and the impending problem with the hard drive. A wrong step can make your hard drive & data inaccessible for ever. First and foremost thing is Don’t Panic!

Now check whether you have a physical failure or logical failure. Normally in 80% of cases there is a logical failure. To know the type of failure you have hear whether any ticking sound is coming from the hard drive or not? If not that means that it is a logical failure and you can recover your data through data recovery software.

You can choose the data recovery software by searching on Google with keywords like data recovery software, hard drive recovery etc. (See Best Data Recovery Softwares 2009 ) Whilescanning different software product consider these factors:

See to this whether the software supports your systems hardware like RAM (Random Access Memory), Operating Systems (particular Window flavors, Unix, Linux, Solaris etc).

You must check your RAM before installing the data recovery software, as these software uses recursive search operation which requires lots of virtual memory. For a fast recovery you have large size of virtual memory. I would recommend 256 MB or 1 GB would be best.

After selecting the software it’s the turn of software Installation. NEVER means NEVER install the software on the same physical drive from where you have lost your data. As it may get over written and you will lose it for ever.

Always use a working computer with a drive having enough free space to store your recovered data.

Verify that the drive in the PC is connected on the Primary Channel as Master.
You can connect the drive as:

• Slave on the primary channel OR AS
• Master or Slave on the secondary channel

Note: You can take help of support executive in your office or your maintenance engineer if you are not comfortable in connecting the drives.

Attaching the Drive in to slave has three simple steps:

• Set the jumpers on the hard drive or CD ROM
• Plug and screw the drive in
• Boot the computer up and make sure the drive is detected

Read More

Causes Of Data Loss: Natural Disaster

Causes Of Data Loss: Natural Disaster Natural Disasters is the least likely cause of data loss however they can kill an entire company. The eruption of natural disasters and the complete equipment failure are rare but they do occur. Although it accounts for around 3% of all data loss but the magnitude of data loss is highest.

The disaster may strike anywhere and occurs in many shapes and sizes. Natural disasters may occur in the form of fire, flood, lightening strikes followed by power surges.

You can protect your valuable information from getting destroyed by the evil effects of a disaster by following the below-mentioned preventive measures.

Since, it is statistically unlikely for natural disasters to occur in two locations simultaneously. Hence, the perfect solution to protect your system from a natural disaster is an offsite backup i.e. you can keep your data in two different locations away from each other.

Fire Damage:
When the fire catches your computer, it may damage the plastic encasings and components of the computer but the data present in the metal hard drive may still be recovered. There are many data recovery software & Service companies, which provide data recovery from fire damages.

When the fire strikes, you can do a bit from your end to lessen the extent of damage.

• When your computer becomes wet from fire hoses, take the wet hard drive out of the system and do not dry; instead place it in a plastic and airtight bag. It is because during a fire, with the help of small air vents, extreme pressure changes pull the contaminants and water inside the drive.
• If you notice that you are not able to pull the hard drive out of the melted computer because it is sealed, then leave it like that.

Flood:
When a single drop of water can short out your computer, what when the whole equipment is completely submerged in the river water. Calculate the extent of damage when it is sunken not only for an hour but for days. However, no matter what, your data can still be recovered if you follow the following measures.

• Make sure that you turn off the computer and do not turn it on. It is because the drive may seem dry but there is small amount of water, which may still be present on the components and can cause a short when powered on.
• You may think that drying the wet drive may be of help but it is not the case. However, dried water leaves contaminants on the drive and can cause a head crash to occur when the system is powered on. Hence, it is recommended to place the media in a plastic airtight bag instead.
• Do not store your mission critical data in a flood plain.

Power outage/ surge:
Power outages are known to be the most common cause of data loss than all other natural disasters.

When you notice a spark, smoke or you observe that your hard drive does not spin and if it is, you are unable to access the information, then your system might be victim of a power surge. Power problems caused by small surges, spikes, sparks and line sags in the electricity make it essential to protect servers, workstations, and networks.

When you think of preventing data loss due to power supply problems, you automatically think of connecting your system to a UPS (Uninterrupted power supply), surge protectors, isolation transformers, or a surge suppressor. However, you can follow these protective measures to prevent your computer from a disastrous effect.

• Make sure that you unplug all the power cords connected to your system in order to prevent further damage to have occurred. The cords could be a power cable, modem, printer, or network cable.
• The most severe damage to your hard drive occurs when the power supply returns. Therefore, after the power returns, wait for at least half an hour for the power to get stabilized and then you may power on the computer.
• UPS main objective is to provide continuous, sufficient-grade power to electronics possessing valuable information. So, make sure that you connect your system with a UPS or a surge protector to prevent your computer from further power attacks. It is for the reason that extreme power fluctuations can damage sensitive electronic components.

Read More

Linux Recovery Software For Linux Based Computer

Linux Data Recovery Software Linux is a great and powerful operating system that has included unique features, advanced technologies and great applications. The reason behind its popularity is its great maintenance and security of data stored into their hard disk. Linux operating system is a multi-user and multi-tasking operating system that is the need of today’s world where unlimited data storage required into the computer. It is very powerful and easy to use operating system that has no required extra efforts. Anyone can use this that has technical sound or not.

Since it has multi-user & multitasking capacities, it is widely used around the world and there is a big community of Linux users. Although it is a high quality product, but sometimes it also face problems like data crash or data corruption. The corrupted data can be user stored data of system data which is necessary to run the system properly. If this kind of unfortunate event happens and you found that you can not access your files then you need to use certain recovery software so save yourself from this disaster. The software which is used to do certain critical operations are known as Linux Data Recovery Software.

The Linux Data Recovery Software can do all kind of recovery based on Ext2, Ext3 & ReiserFS file system recovery, recovers Linux deleted files or other kind of files. It first searches the bad sector, corrupted or deleted files and then it recovers it. Then it repairs all the files. After the repairing process finishes, it stores it on the specified location where you want to store the repaired files.

The Linux data recovery software is a must have product for all the Linux users who are professionals and thoroughly use their Linux based computer. The Linux data recovery software is made to recover all kinds of corrupted or damaged files which are on the Linux operating system. It helps you in following conditions:

  • When your files & folders are lost on your Linux desktop
  • You have accidentally formatted your hard disk
  • You have deleted the files from the trash or recycle bin
  • Operating System corruption
  • Missing files & folders
  • Missing Volumes
  • Deleted Volumes

Linux Data Recovery Software is software which can solve all your problems on your Linux based computers. To save your precious data, you must need to go for the Linux data recovery.

Read More

What is a Megabyte (MB) and Gigabyte (GB)?

Hard Drive Capacity Defining how hard drive manufacturers and operating system interpret megabytes and gigabytes.

Hard Drive Manufacturer Capacity Definitions
The listed capacity is an unformatted (raw) capacity. After partitioning and formatting, actual storage capacities may vary depending on the operating system and configuration. Maxtor adheres to the NIST and IEC definitions of Megabyte and Gigabyte.

Examples:
1 MB = One Million Bytes
1 GB = One Billion Bytes

Operating System & BIOS Capacity Definitions
Storage devices are marketed and sold in terms of decimal (base 10) capacity. In decimal terms, one Gigabyte (GB) is equal to one billion bytes. Most BIOS is follow this definition as well. However, many operating systems use the binary (base 2) numbering system. That would be two to the thirtieth power, or 1,073,741,824 bytes which equals one binary-Gigabyte (also called Gibibyte or GiB).

According to the NIST and IEC standards, an 80 GB hard drive would contain eighty billion bytes. 80,000,000,000 bytes divided by 1,000,000,000 bytes equals eighty decimal Gigabytes. In binary terms, 80,000,000,000 bytes would be divided by 1,073,741,824 for a total of 74.5 binary GB. However, there are still 80 billion bytes on the drive in either case.

Some utilities use abinary conversion to calculate capacity. This is why users might see 504 MB reported on one utility and 528 MB from another.

Read More

What is the difference between Normal, LBA or Large mode?

Normal mode is the standard BIOS translation scheme. This mode does not support drives greater than 504 MB. Large mode is a generic translation scheme used by some BIOS’s to access drives up to 1 GB. Logical Block Addressing (LBA) mode is a more advanced method of translation than Large mode. LBA mode is a somewhat faster and can see drives 8.4 GB and greater.

Read More

Performing a Low Level Format on a SCSI disk drive

Low Level Format How do I perform a Low Level Format on a SCSI disc drive?

  1. Download and install SeaTools_enterprise software.  Use SCSIMax for Maxtor or Quantum SCSI drives.
  2. Click START | PROGRAMS | SEATOOLS ENTERPRISE to run the program. It will scan any SCSI device(s) installed in the system.
  3. Highlight the drive you would like to format.
  4. Click VIEW | ADVANCED. This will take you to the “Advanced Menu” of the software.
  5. Click ADVANCED | FORMAT. This will bring you to another screen. Click the “Format” tab.
  6. Click the “Format Now” button. You will be prompted to make sure you would like to continue.
    WARNING: All data will be lost!
  7. If you are sure, click “Yes” to continue. If you are not sure, click “No” to exit the utility.
  8. The selected drive will now format and bring your drive back to factory settings.

The advantage to using our low-level routine as opposed to others (such as from SCSI BIOS utilities) is that once you start the routine it can be disrupted at any time. With BIOS utilities, disrupting could damage the drive and render it inoperable. This can also occur from an unexpected power outage.

Read More

Same data takes more space on larger hard drive

Why does the data from my old, smaller hard drive take up more space on my new, larger hard drive?

This is a limitation of your operating system, not of your hard drive.

In operating systems using a File Allocation Table ( FAT ) architecture, a “cluster” or “allocation unit” is the smallest unit of storage space required for data written to a drive. There are limitations to how many clusters a hard drive can be broken down into. “Slack space” is the difference in empty bytes of the space that is allocated in clusters minus the actual size of the data files.

The size of the cluster is determined by the capacity defined for the logical drive during partitioning. Using a larger partition means the operating system increases the smallest unit of storage space required for data written to a drive. In systems where many small files exist, more space is given away in slack space. Usually, when data is transferred from a small drive to a larger one (with a larger working cluster size ), the net space required will be larger than the original. On rare occasions, where the difference in capacity is small but the upgrade uses a larger cluster size and the original drive was out of disk space using lots of small files, there may not be enough room on the new drive! Fortunately, this doesn’t happen too often.

This is one of those areas where past decisions limit today’s capabilities. When computers were designed, decisions were made using projections based on the needs of the customer and the technology that would be available “in the future”. As with many such predictions, the reality of our technological advances far surpasses the vision of those who set the standards. In other words, we are a lot smarter than we thought we would be!

The following analogy illustrates how cluster size and slack space work:

If the drive has a cluster size of 2K and a 3K file is written to the drive, 2 clusters are used and there is 1K of slack (or lost) space. If that same 3K file is written to a drive whose cluster size is 8K, only 1 cluster is used, but the slack space is 5K. If the 3K file is written to a drive whose cluster size is 32K then 29K of space would be lost!

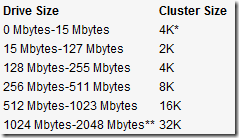
This is where partitioning comes into play. When you drop the partition size below a certain Megabyte size, the cluster size drops also:

Hard Drive Space

*Note: Uses a 12-bit FAT, all others use a 16-bit FAT.
**Note: Another DOS limitation is 2Gbytes per partition or logical drive.

There are several ways to partition a drive. The most common method is to create one large partition. That works fine, but as hard drives get larger, doing so can limit the usable space on the drive. You need to decide whether or not to partition the drive at 100% or to split the drive into extended and logical drives.

Which option is best for you? Check out the following example: A customer running programs that create a lot of small files should partition the drive for the smaller cluster size. A customer running a program that creates a few very large files, should be fine with a single large partition. If you are still unsure which option is best for you, we recommend one large partition.

Interested in seeing the cluster size on your hard drive? Run CHKDSK on your hard drive. Locate the line that states “xxxx bytes in each allocation unit.” That’s DOS-eze for saying “cluster size.” If you have multiple partitions or multiple hard drives, you will need to specify CHKDSK C: or D:, etc.

For more detailed information on DOS cluster size and slack space refer to the DOS manual that accompanied your original DOS diskettes or search the Microsoft knowledge base at http://www.microsoft.com/.

Read More

Identifying FAT16, FAT32, and NTFS File Systems and partitions

File systems How can I tell what type of file system (FAT16, FAT32, NTFS) my drive is formatted in?

To identify what type of file system the drive is formatted in:

  1. Click on the Start button and select Computer if using Windows Vista, My Computer if using Windows XP or 2000, or Windows Explorer if using Windows Me or 98.
  2. Right-click on the drive letter you want to check.
  3. Click on the Properties option from the pull down menu. A window will appear with the type of file system you have. If you do not see any information regarding FAT16, FAT32, or NTFS in the window that means the drive is formatted in FAT16.

Notes:

  1. Partitions created with the FAT16 file system have a size limitation of 2,048 MB (2.1 GB).
  2. Microsoft first started supporting the FAT32 file system with the release of Windows 95B (a.k.a. OSR2), circa 1997.
  3. When booting from Windows 95A, a Windows 95A startup disk, or any version of MS-DOS, a FAT32 partition will appear as a NON-DOS partition in FDISK.
  4. FAT32 partitions have a theoretical partition size limitation of 2 terabytes (TB). However, new partitions created by either Windows Vista, Windows XP, or Windows 2000 will limit their size to 32 gigabytes (GB). To create partitions greater than 32 GB under Windows Vista, XP, or 2000, you will need to format them using the NTFS file system (or create multiple FAT 32 partitions for drives greater than 32GB).
  5. Windows Vista, Windows XP, Windows 2000, and Windows NT all support the NTFS file system. Windows 2000, XP, and Vista can both support the FAT32 and NTFS file systems, however Windows Vista cannot be installed on a FAT32 partition. Windows NT cannot support FAT32 partitions.
  6. MaxBlast and DiscWizard allow FAT32 partitioning of a drive larger than 32GB.
Read More

Windows file systems and Mac File Systems

Windows file Systems And Mac File Systems This article provides a brief history and description of Windows file systems and Mac file systems.

File Systems
A file system organizes large numbers of files on some sort of recording medium (most commonly a disk drive or cd-rom). Mac and PC computers use different primary file systems which is why a program like TransMac is necessary.

The two common versions of Mac file systems (or volume formats) are standard HFS and Mac OS Extended (or HFS+). HFS came about early on in the life of the Macintosh line when disks had relatively small capacities. Limitations appeared in this format when disk drives grew very large in size. Mac OS Extended (or HFS+ as it was originally called) is similar to HFS but some of its internal structures were changed to accommodate the changing needs of modern personal computing. The major differences between the two are outlined below. HFS is best for small volumes or those that may be used on older systems (before OS 8.1). Mac OS Extended is best for larger volumes as long as they will not be used on older systems.

Standard HFS:

  • Compatible with all Mac OS versions
  • File names limited to 31 characters
  • File sizes limited to 2GB
  • Large volumes with small files waste a lot of space.

Mac OS Extended (HFS+):

  • Compatible with Mac OS 8.1 and later
  • 255 character Unicode file names
  • No file size limit
  • Less wasted space

Windows uses two primary types of file systems FAT (File Allocation Table) and NTFS (New Technology File System).

FAT:
There are three variations of the FAT file system: FAT12, FAT16 and FAT32. FAT12 and FAT16 originated in the DOS days. They had the same sort of problems HFS had due to growing  disk sizes. FAT32 was created to alleviate some of these problems, but it still has limitations like a maximum file size of 4GB.

NTFS:
NTFS was created for Windows NT. It does not have as many limitations as the FAT systems and also includes much needed security and reliability features. Recent versions of Windows (NT, 2000, XP, etc.) support both file system types, but older versions of Windows (95, 98, Me) do not natively support NTFS.

Read More

How to configure my SATA drive as a boot device?

SATA Boot Device If your SATA controller is a bootable controller (the vast majority are) you may boot from the SATA drive. You may need to enter Setup and change the boot sequence so that the SATA controller is the first boot device listed. In most cases, if the SATA controller is embedded (not an add-on controller card) on the motherboard, the BIOS Setup utility will have an option to choose the SATA drive as the first boot device. Look for Boot Sequence, Boot Options, Boot Order or a similar setting to make this change. If Setup does not allow this change, your system BIOS may not allow the SATA controller to be designated as a boot device at the BIOS level. In such cases, you still may be able to boot to the SATA drive as long as there is not a bootable EIDE drive installed in the system as well.

Note: When installing Windows 2000/XP to a Serial ATA drive, you may need to specify the SATA controller drivers early on during the installation.

Read More