Formatting an Internal or External hard drive using Mac OS

A step-by-step guide to formatting an ATA hard drive with a Macintosh operating system(Mac OS).

  • Mac OS 8.x thru 9.x
  • Mac OS X or 10

Formatting an ATA hard drive in Macintosh operating system 8.X thru 9.X

Step1.
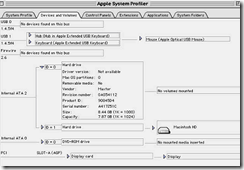
After hooking up the hard drive either boot off the CD or the main Macintosh HD then go to the Apple System Profiler located under the Apple menu. From there go to Devices and Volumes and check to see if the hard drive that is going to be formatted is properly displayed. If the drive is not displayed make sure that the drive is properly installed or connected.

Format hard drive using Mac OS

Step 2.
Once the drive is detected and determined to be the one that is to be formatted go to the System Folder, Utilities, Drive Setup, and ‘click’ on the “Drive Setup” icon.
Format hard drive using Mac OS

Step 3.
‘Click’ on the drive you want to format then ‘click’ Initialize.
Format hard drive using Mac OS

‘Click’ either on Initialize for a single volume format or ‘click’ on Custom Setup to specify type of format, partition, and size. For Custom Setup instructions go to Step 4.
Format hard drive using Mac OS

Step 4.
In Custom Setup select the Partition Scheme, the type of format, and the size. Then ‘click’ on OK.
Format hard drive using Mac OS

Step 5.
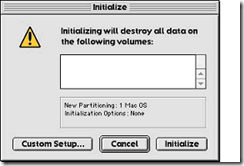
This will then take you to the Initialize screen. ‘Click’ on initialize. After the drive initializes it will be ready for use.
Format hard drive using Mac OS

Step 6.
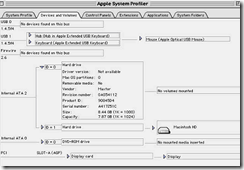
To verify that the system recognizes the correct partitions, size, and format go back to Apple System Profiler and select the Devices and Volumes folder. Check the information from the pull downs.
Format hard drive using Mac OS

To format the drive for Mac OS X (Jaguar, Panther and Tiger)

Note: The way in which Mac OS X mounts the hard drive depends on the drive’s capacity.

Step 1. Plug your drive into the Macintosh.

Step 2. Launch the Disk Utility.
Format hard drive using Mac OS

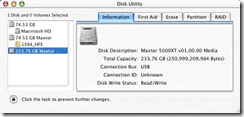
Step 3. Select your new drive from the list on the left. A description of the drive appears in the right window.
Format hard drive using Mac OS

Step 4. Select the Partition tab at the top of the window.
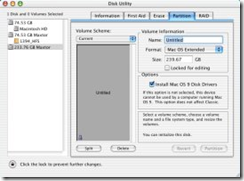
Format hard drive using Mac OS

Step 5. You may partition the drive or just keep it to one volume. For each volume:.

  • Enter a name for your drive in the. Name field.
  • Select the Mac OS Extended from the Volume Format drop-down list.
  • Select the check box next to Install Mac OS 9 Drivers. This will allow your disk to be recognized if you start your system with Mac OS 9.
  • Click Partition to continue. An alert dialog appears to confirm the Partitioning/Formatting process.
    Format hard drive using Mac OS
  • Click Partition to start the Partitioning/Formatting process.
    Format hard drive using Mac OS
  • When complete, the drive will mount to the Desktop.
Read More

How to Troubleshoot SCSI/ATA hard drive combinations?

SCSI Hard Drive When SCSI drives are connected to the SCSI host adapter, with an ATA drive installed, you are unable to boot from the ATA drive.

The SCSI host adapter and the ATA port on the motherboard could be set for the same IRQ or address or both. Check the following:

  • For the primary port, the ATA ports on the motherboard will likely be set to IRQ 14, and the I/O address will likely be set to 1F0-1F7.
  • For the secondary port, the ATA ports on the motherboard will likely be set to IRQ 15, and the I/O address will likely be set to 170-177.
  • The SCSI host adapter’s IRQ and I/O address should not conflict with the above settings.
  • If using a plug-in controller or host adapter with a BIOS, make sure the BIOS address does not conflict with the address settings of other cards or devices.
  • Check the documentation for the motherboard or SCSI host adapter for detailed information on how to change these settings. If unavailable, contact the vendor of the ATA or SCSI host adapter.

Once these setting are properly implemented, your computer should be able to recognize available ATA and SCSI drives with no problem.

You are unable (or there is a long delay when trying) to boot from the SCSI drive.

 The motherboard’s BIOS might be “pinging” the ATA bus looking for an ATA drive. When using a SCSI drive as a boot device, there should not be an ATA drive physically attached as the Primary 0 (master) drive, and the CMOS settings for the Primary 0 drive should be set to “none” or “not installed”. In addition, check the CMOS settings for the Primary 1, Secondary 0, and Secondary 1 drives. If any of those drives are not physically present, the corresponding settings should be set to “none” or “not installed” as well.

If you are still unable to boot from the drive, make sure it has been properly prepared as a bootable drive – make sure it has been formatted and has active partitioning set.

The SCSI drive is not recognized at full capacity.

Make sure the SCSI host adapter’s setting for “above 1GB support” is enabled. For drives larger than 8.4 Gbytes, enable the BIOS’ INT13 Extensions.

If the drive is reporting less than its full factory capacity to the controller BIOS, it is possible that the drive may have been programmed to a smaller capacity (Seagate SCSI drives support a change capacity feature).

If this is the case, standard drives may be returned to full capacity (or reprogrammed to any capacity up to full capacity) using Seagate’s SeaTools utility.

The SCSI drive is not performing optimally.
Try the following:

  • Make sure your card and motherboard’s BIOS are optimally configured for performance. You might need to contact the manufacturer of the card for assistance with these options.
  • Check your SCSI cable and the drives’ ID, termination, and termination power settings.
  • Make sure the cable is of good quality and is not coiled up inside the computer.
  • Try to route SCSI ribbon cabling away from the power supply.
  • If this is the only device attached internally, set the ID to 0 and terminate the drive.
  • If there are 2 or more devices internally attached to the SCSI cable, set the boot drive to ID 0, set the other devices to any other unassigned SCSI ID (except 7, which is usually reserved for the SCSI host adapter), and terminate the drive that is physically at the end of the cable. Termination power should be set on both drives to match the requirements of the SCSI host adapter.

The following recommendation is DATA DESTRUCTIVE. Proceeding will ERASE ALL DATA FROM THE DRIVE.

    We recommend that you use the SCSI host adapter’s utility to low-level format (or initialize) the SCSI drive. This will help ensure that the drive is properly communicating and optimally synchronized to the host adapter. If possible, BACKUP the drive(s) before following this procedure.
  1. If this is not possible, and the data is needed, please consult a data recovery service to assist you in recovering your data.
  2. A low-level format typically takes 45 – 60 minutes per gigabyte. The larger the drive, the longer the time required for completion.
  3. DO NOT TERMINATE OR ABORT THE LOW-LEVEL FORMAT! The drive(s) can become permanently damaged.

After the low-level formats are completed, reboot the computer from a bootable system or recovery diskette and proceed to prepare the drive for use. In a DOS or Windows 95/98 environment:

1. Use FDISK to partition the drives as desired. Ensure that the C: partition is a “PRI-DOS, ACTIVE” partition.

2. After partitioning the drives, reboot the computer.

3. Use FORMAT to high-level format each partition on the SCSI drives.

a) Type format X:, where X is the drive letter of the drive you wish to format.

b) If you want to make the C: partition bootable, add the “/S” parameter to the end of the command to transfer the system files. (At the command prompt, type FORMAT C: /S)

Each partition should now be formatted to its full capacity, ready to store data.

Read More

Hard Disk Data Recovery Tips

Hard Disk Data Recovery Before you venture into hard disk data recovery business, it is necessary to know the causes of hard disk failure. The causes can be either logical failture, or electrical failture or mechanical failture.

  • Logical causes include problems with the boot sector of the hard drive which leads to non-booting of Windows. In this case, you would be able to you’re your computer from another disk. You can then investigate if you have problems with the boot sector or you have bad sectors on the disk itself. Hard disk data recovery in this case can be possible via Data Recovery Software.
  • Electrical causes include problems caused due to voltage problems which may have led to the burning of the circuit board. For this you may have to open your desktop’s ATX box or your laptop’s bottom cover. Ensure that you have shut off the electrical supply to your machine and are working in a static-free environment. You also need to wear an ESD wrist strap. Under no circumstances must you touch the circuit board as this might damage the disk head. Just try to see if you can see any signs of burnt components or any signs of burns on the circuit board. In this case, you can contact your hardware supplier or a service agent to figure out the next step.
  • Mechanical problems are caused when the hard drive and / or its parts have been physically damaged due to a number of causes. You may hear clicking sounds from the hard disk itself. This kind of failure can also be caused by dropping the hard disk or exposing it to water or humid atmospheres. Under no circumstances must you try to shake the hard disk or remove the hard disk cover. Most times, a physical repair of hard disks or their parts is not possible. You can find a data recovery service provider who may be able to help you with this problem. Look for service providers who have a ‘No Data, No Pay’ agreement.

Hard Disks of computers – either laptops or desktops – are susceptible to failure where the data that you have stored on it either disappears / cannot be found. The good news is that this data can often be recovered. There are various ways of doing so.

Here are some tips for general hard disk data recovery tips suggested by professionals in this field:

  • Always use firewalls and good virus protection programs for your computer.
  • Don’t run the disk defragmenter if you want to recover a file that you have ended up deleting. Use a Data Recovery Software first. Doing so will increase your chances of recovering the lost data.
  • Programs such as scandisk, chkdsk or Norton Disk Doctor will not help you with data recovery. In fact, they may often end up hinder the process of hard disk data recovery.
  • If your computer is not booting, you can try booting it in safe mode and try to disable or uninstall any recently installed programs which may have caused the problem. You can also try and see if running System Restore can solve the problem effectively.
  • Before you buy data recovery software, ensure that you know exactly what kind of data it recovers. Instead of trying out a variety of softwares, first know what kind of data you want to recover and then look for that data recovery software which will meet your needs.
  • Know what kind of file system your computer’s hard drive is using. This will help in locating the right kind of data recovery software for your computer data recovery process. Similarly, knowing the file system used by your laptop will help in the laptop data recovery process.
  • The best tip ever is to always keep a backup of your important data.
  • Sometimes it may not be possible to constantly keep backing up data, especially with recent files. If your hard disk crashes while you are working, don’t try to save the file as you may also end up losing data that has been saved earlier.
  • Before you go to the hard disk data recovery experts make sure that you know the relevant details such as the Operating System, the details of what happened before your hard disk failed, and if your computer still recognizes the drive or not.

Thus, based on the causes of hard disk failure you can find different methods of hard disk data recovery.

These tips will help you identify the problem with your hard disk and even help you with hard disk data recovery on your own. However, if you are unsure, then it is best that you find a data recovery service provider who offers a ‘No Data, No Pay’ agreement.

Read More

How to Make Custom iPhone Ringtones for Free

Iphone Ringtones You don’t have to pay for your songs twice to get a ringtone. There are many songs in your music library, but no way to make ringtones from any of them. Actually, with a little bit of trickery (nothing illegal) you can create ringtones from any of your non-DRM songs in your iTunes library easily, and for free. This works on both Mac and Windows PCs.

1. Open iTunes
2. Find the song that you want to make into a ringtone.
3. Listen to the song and find the part of it you want to use. The chorus may be a good place to start.
4. Write down the start and stop times of the clip.
5. Right-click the song and select “Get Info.”
6. Click the “Options” tab.
7. Type in the start time of your ringtone in the text box next to “Start Time” in the minutes:seconds (i.e. 2:01) format.
8. Type in the end time of your ringtone in the text box next to “Stop Time.” Make sure the ringtone is no more than 40 seconds long.
9. Click “OK”.
10. Right-click your song again and select “Convert Selection to AAC”. Wait for iTunes to convert your song. It will create a duplicate version.
11. Right-click the ringtone and select “Delete”.
12. Click on the “Keep Files” button.
13. Find the file. It’s usually in your User folder under Music > iTunes > iTunes Music and under the band’s name. It will have an extension of “m4a.”
14. Replace the “m4a” extension of your ringtone with “m4r”. You can either double-click slowly to re-name your file, or right-click and select “Get Info” on a Mac or “Rename” on a Windows PC.
15. Click “Use .m4r” or the PC equivalent when the system warns you that the change may affect the use of your file.
16. Double-click the ringtone file. ITunes will automatically add it to your ringtones folder in your iTunes Music Library.

17. Connect your iPhone and sync your ringtones.

Warnings

a. For everyone having problems syncing the ringtones to your iPhone: Find the ringtone in your Ringtones folder and change the extension back to .M4A & attempt to sync again.

b. Instead of deleting it, you can also drag the newly converted ringtone to your desktop from iTunes and follow the rest of the steps.

c. There may be some problems with the latest version of Leopard – renaming the file may not work properly, and you won’t be able to add it to the ringtones folder.

d. This will not work with songs bought at the iTunes store or that has DRM (copy-protection). Your best bet is to use a song that you have imported from a CD.

Tips:

1. For those of you using a PC who can not see the file extension m4a follow these instructions and you should be able to see it
1) Go to control panel
2) Double click the folder options icon
3) Click on the view tab
4) scroll down and uncheck the box “hide extensions for known file types
when you go back and view your converted song you should now see the file extension m4a this is what you need to change to m4r

2. The Import Settings dialog (go to Preferences -> General -> Import Settings…) controls the encoding method used by iTunes. Change it to AAC in the Import Settings dialog and the “Convert Selection to AAC” option will appear in the song’s context menu and in the Advanced menu.

3. pshaheen, there is right click functionality in Mac OS X. If you only have a one button mouse or a laptop trackpad, you can hold hold Control and then click which is the same thing as right click. This will allow you to access the menus you need.
Ctrl + Mouse Click = Right Click

Read More

How do I know if my PC supports USB?

USB To help determine your system’s USB capabilities you can download a free USB evaluation utility from the following site: www.usb.org

This program will examine your system and inform you of your computer’s USB capabilities.

For a general rule, if your PC was manufactured before 1996, it probably does not include USB. If the machine was manufactured in 1997 or later, it may support USB 1.0 . Most computers manufactured after 1998 support USB 1.0. Systems available since 2001 probably support USB 2.0.

With some PCs, you may need to connect an adapter (PCI or CardBus) to connect USB peripherals. Read your system documentation if you’re not sure there is a USB port.

Read More

Does USB 2.0 and USB 1.1 hardware work interchangeably?

USB Devices You may have heard that USB 2.0 is “backward-compatible” with USB 1.0/1.1 (Full-Speed USB). While that’s true, USB 1.1 is also forward-compatible with USB 2.0.

Whenever a system has USB 2.0 ports, you’ll find the “Enhanced” USB controller in Device Manager, but you will also find two other USB controllers. These two to mantain backward compatibility to USB 1.1 devices. Each USB 2.0 host actually has 3 chips onboard. The USB controller routes signals to the correct controller chip depending on how a device is recognized. Where a device is physically plugged in has no bearing on how it is routed. All ports on a USB 2.0 motherboard can host any USB devices at all as long as the system and devices are healthy.

The vast majority of USB 2.0 devices will work on older PCs and Macs. None should flat-out fail unless there are other issues with the system. Hi-Speed USB devices will revert to Full-Speed operation when connected this way. Understand that Hi-Speed is at least ten times faster than Full-Speed in actual operation, so the speed difference is quite noticeable.

Read More

What is the procedure for disconnecting an external hard drive?

External Hard Drive It is important to follow the appropriate steps when disconnecting the hard drive. If the proper procedure is not followed then data may be lost.

In Windows a small icon appears in the system tray (next to the clock) . this is the dismount icon that allows you to safely disconnect hot pluggable devices.

To dismount the drive before removing it follow these steps:

  1. Right click the icon. This give you the options to safely remove each hot plug device attached to the system.
  2. Choose to remove the external drive. Once you click the choice another window will open allowing you to select which device to remove.
  3. Click the Stop button then you will be prompted for confirmation.
  4. Windows OS displays a message when it is safe to turn off the drive.
  5. Once the drive is turned off, disconnect the interface cable.

If the device is busy then the request to stop the device will be rejected. Be sure to close any applications that are using data from the external drive then attempt to stop the device again. Usually the Windows Explorer will be open and will be the application keeping the drive busy.

In Mac OS the drive appears as an icon on the desktop. Before unplugging the drive the drive needs to be dismounted by dragging the drive to the Trash Can. Wait a few seconds after the drive has gone into the Trash Can, once the activity light has gone out you can safely remove the drive. Once the drive is turned off, disconnect the interface cable.

Note: MacOS users should always dismount the drive before shutting down (or powering off) their computer. If the drive is not properly dismounted there is a chance of data loss.

Read More

Top 10 External Hard Drives

External Hard Drives An external hard disk drive is a type of hard disk drive which is externally connected to a computer. Modern entries into the market consist of standard SATA, IDE, or SCSI hard drives in portable disk enclosures with SCSI, USB, IEEE 1394 Firewire, eSATA client interfaces to connect to the host computer.

External hard drives are certainly known for their memory storage capacity. They allow one to store data up to four thousand gigabytes, along with easy portability. There are many external hard drives available in the market which have unique features and functions. When external hard drives were newly launched, they were very expensive. However, due to their wide demand and use, the prices have lowered significantly. Let’s take a look at some of the best external hard drives available.

1. Maxtor OneTouch 4 Plus 1 TB 3.5″ USB 2.0

  • 1 TB external hard drive connects to your computer via USB cable or FireWire 400
  • Simple Maxtor user interface for drive management, security, and backup scheduling
  • Two levels of security against unauthorized use – Maxtor DrivePass¿ and data encryption
  • Sync data between 2 or more computers on the same operating system
  • Drive and power management utilities; 5-year limited warranty Price: $119.99

2. Western Digital My Passport Elite Portable 500 GB USB 2.0 Hard Disk Drive (Titanium)

  • Luxurious Soft-touch Finish
  • Capacity gauge
  • Backup and Sync Software
  • Powered directly from the USB port on your PC. No separate power supply is needed
  • Remote access – Connect My Passport to any PC and run MioNet® Key software to remotely access files, music, and photos from any of your computers with MioNet software installed. Free for the life of the drive (Windows only) Price: $134.95

3. Seagate FreeAgent Go 500 GB USB 2.0 Portable External Hard Drive

  • 5,400 RPM Spin Speed, 8 MB Cache Buffer
  • USB 2.0: up to 480 Mb/s
  • Sync and back up quickly at your desktop without having to search for cables.
  • Guard the privacy of important files and folders.
  • Get your storage solution up and running quickly. Price: $114.97

4. LaCie Hard Disk 1 TB USB 2.0 External Hard Drive

  • 1 TB USB external hard drive with a stunning design by Neil Poulton
  • Fast USB 2.0 interface offers connectivity and transfer rates of up to 480 Mbps
  • Plug and Play functionality for both Macs and Windows
  • Includes one-year online backup service providing unlimited off-site backup storage
  • Measures 4.6 x 1.8 x 7.6 inches (WxHxD); 2-year limited warranty Price: $119.99

5. Maxtor 320GB Black Armor 2.5-Inch External Hard Drive

  • Box Content – BlackArmor external hard drive with pre-loaded security and backup software, Quick Start guide, USB 2.0 cable, and Protective slip case
  • Protected by Seagate Secure hardware based encryption technology delivering Government certification as the strongest data security available for an external storage device
  • Removal of the USB cable from your computer auto locks the drive
  • No tedious manual security procedures found in software-based encryption technology
  • Hint feature offers a reminder in the event of a forgotten password Price: $89.99

6. Toshiba 320 GB USB 2.0 Portable External Hard Drive

  • USB Powered for Portability/ 320GB Capacity/ Up to 480Mb/s Speed
  • Small Size Saves Desktop Space/ Compact/ Lightweight/ Just 6 oz./ Black and Grey
  • Internal Shock Sensor and Ramp Loading Technology
  • Simple Solution for Backup or Increasing Computer Storage
  • Perfect for Music/ Movies/ Photos/ Games/ Large Business Files/ Etc. Price: $82.51

7. Seagate FreeAgent Desk 1 TB USB 2.0 External Hard Drive

  • USB 2.0: up to 480 Mb/s
  • Rotational Speed: 7200 RPM
  • Simple software, energy efficient, and encryption
  • Dynamic display, ultra stylish, brushed metal, and flexible Price: $119.99

8. Western Digital 1TB My Passport Studio II

  • Box Contents – Dual-drive storage system, FireWire 800 cable, FireWire 800 to 400 cable, USB cable, AC adapter, Software CD, Quick Install Guide, 5-Year Limited
  • Lightning-fast FireWire 800 combined with RAID 0 (Striped) yields the speed you need for smooth video editing, rendering complex 3D objects or special effects and saving huge blocks of data in record time
  • Designed to use only WD’s GreenPower drives, this system uses about 30% less energy than standard systems and runs quietly because it doesn’t need a fan
  • 1TB = 1000GB Hard Drive Capacity
  • Pre-configured to RAID 0 (Striped) Price: $223.96

9. LaCie Rugged All-Terrain Hard Disk 320 GB

  • 320 GB external hard disk with rugged, shock resistant case
  • Triple interface including FireWire 800, FireWire 400, and USB 2.0 for speed and universal connectivity
  • Bus-powered so no bulky power adapter required
  • Includes one-year online backup service providing unlimited off-site backup storage
  • Measures 3.5 x 1.0 x 5.7 inches (WxHxD); backed by a 3-year warranty Price: $119

10. Iomega Prestige 500 GB USB 2.0 Desktop External Hard Drive

  • Easy-to-use: simple USB 2.0 interface; just plug and play
  • Stylish and durable: stylish drive – available in a dark silver brushed finish; sturdy aluminum construction with included stand
  • Secure: EMC retrospect HD (PC) license is included for easy file backup (software available via easy download)
  • Energy efficient: powered by an Energy Star qualified adapter for a better environment Price: $79.95

External hard drives aren’t as fast as internal models, but they are great for backups and are easy to install.

Read More

What are the hardware and software requirements for USB 2.0 PCI Card?

USB 2.0 PCI Card System Requirements For PC Users:

  • Available PCI expansion slot
  • Pentium Class II processor or higher
  • Minimum 32 MB RAM
  • Windows ® 98 Second Edition/Millennium/2000/XP
  • CD-ROM drive

Included in the Kit:

  • USB 2.0 PCI Adapter Card
  • Installation guide
  • Installation software
  • 1-Year warranty

Features:

  • Perfect for today’s new-generation USB devices, such as printers, scanners, cameras, MP3 players and storage devices
  • Add four external and one internal USB 2.0 port
  • Data speeds up to 40 times faster than USB 1.1
  • Supports both USB 2.0 and 1.1
  • Easy installation
  • PC compatible
Read More