Does Western Digital Perform Or Provide Data Recovery Services?

Western Digital will stand behind the warranty that is supplied with the defective hard drive. If your drive is still within its warranty period, the drive can be replaced through Western Digital RMA Process.

We apologize, but Western Digital does not perform data recovery services.

You may however use one of Western Digital’s authorized data recovery service companies. In order to retain the warranty of the defective hard drive, you must use a Western Digital authorized data recovery service company. For more information on Western Digital’s authorized data recovery service companies, please see the information in the following.

Americas Data Recovery Partners:

(North America,Central America,South America)

CBL Data Recovery Technologies

Toll Free: (800) 551-3917
Atlanta: (678) 417-9150
Houston: (281) 895-7515 New York City: (914) 765-0220
San Diego (619) 449-1200
Toronto, Canada: (905) 479-9938

More Locations:
Barbados
Brasil
Canada

Data Mechanix

Toll Free: (800) 886-2231
Phone number: (949) 263-0994
Fax number: (949) 263-1549

DriveSavers Data Recovery

Toll Free: (800) 440-1904
Phone number: (415) 382-2000
Fax number: (415) 883-0780

DTIDATA Recovery Services

Corporate Headquarters
Toll Free: (866)-438-6932
Phone number: (727)-345-9665
Fax number:: (813)-830-6032
WD Customer Discount

ESS Data Recovery

Toll Free: (800) 237-4200
Phone number: (618) 654-3553
Fax number: (800) 299-7815
E-mail: readytohelp@essdatarecovery.com

First Advantage Data Recovery Services

Corporate Headquarters
Toll Free: 877-304-7189
Address:
8650 Freeport Parkway S. Suite 150,
Irving, Texas 75063
WD Customer Discount

Flashback Data

Address:
4029 S Capital of Texas Hwy
Suite 224
Austin, TX 78704

Toll Free: (866) 786-5700
Phone number: (512) 301-5700
Fax number: (512) 301-0333
E-mail: info@flashbackdata.com

Nortek Certified Data Recovery

Address:
2000 Main Street West
North Bay, Ontario – Canada
P1B 8G5

Toll Free: 1-877-474-2058
Phone number: (705) 474-2058
Fax number: (705) 474-2409

Ontrack® Data Recovery

Kroll Ontrack Corporate Headquarters
Address: 9023 Columbine Road, Eden Prairie, MN 55347
Toll Free: 800 872 2599
Phone number: 952 937 5161
Fax number: 952 937 5750

Los Angeles, California
Kroll Ontrack

Address: 18350 Mt Langley St Ste 110, Fountain Valley CA 92708
Toll Free: 800-872-2599
Phone number: 714-641-0530

Washington, DC
Kroll Ontrack

Address: 11411 Isaac Newton Square S, Reston VA 20190
Toll Free: 800-872-2599
Phone number: 703-821-8101

New York City, New York
Kroll Ontrack

Gateway Plaza
Address: 1 Harmon Meadow Blvd Ste 225, Secaucus NJ 07094
Toll Free: 800-872-2599
Phone number: 201-770-0400

Toronto, Canada
Kroll Ontrack

Address: 155 Gordon Baker Rd Ste 100, Toronto Ontario M2H 3N7, Canada
Toll Free: 800-872-2599
Phone number: 416-491-1650

SalvageData Recovery Service Lab

Toll Free: (800) 970-7188
Phone number: (203) 973-0242
Fax number: (203) 621-0628
Contact for FREE Quote

Vogon International

Toll Free: (800) 392-5373
Phone number: (405) 321-2585
Fax number: (405) 364-8242
E-mail: data.recovery@vogon.us

EMEA Data Recovery Partners

(Europe,Middle-east,Africa)

1st Computer Traders Ltd

Address: Unit 6, Mercian Park,
Felspar Road,
Amington Industrial Park
Tamworth, Staffs. B77 4DP,
UK Phone number: +44 (0) 1827 55555
Fax number: + 44 (0) 1827 66666
E-mail: dr@1ct.com

CBL Data Recovery Technologies

Germany
Toll Free: 0 800 5500 999

United Kingdom
Toll Free: 0 800 028 2069

CSSI Africa

Midrand Office
Computer Storage Services, Johannesburg
CSS House
Augrabies Road
Waterfall Park
Midrand
South Africa
Phone number: 011-541 9900
Fax number: 011-541 9920
E-mail: dr@cssi.co.za

Cape Town Office
Computer Storage Services, Cape Town
K3 – Centurion Business Park
Montague Gardens
Cape Town
South Africa
Phone number: 021-555-4450
Fax number: 086-602-9178
E-mail: drcape@cssi.co.za

Durban Office
Computer Storage Services, Durban
4 Pencarrow
Pencarrow Park
Armstrong Avenue
Umhlanga Rocks
South Africa
Phone number: 031-566-5377
Fax number: 086-695-9677
E-mail: infodurban@cssi.co.za

Datex Europe

French:
France 01 69 31 01 01
Others: +33 1 69 31 01 01
E-mail: bienvenue@datex.fr

Spanish
(+34) 626 65 01 37
E-mail: urgencia@DatosExpress.com

Portuguese
+33 1 69 31 01 01

English
UK : +44 28 7082 5678
Others : +33 1 69 31 01 01

Mention WDC and receive special discount rates.

Disklabs

United Kingdom
Unit 6 and 7 Mercian Park
Felspar Road
Tamworth
Staffordshire
B77 4DP, England
UK Phone number: 0800 DATA SOS (0800 3282 767)
Intl Phone number: +44 1827 55999
UK Fax number: 01827 66666
Intl Fax number: +44 1827 66666
Email dr@disklabs.com

Netherlands
Orlyplein 85
1043 DS, Amsterdam
The Netherlands
Entrance Busitel 1, 3rd floor
Open for delivery 08:30 till 17:30
Phone number: 020 403 7579
Fax number: 020 403 7310
Tel Int: +31 (0) 20 403 7579
Fax Int: +31 (0) 20 403 7310
Email info@disklabs.nl

Moscow Data Recovery Laboratory

Russia
Phone number: +7(495)979-12-57
E-mail: support@mhdd.ru
Website: http://www.mhdd.ru

Norman Data Recovery Service

Netherlands
Head office
Diamantlaan 4a
2132 WV Hoofddorp

Phone number: +31-(0)23-78 90 244
Fax number: +31-(0)23-5612670
E-mail: datarecovery@norman.nl
Website: http://www.norman-datarecovery.nl

Belgium
Grote Baan 119/2
3511 KURINGEN

Phone number: +32-(0)11 323 022
Fax number: +32-(0)24027180
E-mail: datarecovery@norman.nl
Website: http://www.norman-datarecovery.be

Ontrack Data Recovery – Europe

Austria
Kroll Ontrack GmbH
Zweigniederlassung Österreich
Landstraßer Hauptstraße 71/2
A-1030 Wien
Österreich
Toll Free: 0800 644 150
Phone number: +43 (0)1 717 28 380

Belgium
Kroll Ontrack Sarl
Pegasuslaan 5
1831 Diegem
Belgique
Phone number: +32 (0)2 709 20 41

Denmark
Ibas Danmark ApS
H. P. Christensensvej 1
3000 Helsingør
Danmark
Phone number: +45 70 22 34 00

Finland
Kroll Ontrack – Ibas

Läkkisepäntie 11
00620 Helsinki
Finland
Phone number: +358 9 2727 210

France
Kroll Ontrack
2 Impasse de la Noisette
91371 Verrieres-le-Buisson Cedex
France
Toll Free: 0800 10 12 13
Phone number: +33 1 69 53 66 99

Germany
Kroll Ontrack
Hanns-Klemm-Straße 5
71034 Böblingen
Deutschland
Toll Free: 0 800 10 12 13 14
Phone number: +49 (0)7031 644 0

Ireland
Kroll Ontrack
Marsh House
25-28 Adelaide Road
Dublin 2
Ireland
Toll Free: 1800 930 183
Phone number: +353 (0)1 6048250

Italy
Kroll Ontrack Srl

Via Lario, 1
22070 Fenegró (CO)
Italy
Toll Free: 800 44 00 33
Phone number: +39 031 3525611

Netherlands
Kroll Ontrack
Holland Office Center
Kruisweg 825c
2132 NG Hoofddorp
Nederland
Toll Free: 0800 5 765 565
Phone number: +31 (0)23-5673030

Norway
Kroll Ontrack – Ibas
Postboks 1250
Arkoveien 14
2206 Kongsvinger
Norge
Toll Free: 810 10 100
Phone number: 47 62 81 01 00

Poland
Ontrack Sp. z o.o.
ul. Jana III Sobieskiego 11
40-082 Katowice
Polska
Toll Free: 0 800 90 90 90
Phone number: + 48 (32) 77 999 99

Russian Federation

Phone number: +7 495 229 44 38

Spain
Kroll Ontrack Iberia S.L.
C. Anabel Segura 7 1ª Planta, Oficina B
28108 Alcobendas
Madrid
España
Toll Free: 900 112 012

Sweden
Kroll Ontrack – Ibas
Märstagatan 4
753 23 Uppsala
Sverige
Phone number: +46 (0)18 10 44 40

Switzerland
Kroll Ontrack S.a.g.l.
Piazza Boffalora 4
P.O.Box 191
6830 Chiasso 3 Boffalora
Suisse
Toll Free: 0800 880 100
Phone number: +41 (0)91 682 86 92

Kroll Ontrack Sagl
Hertistraße 25
28304 Wallisellen
Switzerland
Toll Free: 0800 880 100
Phone number: +41 (0)44 877 30 90

United Kingdom
Kroll Ontrack Limited
The Pavilions1 Weston Rd Kiln Ln
Epsom Surrey KT17 1JG
United Kingdom
Toll Free: 0800 243 996
Phone number: +44 (0)1372 741 999

Recovery Labs

Spain
Parque Empresarial Euronova III
Ronda de Poniente 4
CP: 28760 Tres Cantos
Madrid ESPAÑA
Phone number: 902 109 009/ +34 91 804 94 23
Fax number: 902 199 009/ +34 91 804 94 63
irl@recoverylabs.com

Germany
An der Welle, 4
PLZ: 60322
Frankfurt ALEMANHA
Phone number: +49 (0)69 7593 8454
Fax number: +49 (0)69 7593 8200
irl@recoverylabs.net

Italy
Via Torino 2, 4º Piano
CAP: 20123
Milano ITALIA
Phone number: +39 02 72 54 64 72
Fax number: +39 02 72 54 64 00
irl@recoverylabs.it

Brasil
Rua Willy-Aureli, 623
04789-090 Interlagos
São Paulo S.P. BRASIL
Phone number: (011) 5667-9569
sac-brasil@recoverylabs.com

Portugal
Avenida da Liberdade, 110, 1º Andar
CP: 1269-046
Lisboa PORTUGAL
Phone number: +351 21 340 46 35
Fax number: +351 21 340 45 75
irl@recoverylabs.pt

France
La Grande Arche – Paroi Nord – 14/15 Floor
CP: 92044 La Defense
Paris FRANCE
Phone number: +33 (0) 1 40 90 31 23
Fax number: +33 (0) 1 40 90 31 01
irl@recoverylabs.fr

APAC Data Recovery Partners:
(Australia,New Zealand,Pacific Islands,Asia,China)

CBL Data Recovery Technologies

Australia
5 / 180 Anzac Ave.
Redcliffe, Queensland
Australia 4020
Local Phone number: (07) 3283.3303

China
58 Sanlihe Road
Beijing, P.R. China
100045
Phone number: (0086 10) 68 55 70 58

Singapore
2 No.51, Changi Business Park Central 2
Unit #08-08
The Signature
Singapore, 486066
Phone number: +65 65880261
Fax number: +65 65880484

India
No 10, Sadanand CHS
St. Anthony’s Street
Kalina, Mumbai
400098
India
Tel.: 22 26651499

Japan

3-4-17 Kudan-Minami
Chiyoda-ku
Tokyo 102-0074
JAPAN

Ontrack® Data Recovery

Australia
Kroll Ontrack

28 Donkin St Ste 8
West End Queensland
Australia
Toll Free: 800 872 259
Phone number: +61 7 3255 1199

Hong Kong
Kroll Ontrack (HK) Ltd.
1701-02 Central Plaza,
18 Harbour Road
Wanchai
Hong Kong
Toll Free: 800 930 324

Japan Tokyo
182 Shinkoh, Iruma,
Saitama, 358-0055 Japan
Phone number: +81 (0)42-932-6365
Toll Free: 0120 413 374
Fax number: +81 (0)42-932-6370

Singapore
Kroll Ontrack Singapore Pte. Ltd.
Nordic European Centre
3, International Business Park
#02-17
Singapore 609927
Toll Free: 1800 872 2599

Shanghai Myung Information Technologies Co.,Ltd.

Mr.Chen Du.
Phone number: 021-50815652
Toll Free: 800-820-7077
Cell Phone: 13816888477

Shanghai
Room 8017,Zhangyang Road,
Huacheng Building
Pudong New Area, Shanghai
Phone number: 021-50815662

Beijing
RM 814,office Tower 1,Junefield Plaza,
No.6 Xuanwumenwai Street,Beijing
Phone number: 010-63108100, 010-63108101

Shenzhen
Room 3010,Block A,Stars Plaza
No.38 Hongli Road,Shenzhen
Phone number: 755-83975075, 755-83975076

Guangzhou
Room 1311, Longhui Bldg., No. 5
Longkou East Rd., Tianhe, Guangzhou
Phone number:020-87596211,020-87584150

Vector Technology Company Limited

RM.3010, Block A, Stars Plaza, #38 Hongli Rd., Shenzhen, Guangdong P.R.China 518028
Phone number: 86-755-83975076
Fax number:86-755-83741954

Read More

Server Recovery Tips

Server Recovery Data disasters will happen. Accepting that reality is the first step in preparing a comprehensive disaster plan. Time is always against an IT team when a disaster strikes, therefore the details of a disaster plan are critical for success.

Here are some suggestions from Ontrack Data Recovery engineers of what not to do when data disasters occur:

  • In a disaster recovery, never restore data to the server that has lost the data – always restore to a separate server or location.
  • In Microsoft Exchange or SQL failures, never try to repair the original Information Store or database files – work on a copy.
  • In a deleted data situation, turn off the machine immediately. Do not shut down Windows – this will prevent the risk of overwritten data.
  • Use a volume defragmenter regularly.
  • If a drive fails on RAID systems, never replace the failed drive with a drive that was part of a previous RAID system – always zero out the replacement drive before using.
  • If a drive is making unusual mechanical noises, turn it off immediately and get assistance.
  • Have a valid backup before making hardware or software changes.
  • Label the drives with their position in a RAID array.
  • Do not run volume repair utilities on suspected bad drives.
  • Do not run defragmenter utilities on suspected bad drives.
  • In a power loss situation with a RAID array, if the file system looks suspicious, or is unmountable, or the data is inaccessible after power is restored, do not run volume repair utilities.
Read More

How to Fix Windows XP Damaged Boot Sectors?

image The master boot record (MBR) is a small program typically located on the first sector of the hard drive.

It examines the partition table to determine which partition to boot first and then executes the proper commands to run the operating system installed on that partition. If the boot sector becomes corrupt or is overwritten by another operating system, Windows XP will not be able to load. Fortunately, the Windows XP installation CD contains an application that can fix damaged boot sectors.

  • Place the Windows XP CD into the optical drive, and then restart the computer. Enter the BIOS (usually by pressing “F1,” “F2,” or the “Delete” key) and set the system to boot from the optical drive first. Refer to your owner’s manual if necessary. Save the BIOS settings and allow the computer to restart. When prompted, press any key to boot from the Windows XP CD. If you do not press a key at the prompt, the computer will attempt to boot into the hard drive instead of the CD.
  • Click Enter > F8 to accept the Windows XP license agreement. Press “R” to enter the Recovery Console after the Windows XP setup screen appears. Select the drive that contains Windows XP when asked “Which Installation Would You Like to Log Onto?” (usually “1: C:\WINDOWS”), and then press “Enter.”
  • Enter your Windows XP administrator password when prompted, and then press “Enter.” If you do not have a password, leave the box blank and press “Enter.”
  • Type “fixmbr” (omit the quotes) at the command prompt then press “Enter.” The “fixmbr” utility will overwrite and repair the damaged boot sector. After the process is complete, remove the Windows XP CD and restart the computer.

    Note: Some computer viruses are designed to corrupt the master boot record. Keep your antivirus software updated, and set the program to run a full system scan daily.

    How to Create A Windows Xp Boot Record?

  • Place the Windows XP installation CD in your computer’s CD drive and start the computer. The computer will use the information on the CD to start, instead of trying to start using information from the missing boot record on the computer’s hard drive.
  • Follow the prompts in the Recovery Console setup process. Type “R” when the Welcome to Setup screen is displayed. This selects the repair and recovery functions of the Recovery Console.
  • Select the operating system you want to repair and enter the administrator password for that operating system if prompted. The Recovery Console will next display a command prompt.
  • Type “fixmbr” at the command prompt, then press the “Enter” key. This starts the process of creating a new master boot record for your computer’s hard drive.
  • Remove the Windows XP product CD from the CD drive and restart your computer when the repair process is finished.

    How to Restore a Vista Boot Record?

  • Open a DOS prompt. Click the Windows “Start” button and select “Run.” In the textbox, type “cmd” and press “Enter.”
  • Execute Bootsect.exe. In the DOS window, type “Drive:\boot\Bootsect.exe /NT60 All.” Replace “Drive” with the drive letter of your Windows installation. For most people, this location is “C.”
  • Run “Bcdedit.exe” to edit the boot.ini file. To edit the file, type the following into the DOS prompt: Drive:\Windows\system32\Bcdedit /create {ntldr} /d “Description for earlier Windows version”
    “Drive” is the location of the Windows installation files as in Step 2.
    “Description for earlier Windows version” is replaced with any text, but the typical entry is your previous operating system, such as “Windows XP” or “Windows 2003”
  • Restart the computer.
Read More

How to Install A (PATA) Hard Disk Drive?

Step 1. Opening The Computer Case

Important: Each computer has a different way of opening the case and location of the hard disk drive. Refer to the user’s manual of your computer for detailed instructions.

Warning: The following procedure listed below will have you working within the chassis of the system. Following a few simple rules will keep you and your hardware safe.

1. Always power OFF your computer and disconnect the power cable before opening the case.

2. Always use an anti-static wrist strap before connecting or disconnecting anything within your computer.

Step 2. Installing The Hard Disk Drive

3. When the hard disk drive is level with the hard drive rack, gently push it in place without exerting too much force. Tighten the hard disk drive in place using the screws supplied with the product.

Note: If screws other than those supplied are used, the PCB board of the hard disk drive may get damaged and cause the hard disk drive to malfunctio.

Step 3. Making Your Connections

4. Line the key on the UDMA cable with the opening on the hard disk drive.

Note: Make sure the cable is not inserted in reverse since this can damage the connector and hard disk drive. Do not force or rock the connection into it’s socket on the hard disk drive. Push it in straight until it is seated.

Pata UDMA and Power Cable Connections

5. Line the Molex power cable connector with the opening on the hard disk drive.

Note: Make sure the cable is not inserted in reverse since this can damage the connector and hard disk drive. Do not force or rock the connection into it’s sockets on the hard disk drive. Push it in straight until it is seated.

Read More

Free Hard Disk Drive Diagnostic Utility For Samsung Hard Drive

Samsung Free Hdd Diagnostic Tool Note: The following free hard disk drive utilities and diagnostic tools are only for Samsung Hard Disk Drives. Using any of these utilities on a hard disk drive that was not manufactured by Samsung will have adverse effects on that hard disk drive.

Hardware Utilities

Disk Manager provides support for Dynamic Drive Overlay, which will allow older BIOSes to support large-capacity hard drives. Disk Manager can also partition the drive. (Note: Registration information needed for downloading)

  • Disk Manager for FDD
  • Disk Manager for CD Rom

Hardware Diagnostics

There are three utilities depending on the model of your hard disk drive for diagnosing hardware problems and performing low-level formats:

SHDIAG is a hardware diagnostic for older Samsung hard drives. Backing up data before using SHDIAG is strongly advised.

Hard Disk Drive Series

Model Number

Spinpoint V20400

SV4084D, SV3063D, SV2042D, SV1021D, SV0761D

Spinpoint V15300

V3064D, SV2043D, SV1532D, SV0761D

Spinpoint V10200

SV2044D, SV1533D, SV1022D, SV0511D

Spinpoint V9100

SV1824D, SV1363D, SV0842D, SV0431D

Other Older Models

SV2046D, SV1705D, SV1364D, SV1023D, SV0682D, SP1828D, SP1366D, SP0914D, SV1296D, SV0844D, SV0643D, SV0432D

HUTIL is made with the aim of testing a Samsung hard disk drive while it is installed inside a PC, regardless of the status of user’s operating system. It is a good idea to test drive that is having problems with HUTIL to see if it is truly defective to avoid possible unnecessary troubleshooting or factory service. HUTIL includes EraseHDD, a utility that will perform a low-level format including the partition table and Master Boot Record.

Hard Disk Drive Series

Model Number

SpinPoint F1

HD161GJ, HD162GJ, HD251HJ, HD252HJ, HD322HJ, HD501IJ, HD502IJ, HD752LJ, HD753LJ, HD102UJ, HD103UJ

SpinPoint F1 CE

HA251HJ, HA321HJ, HA501IJ, HA751LJ, HA101UJ

SpinPoint F1 RAID

HE322HJ, HE502IJ, HE753LJ, HE103UJ

SpinPoint S250

HD162HJ, HD200HJ, HD250HJ

SpinPoint S250 CE

HA250HJ, HA161HJ

SpinPoint N2

HS030GB, HS031GA, HS040HB, HS041HA, HS04THB, HS060HB, HS061HA, HS06THB, HS080HA, HS080HB, HS081HA, HS082HB, HS10TJB, HS120JB, HS122JB

SpinPoint N1

HS122JC, HS08XJC, HS10XJC/M

SpinPoint M5

HM201JI, HM250JI, HM061GI, HM080GI, HM121HI, HM160HI, HM160HC, HM121HC, HM080GC, HM061GC

SpinPoint MH80S

HM08HHI, HM12HII, HM16HJI

SpinPoint S166

HD041GJ, HD081GJ, HD042GJ, HD082GJ, HD120HJ, HD161HJ

SpinPoint T166

HD251KJ, HD252KJ, HD320KJ, HD321KJ, HD402LJ, HD403LJ , HD500LJ, HD501LJ, HD080GJ, HD160HJ, HD300JJ, HD301JJ, HD320JJ, HD321JJ

SpinPoint T133

HD250KD, HD250KJ, HD300LD, HD300LJ, HD301LJ, HD320LD, HD320LJ, HD321LJ, HD400LD, HD400LJ, HD401LJ

SpinPoint P80SDH

HD121IJ, HD161JJ

SpinPoint P80SD

HD040GJ, HD080HJ, HD120IJ, HD160JJ

SpinPoint M80

HM040GI, HM040GC, HM061HC, HM062HI, HM080HI, HM080HC, HM100II, HM100IC, HM120II, HM120IC, HM160JI, HM160JC

SpinPoint M60

HM020GC,HM021GI, HM030GI, HM030GC, HM040HC, HM041HI, HM042HI, HM060HI, HM060HC, HM061HI, HM080II, HM080IC, HM081II, HM100JI, HM100JC, HM101JI, HM120JI, HM120JC, HM121JI

SpinPoint P80VEM

SP0451N, SP0842N

SpinPoint P80VEA

SP0822N

SpinPoint P80M

SP1243N, SP1253N, SP1644N, SP1654N

SpinPoint P80A

SP0431N, SP0441N, SP0832N, SP1223N, SP1233N, SP1624N, SP1634N

SpinPoint P120

SP2014N, SP2514N, SP2004C, SP2504C

SpinPoint V120

HA250JC, HA200JC, SP2504N, SP2004N, SP1603N, SP1613N, SP1202N, SP1212N, SP1603C

SpinPoint M40

MP0302H, MP0402H, MP0603H, MP0804H,HM040HI, HM060II, HM080JI

SpinPoint P80

SP0211N, SP0401N, SP0612N, SP0802N, SP0812N,SP1203N, SP1213N, SP1604N, SP1614N, SP0812C,SP1213C, SP1614C, SP0822N

SpinPoint V80

SV0401N, SV0802N, SV1203N, SV1604N, SV0211N, SV0612N, SV0802E, SV1203E, SV1604E

SpinPoint VL40

SV0211H, SV0311H, SV0401H, SV0411N, SV0211N

SpinPoint PL40

SP0411N, SP0211N, SP0311N, SP0411C

SpinPoint V60

SV1204H, SV0813H, SV0602H, SV0301H

SpinPoint P40

SP8004H, SP6003H, SP4002H, SP2001H, SP80A4H, SP60A3H, SP40A2H, SP20A1H

SpinPoint V40

SV8004H, SV6003H, SV4002H, SV2001H, SV8014H, SV6014H, SV6013H, SV4012H, SV3012H, SV2011H

SpinPoint V30

SV6004H, SV4003H, SV3002H, SV2002H, SV0802H

SpinPoint P20

SP4004H, SP3003H, SP2002H, SP1001H

SpinPoint V20400

SV4084H, SV3063H, SV2042H, SV1021H, SV0761H

  • HUTIL for FDD       
  • HUTIL for CD Rom

SUTIL is a utility for older Samsung hard drives that will format them and reset their DMA Modes.

Hard Disk Drive Series

Model Number

Spinpoint V20400

SV4084D, SV3063D, SV2042D, SV1021D, SV0761D

Spinpoint V15300

V3064D, SV2043D, SV1532D, SV0761D

Spinpoint V10200

SV2044D, SV1533D, SV1022D, SV0511D

Spinpoint V9100

SV1824D, SV1363D, SV0842D, SV0431D

Other Older Models

SV2046D, SV1705D, SV1364D, SV1023D, SV0682D, SP1828D, SP1366D, SP0914D, SV1296D, SV0844D, SV0643D, SV0432D

  • SUTIL for FDD

Data Advisor®

Data Advisor is a free hard disk drive diagnostic utility available from http://www.ontrack.com/dataadvisor/. Data Advisor quickly assesses the health of your hard disk drive, file structures, and computer memory by identifying problems that could cause data loss. Don’t worry if you can’t boot your system to Windows; Data Advisor is self-booting, so it runs even when your system won’t.

Note: Ontrack DataRecovery is not associated with Samsung, Inc.

Read More

How To Set The Jumper Setting On Samsung (PATA) Hard Disk Drive?

Setting The Jumper On Your Hard Disk Drive

Use the common jumper settings for Samsung hard disk drives that are listed below. Please verify the jumper setting by checking the label on your hard disk drive.

Important: If you partitioned and formatted your hard disk drive, with the General or 32 GB pin setting, and now need to use the opposite pin setting; remember to partition and format the drive again after changing the pin settings.

Configuring your Hard Disk Drive (Master, Slave, or Cable Select) – Setting the Jumper

  • If this is the only HDD in your computer, set the pin setting to Master.
  • If this is the second HDD in your computer, set the pin setting to Slave.
  • If this is the second HDD in your computer, and the first drive is set to Cable Select, set the pin setting to Cable Select.
  • If you are replacing the HDD in your computer, set the jumper setting to match that of the drive you are replacing.

Cable Select:

    • This setting is the default setting for PATA/IDE hard disk drives. With the Cable Select jumper setting, the BIOS determines whether a hard disk drive is Set as Master or Set as Slave by it’s position on the UDMA cable.
    • If the hard disk drive jumper is set to Cable Select and is connected to the black connector on the end of the UDMA cable, it is recognized as Set as Master for that PATA controller.
    • If the hard disk drive jumper is set to Cable Select and is connected to the grey connector on the middle of the UDMA cable, it is recognized as Set as Slave for that PATA controller.Note:When using Cable Select, your system must meet the following conditions:
      • Your systems host controller must support Cable Select.
      • Your hard drives must support Cable Select.
      • Your cable must support Cable Select.

Set as Master:

  • Use this setting if you are installing an additional hard disk drive to a single UDMA cable with a hard disk drive Set as Slave, jumper one hard disk drive to Set as Master, and the other to Set as Slave.
  • Use this setting if you are installing an additional hard disk drive to a single UDMA cable and the Cable Select setting is not recognized.


Set as Slave:

  • Use this setting if you are installing an additional hard disk drive to a single UDMA cable with a hard disk drive Set as Master, jumper one hard disk drive to Set as Master, and the other to Set as Slave.
  • Use this setting if you are installing an additional hard disk drive to a single UDMA cable and the Cable Select setting is not recognized.

32 GB Clip Setting:

Use this on computers manufactured before November 1998 when either you start up your computer and see the message, “Hard disk drive controller failure“, or your system stops responding during the boot process after installing a new drive. This occurs when the hard disk drive is too large for the BIOS to support.

Read More

How To Upgrade Firmware On Seagate Serial ATA Hard Drive?

FreeDOS Update Procedure

Firmware Update This is a walkthrough on how to upgrade the firmware on a Seagate Serial ATA hard drive.

(Firmware Update for STM3500320AS, STM3750330AS, STM31000340AS)

Note:  For best results during system startup, it is recommended to disconnect peripherals such as USB storage devices, printers, scanners, etc.

If your keyboard does not respond within FreeDOS, use a wired rather than a wireless keyboard.

      1. Boot up to the CD. Most systems will automatically boot to the CD if it is bootable. If it does not, please consult your system documentation on how to modify the system boot sequence.
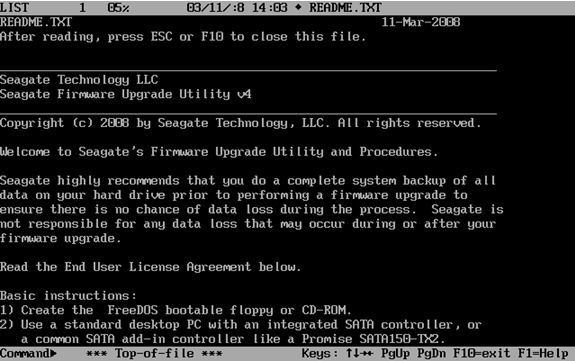
      2. After the system boots to the CD you will be presented with a README file.c
      3. Press ESC or F10 to proceed to the next step.Firmware Update
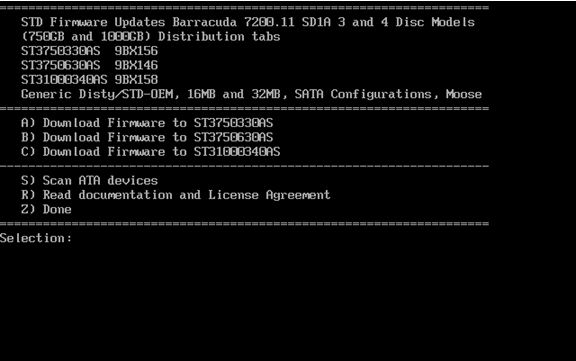
      4. To select the appropriate drive, press the corresponding key. In this example the letter “C” will start the download for the ST31000340AS. Please note that there are different versions of the firmware for each model of drives.Firmware Update
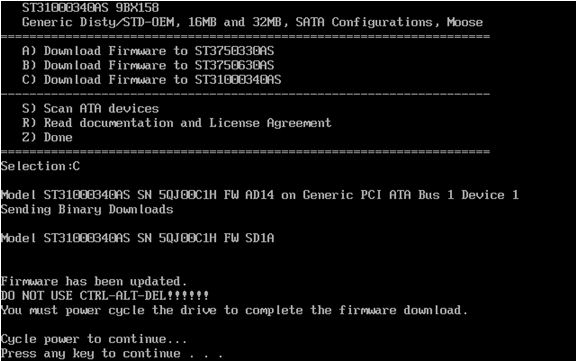
      5. Once the firmware update is complete, you will be prompted to turn your computer off by pressing any key.
        Note:A soft reset (Control-Alt-Delete) is not sufficient.
      6. Turn on your computer and remove the firmware CD to allow your system to boot normally into your operating system. Your drive has been updated.

General information: Scanning for devices

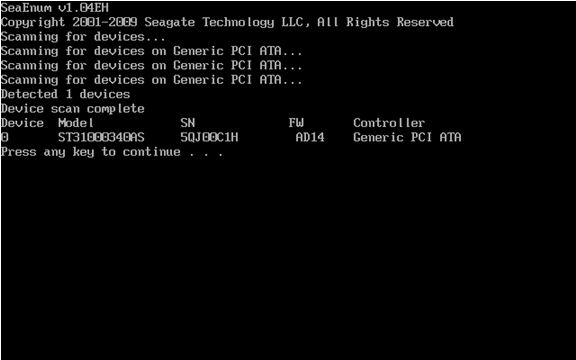
You can use the “Scan ATA device” by pressing the “S” key at the “Selection:” prompt to view Seagate drives which are detected.

The scan procedure will display only Seagate drives, and will display the current firmware revision loaded on the drive.

Firmware Update

Firmware Update for Macintosh

Can I update the firmware on my hard drive if it is installed in a Mac?

Yes, however it must be an Intel-based Mac (i.e. MacPro and iMac – with Intel inside). There are other models of Macs that have Intel processors such as the MacBook and MacBook Pro notebooks as well as the Mac Mini, but these drives have notebook (2.5 inch) drives which are not affected.

I have a PowerMac.  Can I update the firmware on my hard drive?

Older Macs that are PowerPC-based (PowerMac G3, G4, G5 and iMac G3, G4, and G5) are incompatible with the FreeDOS operating system which is required to perform the update.

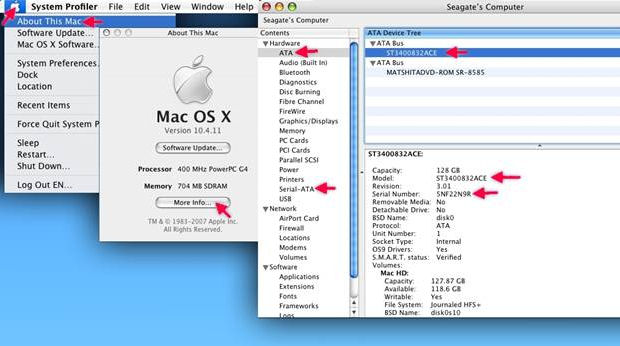
How to find your drive’s serial number and model number in Mac OS X

Firmware Update

  1. Choose the Apple from the menu.
  2. Choose “About this Mac”
  3. Choose ” More Info…”
  4. Choose the drive type: Serial ATA
  5. Highlight  the appropriate drive listed under the bus.
  6. Below you will see the Model and Serial number of the highlighted drive.

Instructions for updating firmware on an Intel based Mac.

  1. Download and burn the Firmware ISO that has been provided to you by Seagate for your drive(s)
  2. Burn the ISO to a CD.
  3. Insert the freshly burned CD back in to your Mac.
  4. Reboot
  5. After the chime, press and hold the Option key on the keyboard.
  6. Once you see the Apple with the spinning gear beneath, release the Option Key.At this point the system will come to a screen with pictures of hard drives and a CD; the CD should be named Seagate.
  7. Click on the CD
  8. Click on the arrow pointing to the right.
  9. At this point FreeDOS will boot. Follow the on screen instructions.

Firmware Download: FirmwareBase.com

Read More

Samsung Introduces High-Capacity 250 Gigabyte 1.8" Hard Drives

Samsung 250GB 1.8 Hard Drive Samsung announced its 250 Gigabyte (GB) 1.8 inch hard disk drive, the Spinpoint N3U which incorporates a native USB controller on its printed circuit board. This optimized design results in a smaller foot print, less power consumption and optimized performance, which is ideal for portable external storage devices. The Spinpoint N3U stores up to 125 Gigabytes per platter for a total 250GB data storage capacity.

Most external hard drives require the addition of a bridge circuit board to convert the hard drive’s PATA interface into a USB interface. Samsung’s N3U drive, however, uses a native USB interface and as such does not require this bridge board.

“The new high-capacity 1.8″ 250GB drive enhances Samsung’s product offerings and is ideal for consumers who require a small form factor, high capacity data storage, It is easy to carry around and it is designed to withstand a free fall drop of up to 50 centimeters and be resistant to a maximum shock incident of up to 1500G.” said Choel-Hee Lee, vice president of marketing Storage System Division, Samsung Electronics.

As a native USB interface device, the Spinpoint N3U eliminates possible points of failure due to loose cable connections and optimizes performance by eliminating the interrupt service time for the bridge board to convert PATA to USB signals. And the N3U 1.8″ drive also consumes about 40 percent less power than a 2.5″ hard drive of an equivalent capacity.

Samsung now ships industry leading areal density levels for all of its hard disk form factor products with up to 1.5 Terabyte for 3.5″ drives, 500GB for 2.5″ drives and 250GB for 1.8″ drives. The Spinpoint N3U comes in 120-, 160-, 200- and 250-GB capacities, the disk rotation speed is 3600rpm, and it supports a USB 2.0 interface. The drives are equipped with an 8MB cache memory. Initial shipments to OEMs are scheduled from mid-July with a MSRP at $199.00.

Read More

Does Your Hard Drive Need A Firmware Update?

Firmware Update Many thousands of hard drives enter the market with any given version of firmware in common.

Thousands of drives have the same firmware version when they are sold.
External, SATA, and ATA drives that are used in PCs and for personal storage pass through extensive testing before they leave the factory.  Therefore, they are not designed for firmware updates in the field.

Firmware updates

Performing a firmware update can be risky by itself even in the best of situations.  For example, a power outage during a firmware update carries a very good possibility of ruining the drive.  External, Serial ATA, and ATA drives are not designed for field firmware updates by end users.

Very often, system or device driver issues cause symptoms that are incorrectly called “firmware problems.”

What is firmware?

Firmware is defined as a computer program that is hard-coded into the hard drive and contains its basic operational storage programming.  Another way to think of it is that firmware is a software middleman that allows your hardware to talk to software (i.e., Windows operating systems, etc).  For a hard drive, firmware is a program that governs the behavior and factory settings, even the identity, of that drive.  Any drive that comes out of the factory and is in use in a computer or server has firmware installed on it from the factory.

What is the relationship between firmware and drivers?

Drivers tell the operating system how to behave. Firmware tells the drive how to behave. Seagate provides no drivers for most products in any modern Windows or MacOS operating system – the drivers must come from Microsoft, Apple, or the motherboard.

Why not just put firmware updates online with public links?

There are four main reasons:

  1. Field support for firmware updates involves robust and compatible tools, backwards compatibility and data safety.  These features are designed into Enterprise class SAS, Fibre Channel and SAS interface disc drives.Desktop and Mobile SATA and PATA drives are not designed for firmware updates in the field in the vast majority of cases.  Very often what looks like a newer version of firmware, by the number, may actually be incompatible with previous versions.  If incompatible firmware is copied to an earlier version of the same model, data loss or drive ruin will result.  Performing a firmware update can be risky by itself even in the best of situations.  For example, a power outage during a firmware update carries a very good possibility of ruining the drive.  This is why Seagate uses a warranty exchange process, if necessary, to update SATA and PATA drive firmware.
  2. In most cases, when a hard drive is thought to be malfunctioning, it is an operating system (i.e. Windows) issue or a problem with a software program.  Firmware is easy to blame when a hard drive does not perform as a user expects, when its installation does not proceed exactly as expected, or a myriad of other situations, or even when a drive diagnostic reports bad sectors.  In order to protect the user, Seagate restricts access to firmware updates.
  3. Some drives that still bear the Seagate name on the label but are actually the property of an Original Equipment Manufacturer (OEM) (such as Dell or Hewlett-Packard [HP]) might have unique firmware on them.  OEMs purchase large amounts of bare drives from Seagate and put their own firmware on them, at which point the drive is sold as part of a larger piece of equipment, such as a server or a personal or notebook computer.  Often the OEMs load specialized firmware in order to be able to build in performance enhancements that are specific to their product.However, sometimes these servers or computers are disassembled and the hard drives end up being sold separately from a third-party technology reseller or even on eBay, and because these drives have “Seagate” on the label and sometimes even the same model number (the “ST” number) as standard drives sold in a retail store, it can be easy to confuse the two.  The specialized firmware on some of these drives sometimes works outside of their original equipment and sometimes does not.  In very many cases, performing a firmware update with “standard” firmware would violate Seagate’s legal agreements with the OEM, thus voiding both the OEM and Seagate warranty, and carries a good possibility of ruining the OEM drive.
  4. Very seldom does a firmware update increase the drive’s performance. Most firmware updates are made available in order to solve a problem with timing, in order to synchronize with the timing of the system’s communication lines.

In summary, it is always best to seek other avenues of troubleshooting the hard drive and the surrounding system before resorting to questions of firmware.  If you suspect a drive may be defective, test it using Seatools.

Read More