Does Your Hard Drive Need A Firmware Update?

Firmware Update Many thousands of hard drives enter the market with any given version of firmware in common.

Thousands of drives have the same firmware version when they are sold.
External, SATA, and ATA drives that are used in PCs and for personal storage pass through extensive testing before they leave the factory.  Therefore, they are not designed for firmware updates in the field.

Firmware updates

Performing a firmware update can be risky by itself even in the best of situations.  For example, a power outage during a firmware update carries a very good possibility of ruining the drive.  External, Serial ATA, and ATA drives are not designed for field firmware updates by end users.

Very often, system or device driver issues cause symptoms that are incorrectly called “firmware problems.”

What is firmware?

Firmware is defined as a computer program that is hard-coded into the hard drive and contains its basic operational storage programming.  Another way to think of it is that firmware is a software middleman that allows your hardware to talk to software (i.e., Windows operating systems, etc).  For a hard drive, firmware is a program that governs the behavior and factory settings, even the identity, of that drive.  Any drive that comes out of the factory and is in use in a computer or server has firmware installed on it from the factory.

What is the relationship between firmware and drivers?

Drivers tell the operating system how to behave. Firmware tells the drive how to behave. Seagate provides no drivers for most products in any modern Windows or MacOS operating system – the drivers must come from Microsoft, Apple, or the motherboard.

Why not just put firmware updates online with public links?

There are four main reasons:

  1. Field support for firmware updates involves robust and compatible tools, backwards compatibility and data safety.  These features are designed into Enterprise class SAS, Fibre Channel and SAS interface disc drives.Desktop and Mobile SATA and PATA drives are not designed for firmware updates in the field in the vast majority of cases.  Very often what looks like a newer version of firmware, by the number, may actually be incompatible with previous versions.  If incompatible firmware is copied to an earlier version of the same model, data loss or drive ruin will result.  Performing a firmware update can be risky by itself even in the best of situations.  For example, a power outage during a firmware update carries a very good possibility of ruining the drive.  This is why Seagate uses a warranty exchange process, if necessary, to update SATA and PATA drive firmware.
  2. In most cases, when a hard drive is thought to be malfunctioning, it is an operating system (i.e. Windows) issue or a problem with a software program.  Firmware is easy to blame when a hard drive does not perform as a user expects, when its installation does not proceed exactly as expected, or a myriad of other situations, or even when a drive diagnostic reports bad sectors.  In order to protect the user, Seagate restricts access to firmware updates.
  3. Some drives that still bear the Seagate name on the label but are actually the property of an Original Equipment Manufacturer (OEM) (such as Dell or Hewlett-Packard [HP]) might have unique firmware on them.  OEMs purchase large amounts of bare drives from Seagate and put their own firmware on them, at which point the drive is sold as part of a larger piece of equipment, such as a server or a personal or notebook computer.  Often the OEMs load specialized firmware in order to be able to build in performance enhancements that are specific to their product.However, sometimes these servers or computers are disassembled and the hard drives end up being sold separately from a third-party technology reseller or even on eBay, and because these drives have “Seagate” on the label and sometimes even the same model number (the “ST” number) as standard drives sold in a retail store, it can be easy to confuse the two.  The specialized firmware on some of these drives sometimes works outside of their original equipment and sometimes does not.  In very many cases, performing a firmware update with “standard” firmware would violate Seagate’s legal agreements with the OEM, thus voiding both the OEM and Seagate warranty, and carries a good possibility of ruining the OEM drive.
  4. Very seldom does a firmware update increase the drive’s performance. Most firmware updates are made available in order to solve a problem with timing, in order to synchronize with the timing of the system’s communication lines.

In summary, it is always best to seek other avenues of troubleshooting the hard drive and the surrounding system before resorting to questions of firmware.  If you suspect a drive may be defective, test it using Seatools.

Does Your Hard Drive Need A Firmware Update? Read More »
How to install, partition, format, or reformat a WD external hard drive in Windows XP?

To partition and format the external hard drive with Disk Management, follow these steps:

  1. To begin, access Disk Management by right-clicking on My Computer and left-click on Manage. If you don’t have My Computer on your desktop, it should be located in your Start Menu.
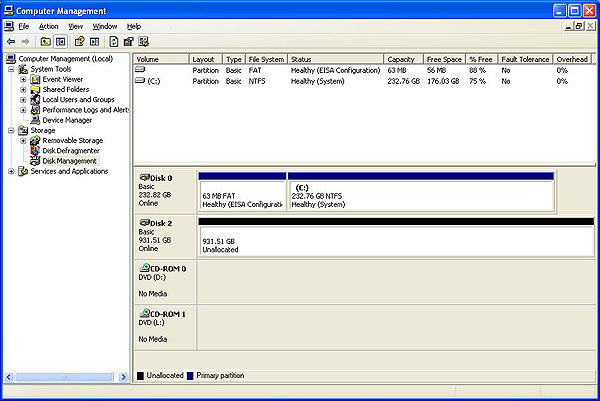
  2. The Computer Management window will open. It will have two panes. On the left pane, there will be a list of items. Under Storage, click on Disk Management. This will load a right pane with 2 windows on the right side. You may need to maximize the Computer Management window to see all your drives.
  3. In the lower right pane, you should see a graphical list of all available drives or devices. Find the drive listing that corresponds to the drive that you want to partition and format. It typically has a black barindicating unallocated space.If there is a blue bar, then the drive has already been partitioned and formatted. Make sure, that if you have data on the drive, you back it up before proceeding. Once you are ready to proceed, right-click on the blue bar and choose Delete Partition… You will get a pop-up window asking you if you really want to delete the partition. Click Yes. The bar should now be black.

    Image

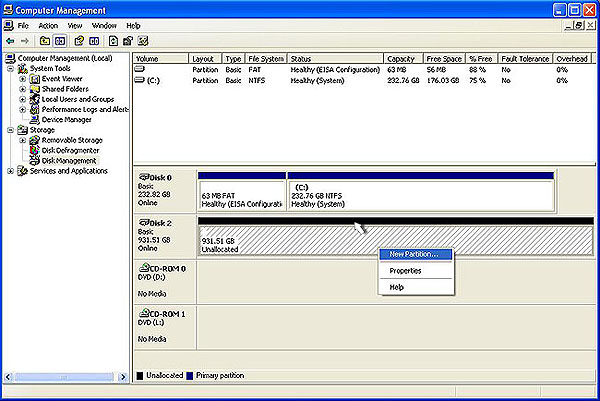
  4. Right-click on the black bar to see a menu of available options. Select New Partition…Image
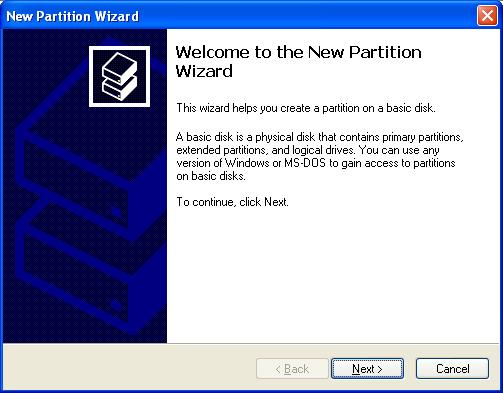
  5. The Welcome to New Partition Wizard will come up. Click on Nextto proceed to the next screen.Image
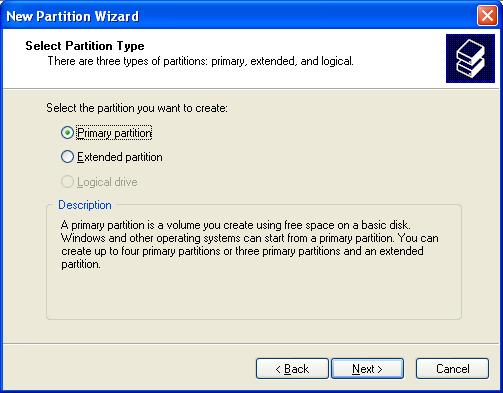
  6. Choose Primary Partition and press Next.Image
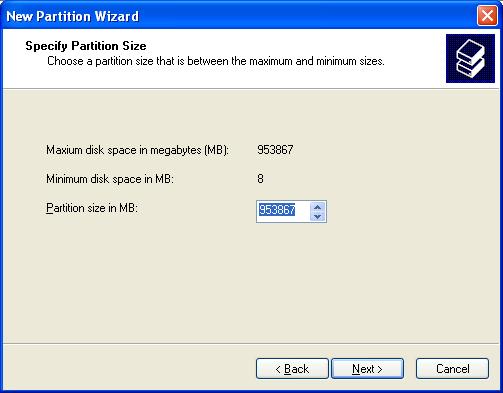
  7. This is where you can set a partition on the drive. By default Windows chooses the whole drive so click on Next.Note: You can also chose to create more than one partition by choosing a smaller size for this partition. Later, you can come back to this window, and create another partition on this drive, by repeating this process.

    Image

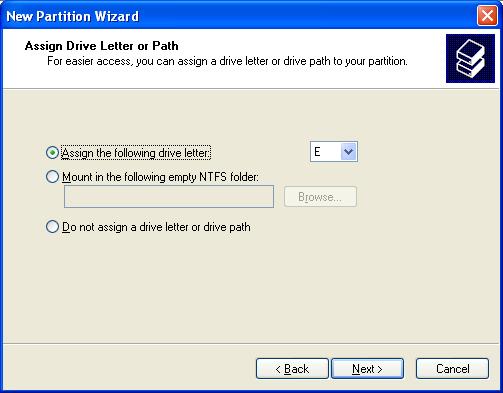
  8. Choose the drive letter that you want the drive to have. By default Windows will choose the next available drive letter. Then click on Next.Image
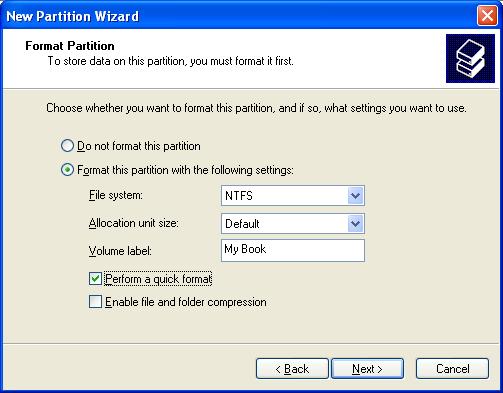
  9. This is the format screen. Make sure that the File System is set to NTFS. In the Volume Label field you can give the drive a name if you want. Check the box that says Perform a Quick Format so that the drive will be formatted quickly. Make sure to leave the Allocation unit size to Default, and then click Next.Image
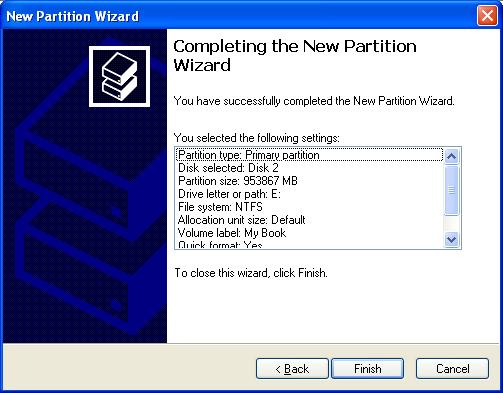
  10. This screen gives you a confirmation of all the steps that you just went through. Click on Next.Image
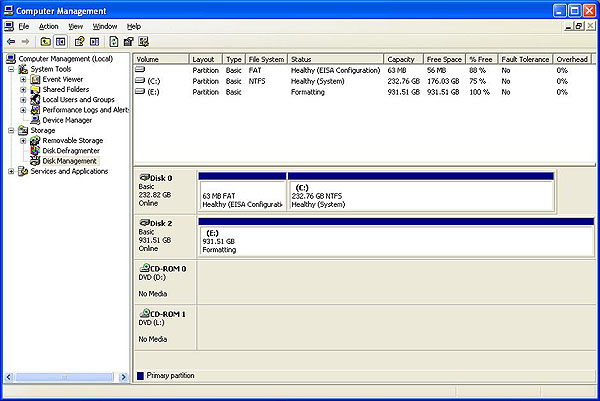
  11. The listing for the drive (Disk 2 in the picture below) will say Formattingas it formats the drive.Image
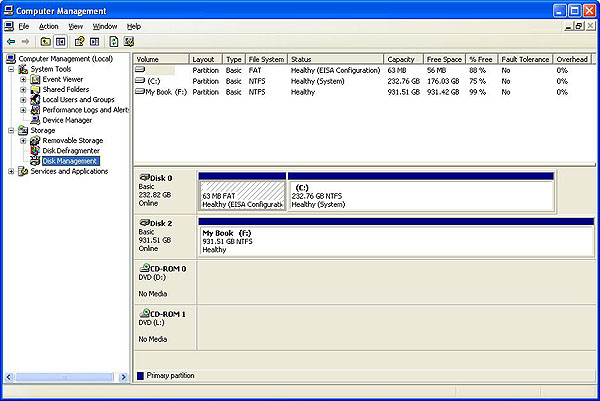
  12. When the drive is done (Disk 2 in the picture below) the bar will be blue and the drive will say Healthy.Image

Note: Once the drivers are installed, you can follow the directions to partition and format the hard drive, if necessary.

How to install, partition, format, or reformat a WD external hard drive in Windows XP? Read More »

How To Create A BlackArmor Recovery CD Or ISO Image?

blackarmor recovery cd I lost my BlackArmor Recovery CD…is there a quick way to create one?

The Seagate BlackArmor Backup software has a utility within it called the Bootable Rescue Media Builder. This utility has the ability to do the following:

  • Create a Seagate BlackArmor Recovery CD.
  • Create an ISO Image of the Seagate BlackArmor Recovery CD that can then be used to create a Recovery CD at a later time.

To Create a BlackArmor Recovery CD

Prerequisite: One (1) blank CD-ROM

  1. Click StartAll ProgramsSeagateBlackArmor BackupBootable Rescue Media Builder.
  2. (For Windows Vista only) A User Account Control (UAC) window opens asking for permission to precede. Click Continue.
    The Welcome to BlackArmor Media Builder window opens.
  3. Click Next. The Rescue Media Contents Selection window opens.
  4. Check the Top-Level, BlackArmor Backup box.
  5. Click Next. The Bootable Media Options window opens.
  6. Click Next. The Rescue Media Selection window opens. Select the CD-ROM drive from the list of options.
  7. Click Next. A Media Parameters/Summary window opens.
  8. At this time (if you have not already done so), insert the blank CD-ROM in your System’s CD/DVD ROM drive bay.
  9. Click Proceed. At this point the Seagate BlackArmor Recovery CD creation starts processing (this may take a few moments to complete).
  10. When finished, an information window opens, notifying you that the process is complete.
  11. Click OK. The BlackArmor Recovery CD is created.

Video Tutorial – Using Bootable Rescue Media Builder to Create a BlackArmor Recovery CD.

To Create an ISO Image of the BlackArmor Recovery CD

  1. Click StartAll ProgramsSeagateBlackArmor BackupBootable Rescue Media Builder.
  2. (For Windows Vista only) A User Account Control (UAC) window opens asking for permission to precede. Click Continue.
    The Welcome to BlackArmor Media Builder window opens.
  3. Click Next. The Rescue Media Contents Selection window opens. Check the Top-Level, BlackArmor Backup box.
  4. Click Next. The Bootable Media Options window opens.
  5. Click Next. The Rescue Media Selection window opens.
  6. Select the ISO Image drive from the list of options.
  7. Click Next. The Destination File Selection window opens.
  8. Browse to the location where you want to save/store the ISO Image.
    Optional – you can opt to change the default filename too.
  9. Click Next. A Media Parameters/Summary window opens.
  10. Click Proceed. At this point the Seagate BlackArmor Recovery CD creation starts processing (this may take a few moments to complete).
  11. When finished, an information window opens, notifying you that the process is complete.
  12. Click OK. The BlackArmor Recovery CD is created.

Video Tutorial – Using Bootable Rescue Media Builder to Create a BlackArmor Recovery ISO Image

How To Create A BlackArmor Recovery CD Or ISO Image? Read More »

What is Error Recovery Control?

Description:

Error Recovery Control Offered on Barracuda ES and ES.2 family SATA enterprise drives, Error Recovery Control (ERC) is a subset of the Smart Command Transport (SCT) command set, enabling the host to set a soft time limit for specific commands (reads and writes).
Advantages:

  • Ensures hosts don’t mistakenly assume busy drives are dead and need maintenance; averts unwarranted drive swaps and RAID rebuilds
  • Boosts RAID performance by flagging disks slowed by errors; alerts need for data reconstruction and rewrite to resolve disk errors, restore speed
  • Unavailable in desktop-class drives (due to less demanding environment)

Key Component:  Soft Time Limit

What is Error Recovery Control? Read More »

System Recovery Procedures for NAS 4100

NAS 4100 Recovery Overview: The NAS 4100 comes with 4 separate hard drives. In the event of a hard drive failure you will be notified via an Email alert and/or Web UI. RAID regeneration can take up to 30 minutes depending on which drive has failed.

To check status of your NAS 4100 drives use Logical Disk Manager. To access the Disk Management utility:

    1. Open “MaxNeighborhood” and double-click on the NAS 4100 that you want to create the folder on.
    2. Login to NAS 4100 with the appropriate Administrator (or Administrator equivalent) username and password.
    3. Click on “Administer this server appliance”. Upon doing this, the NAS 4100 Home Page will appear in the Browser.NAS 4100 Recovery
    4. From the Home Page, click on the “Disks and Volumes”Link. At this point, the Disks and Volumes page will be displayed in the Browser.NAS 4100 Recovery

      NOTE: You may click on the Graphical Link OR the Java Text Link…either will suffice.

    5. Click on the “Disks and Volumes”link.NAS 4100 Recovery

      NOTE: You may click on the Graphical Link OR the Java Text Link…either will suffice.

    6. Click the “Yes”button in the VBScript: Disk Configuration Window.NAS 4100 Recovery
    7. The Windows 2000 Management Snap-In will be displayed in your browser.NAS 4100 Recovery

      The NAS 4100 hard drives are configured as; Disk 0, Disk 1, Disk 2 and Disk 3. Each one of these hard drives, if lost, exhibits slightly different behavior.

Disk Failure | Recovery Time

Disk 0 | 30 Minutes

Disk 1 | 06 Minutes

Disk 2 | 30 Minutes

Disk 3 | 15 Minutes

System Recovery Procedures for NAS 4100 Read More »

The Easiest Way To Erase A Maxtor OneTouch III HardDrive

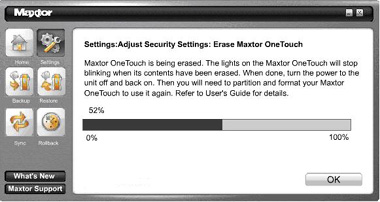
erase harddriveIf you have forgotten your password, you can attempt to reenter it or to recover it, by answering a question that you setup originally when you created your password. You are allowed 5 attempts before you must turn off your drive and turn it back on, to try again at which point you can try an additional 5 times. If you are not able to recover your password, the only other way to unlock the drive is to erase all of its contents.

  1. Click the Settings button. This will open the Settings for My Maxtor OneTouch menu.
  2. Click the Adjust Security Settings button.
    Erase Harddrive
  3. You will see the following. Click Erase Maxtor OneTouch
    The Erase Drive feature is Data Destructive.

    Erase Harddrive
  4. Click Confirm to proceed, and then click Yes to start the Erase process.
    This process can take up to 1 hour to complete. Do not stop the erase process.Erase Harddrive
  5. When finished you will be notified that the drive is erased. Click OK.
    Erase Harddrive
  6. Reconnect the Maxtor OneTouch III drive from the system. Upon doing so, you will be prompted to Format the drive.
    Erase Harddrive

The drive will be formatted into a NTFS format. Once it has been formatted you will need to go back and reset up any backups you might have had setup.

The Easiest Way To Erase A Maxtor OneTouch III HardDrive Read More »

The BlackArmor Recovery CD boots to a dark or barely readable screen

BlackArmor Recovery CD Some video cards and monitors may not correctly display the BlackArmor recovery interface.   Some issues that have been observed are noted below, in some cases temporarily switching to a different monitor helps resolve the issue, in other cases it may be necessary to download a new CD image that has different display settings or drivers that will work with certain video cards.

Monitors:

If you are using an affected monitor, temporarily switch to a different monitor to perform the restore.

ViewSonic model VX2835 WM display

Characters and buttons are nearly black and not readable.

Videos cards:

If you are using an affected monitor, please contact technical support via our web form to receive an updated CD image.  Be sure to include the brand and model of your video card.

Intel(R) 82845G Graphics Controller

Colors are negative images and may be difficult to read.

The BlackArmor Recovery CD boots to a dark or barely readable screen Read More »

FreeAgent XTreme drive doesn’t wake up from hibernation when connected via USB?

FreeAgent XTreme drive doesn’t wake up from hibernation when connected via USB.

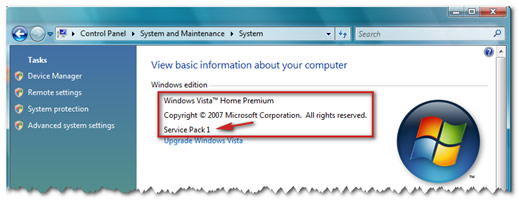
With the original build of Windows Vista some computers may lose connection with the USB external drive after waking up from hibernation.

This issue is addressed in Vista Service Pack 1.

To determine what version of Windows Vista you have, follow these steps:

  1. Click the Windows (Start) Button.
    Image
  2. In the Search bar, type Welcome center and open the Welcome Center.
  3. In the upper right of the screen, click the button that says Show more details.
    (Click to expand)
    Image
  4. On that screen it should say what version of Vista is running, including the service pack level.
    (Click to expand)
    Image

If no service pack is listed, please view Microsoft Knowledge Base article 935791 for instructions on how to obtain Service Pack 1.

FreeAgent XTreme drive doesn’t wake up from hibernation when connected via USB? Read More »

Install FreeAgent Mobile Recovery Software To Your FreeAgent Go drive

FreeAgent Go drive The following procedure will install the FreeAgent Mobile Recovery software to your FreeAgent Go drive. The FreeAgent Mobile Recovery is offered so that you can reload software to your Freeagent drive in the event that the original software becomes lost or corrupted. The procedure will return the software to its original, default state; it is recommended that you backup any/all critical data before continuing.

Procedure:

  1. Download/extract the mobile-recovery-efigs.zip to your Windows Desktop
  2. Double-click setup-mobile-recovery x.x.xx EFIGS.exe.
    Note: The “x” will be denoted by the current revision number
  3. You may see an Open File – Security Warning generated by your operating system; click Run to continue.
    Windows Vista Users – If prompted with an User Account Control window, click Continue. Otherwise, proceed to the next step.
  4. The Choose Setup Language window opens. Select your Language from the drop-down menu (e.g., English) and click OK. At this point, the FreeAgent Go Tools Setup prepares the InstallShield Wizard.
  5. From the Welcome to The InstallShield Wizard window, click Next.
  6. The Choose Destination Location window opens.
    If needed, click Change to choose a different location; select the Drive Letter associated with your FreeAgent Go drive and click OK.
  7. Click Next to continue.
  8. The Ready to Install the Program window opens. Click Install. At this point, the FreeAgent Go Tools installs to your FreeAgent Go Drive. When finished a Configuring Ceedo window opens…this may take awhile to complete.
  9. When finished, the InstallShield Wizard Complete window opens. Click Finish to close the program. Your FreeAgent Go’s software has been returned to its default original state. Please Safely Remove the drive from your computer and reconnect it to launch the AutoPlay Window.

Flash Video: Installing Mobile Recovery Software

Install FreeAgent Mobile Recovery Software To Your FreeAgent Go drive Read More »

WD External Drive Is No Longer Recognized In Windows Or Mac?

How can I tell if my WD external drive is still functional even though it is not recognized in Windows or Mac?

Please note: This answer is highly recommended prior to returning the drive for a replacement.

Some of the simple troubleshooting techniques used below can be applied to external hard drives on a Mac as well as a PC.

Problem:
I was using my external hard drive for some time and now a drive letter (icon) does not appear in My Computer (Mac Desktop) and I cannot access the data on that drive.

Cause:
there could be a few reasons why the drive is not showing up in My Computer (Mac Desktop). The drive itself could have failed, the partition on the drive may be damaged, the data cable may no longer be good, or the drive may no longer be getting enough power to fully spin up.

Solution:
It’s always best to start with the most simple possible causes when troubleshooting. Follow the steps below in order to eliminate the common simple issues:

  1. If the drive is not being recognized, disconnect the power adapter from the surge protector/UPS and plug directly into the wall. Sometimes, surge protectors diminish the power being supplied as more devices are added to them.Note: If after doing this the drive does not spin up at all (you can tell by feeling for vibration on the drive), then either the drive or the power adapter has failed. You will need to replace the power adapter to proceed with the troubleshooting. If after replacing the power adapter, the drive still doesn’t spin up, then you will need to replace the drive. You will find links for data recovery and warranty replacement down below.
  2. If the drive is spinning but not recognized in My Computer (Mac Desktop), then change out the data cable with one that you know is good. Cables get old and the wires inside can break, or pull loose from the connectors.
  3. If that doesn’t work, connect the external drive to another USB port. The USB port could be malfunctioning.
  4. If your drive still isn’t being recognized, turn your PC (Mac) off, disconnect the data cable, restart the computer, and once the operating system is fully up and running, reconnect the data cable. Give it a minute or two to recognize then you will want to access Disk Management (Disk Utility) to see if the drive shows up in there. If it does show up in Disk Management (Disk Utility), then you have a corrupted or damaged partition and will need to re-partition and reformat the drive for it to be recognized on your PC (Mac). See Links and note below.

    Important: If you have data on the drive that you need, do not reformat the drive. You will need to perform data recovery on the drive, before you can proceed with reformatting the drive. With a damaged partition, there is data recovery software that may restore the data. You can research the various kinds on the internet.

  5. If the drive doesn’t show up in Disk Management (Disk Utility), then the last option you have is to connect the drive to another PC. If it works, then there’s an issue with either the hardware or drivers on the primary PC. You will then have to troubleshoot that computer and operating system. For help with the operating system, you will need to contact either Microsoft Support, or if you have a Mac then Apple. For help with the computer hardware, you will need to contact the computer manufacturer.
  6. If the external drive does not show up on another PC, then the drive has failed. You will need to go to data recovery if you need the data on the drive. If the drive is under warranty, you can then replace it with them.

Final Note: (For Windows) If the computer does detect the drive, you can test the drive to make sure that there won’t be any ongoing issues by using Windows Data Lifeguard Diagnostics. (For Mac’s): You can test the drive by running First Aid.

If the software reports any errors for the drive, please see Data Lifeguard Tools 11 Error Codes for a list of error codes and what they mean.

IMPORTANT: To avoid corrupting or losing the data on your external hard drive you should always shut down the drive correctly before you disconnect the data cable from the drive or computer, or the power connection from the drive or the wall outlet.

WD External Drive Is No Longer Recognized In Windows Or Mac? Read More »

Scroll to Top