Posted in

Hard Drive Platter Replacement & Head Exchange Tool: HD HPE PRO

hd hpe pro1. What is “HD HPE PRO”?

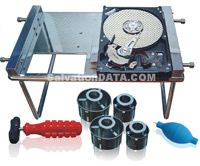
HD HPE PRO is a Hard Drive Platter Replacement and Disk Head Exchange Tool built to handle Head Stack and DSM issues.

2. Why you need “HD HPE PRO”?

Besides firmware problem and the well-known file system problem, as a data recovery professional, you must have experiences that drives click and drive spin motor got stuck or burnt. For few of you, these kinds of problems can be fixed by replacing the damaged parts manually, but for most of the non-experts who want to lay their hands on this bite of cake, it is better if they work in a stable environment with assistance of industrial designed utilities to prevent further damages or misalign because of incorrect operations to maintain the user data intact.

3. What is the highlights of  “HD HPE PRO”?

* Universal-fit workbench assures you to operate on your HD on a relatively stable table, making your job easier and more reliable.

* Pioneer platter exchanger maintains the original cylinder status by removing and placing each platter of the multiple platters together, so that allows you to change multiple platters without moving the platters out of alignment with each other which otherwise will result in data corruption.

* Special Actuator Remover assures you to perform easy operation (removal, installation) on the upper magnet of the actuator which is very hard to be removed and put back because of its strong magnetism and it’s sensitive and embarrassed position (being very close to both the Head Stack and Media Platter), in case it slips out and touch either of its fragile neighbors during the operations — the consequences will be a disaster.

4. Useful Links

  • Data sheet on the HD HPE PRO
  • HD HPE PRO Demo Video
  • Hard Drive Head Replacement Video
  • Contact to find out more about HD HPE PRO (Such as Price, how to purchase…)

New HPE SP (HPE for HDD with spacers) is to be released in March, 2009

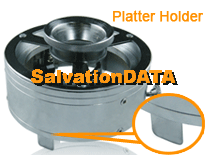
HD HPE PRO will be replaced by HPE SP. This new product, with all the original capabilities of the old version HPE being remained, a newly designed platter exchanger was adapted to replace the old one, which allows users to work on hard drives with spacers between platters.

HD HPE Platter Holder

HPE SP is made of metal alloy and has had the quality and stability improved.

The official version of HPE SP will be available in March, 2009. For old users,  they need only to purchase the new Platter Exchanger (1 for the 3.5″ HDD with spacers or without) to upgrade from HPE PRO to HPE SP.

Posted in

General Knowledge of RAID

1. What is RAID?
RAID is an acronym for Redundant Array of Inexpensive Disks (as opposed to SLED – Single Large Expensive Disk). Today, most drives are relatively inexpensive and the meaning of the ‘i’ is changing into ‘independent’. The purpose of RAID is to use 2 or more drives together in order to obtain increased performance and/or data security.

2. What types of RAID exists? and how do they differ?
The different types of RAID is typically referred to as ‘levels’. This FAQ will focus on level 0, 1 and 0+1 since these are what is most often supported by embedded RAID controllers.

Level 0: Striping
Level 0 provides increased performance by writing alternating blocks of data (referred to as the stripe size) to 2 or more drives simultaneously. Read performance is also improved since data is read from all drives at the same time. No redundant information is stored and failure of a SINGLE drive will cause all data to be lost. The number of drives in a level 0 array is sometimes also referred to as the stripe width.

Disadvantages: Not a “True” RAID because it is NOT fault-tolerant; The failure of just one drive will result in all data in an array being lost; Should never be used in mission critical environments.

Level 1: Mirroring
Level 1 provides redundancy by writing all data to 2 or more drives. Level 1 provides no increase in write performance (it may even be a bit slower). Read performance tend to be faster than a single drive, but not as fast as level 0. Level 1 provides excellent data security since ALL drives has to fail before any data is lost.

Disadvantages: Highest disk overhand of all RAID types (100%) – inefficient; Typically the RAID function is done by system software, loading the CPU/Server and possibly degrading throughput at high activity levels. Hardware implementation is strongly recommended; May not support hot swap of failed disk when implemented in “software”

Level 2: Bit interleaving with Hamming
Data is striped across multiple disks at the BIT level. Dedicated drives are used for Hamming error correction. Hamming error correction is a forward error correction code capable of correcting any single bit error or detecting any double bit error within the code word.

Disadvantages: Very high ratio of ECC disks to data disks with smaller word sizes – inefficient; Entry level cost very high – requires very high transfer rate requirement to justify; Transaction rate is equal to that of a single disk at best(with spindle synchronization); No commercial implementations exist/not commercially viable.

Level 3: Striping with parity
Data is striped across 2 or more disks and parity is written to a dedicated drive. Level 3 is typically implemented at the BYTE level.

Disadvantages: Transaction rate equal to that of a single disk drive at best (if spindles are synchronized); Controller design is fairly complex; Very difficult and resource intensive to do as a “software” RAID.

Level 4: Striping with parity
Data is striped across 2 or more disks and parity is written to a dedicated drive. Level 4 is typically implemented at the block (stripe size) level.

Disadvantages: Quite complex controller design; Worst Write transaction rate and Write aggregate transfer rate; Difficult and inefficient data rebuild in the event of disk failure; Block Read transfer rate equal to that of a single disk

Level 5: Striping with distributed parity
Data and parity is striped across 3 or more drives. Parity is distributed to each drive. Level 5 is the most widely used RAID for servers and other high-performance storage solutions. Any single drive can fail without data loss, ie. at least two drives must fail before any data is lost.

Disadvantages: Disk failure has a medium impact on throughput; Most complex controller design; Difficult to rebuild in the event of a disk failure (as compared to RAID level 1); Individual block data transfer rate same as single disk.

Level 6: Striping with dual distributed parity.
Essentially the same as level 5, but two sets of parity is calculated in order to improve data security.

Disadvantages: More complex controller design; Controller overhead to compute parity addresses is extremely high; Write performance can be brought on par with RAID Level 5 by using a custom ASIC for computing Reed – Solomon parity; Requires N +2 drives to implement because of dual parity scheme.

Level X+Y
It is possible to combine various RAID levels to optimise data security and/or performance. E.g. Level 0+1 and 1+0 as explained below.

Level 0+1: Striping and Mirroring
Level 0+1 combines level 0 and level 1 by mirroring a striped volume. Level 0+1 provides read and write performance very close (or equal) to level 0. Level 0+1 should not be confused with level 1+0. If there is 1 mirror set, a single drive failure will cause the whole array to become, in essence, a level 0 array. Level 0+1 requires an even number of drives and minimum 4.

Disadvantages: RAID 0+1 is NOT to be confused with RAID 10. A single drive failure will cause the whole array to become, in essence, a RAID level 0 array; Very expensive/ High overhead; All drives must move in parallel to proper track lowering sustained performance; Very limited scalability at very high inherent cost.

Level 1+0: Striping and Mirroring
Level 1+0 (sometimes referred to as level 10) combines level 0 and level 1 by striping a mirrored volume. Level 1+0 has better data security than level 0+1. The reason for this is that the level 1+0 controller can take advantage of a partial mirror set, but the level 0+1 controller cannot take advantage of a partial stripe set.

Disadvantages: Very expensive / High overhead; All drives must move in parallel to proper track lowering sustained performance; Very limited scalability at very high inherent cost

JBOD: Just a Bunch Of Drives
Not actually RAID, but some RAID controllers support this. In JBOD, 2 or more drives, which can be of any size, are put together so it appear as a single drive whose capacity is the sum of the individual drives. Since JBOD provides no performance increase and reduced data security, it is seldomly used.

3.  Can I use different sized/typed disks for my array?
Yes, but for all levels (except JBOD) you will loose some capacity on the largest drives.
For level 0, total capacity is equal to the stripe width times the smallest drive.
For level 1, total capacity is equal to the smallest drive.
For level 0+1, total capacity is equal to the stripe width times the smallest drive.
For level 5, total capacity is equal to the number of drives “minus 1” times the smallest drive.

4. Can I change my array after I have put data on it?
The stripe size or stripe width of a level 0 or level 0+1 array can not be changed without rebuilding the array. This will cause all data to be lost. For level 1 and level 0+1 additional mirror drives can add to provide additional data security. This will not cause any data to be lost.

5. Software RAID vs. hardware RAID. Which is better?
For the most part deffinitely hardware RAID. However, software RAID has some few advantages, but its beyond the scope of this FAQ to discuss this further.

6. I want to setup a level 0 RAID. Which stripe and cluster size should I use?
It depends on what the array is going to be used for. In general if the array is used for very large files (Video streaming etc.) a larger stripe size is better. For mainstream usage (office, gaming etc.) a stripe and cluster size in the 8-32 kB range is a common choice. To some extend the optimum stripe and cluster size combination also depends on the RAID controller and drives.

7. How do I setup/partition a level 0 RAID array, and install my OS on it?
The easy way:
1) Attach the drives to the RAID controller. Each drive should be master on its own channel (separate cable) for maximum performance.
2) Enter the RAID controller bios (usually you press CTRL+H after powering on the PC). Setup the RAID0 array with your preferred stripe size. The exact way of doing this depends on the controller. Note: Some controllers (e.g. the Promise-lite) do not allow you to change the stripe size.
3) Make sure you have a floppy with the RAID drivers. Boot from the OS installation CD, and when prompted press ‘F6’ to install third party RAID or SCSI drivers. Insert the floppy.
4) Using the installation program partition and format the drive.
5) Proceed with installing the OS on the boot partition.

The problem with the above method is that you can not specify the wanted cluster size when formatting (For NTFS the default cluster size is 4kB). If you choose to use NTFS it is not possible to change the cluster size without reformatting the drive. For FAT32, the cluster size can be changed at a later time with programs like Partition Magic.

If you want to use NTFS, or do some benchmarks with different stripe and cluster size combinations the recommended method requires a third temporary drive:

1) Attach the drives to the RAID controller. Each drive should be master on its own channel (separate cable) for maximum performance.
2) Attach the temporary drive to the normal IDE controller.
3) Enter the RAID controller bios. Setup the RAID0 array with your preferred stripe size.
4) Install the OS on the temporary drive.
5) Boot on the temporary drive. When the OS is up and running, install the RAID drivers.
6) Partition and format the RAID array with the preferred cluster size. In Windows XP, Disk Management provides the means to partition drives and formatting with a custom cluster size.
7) Optionally perform benchmarks on the array. Reformat the drive with a different cluster size or rebuild the array with a different stripe size. When the array is partitioned and formatted, the temporary drive can be removed.
8 ) Make sure you have a floppy with the RAID drivers. Boot from the OS installation CD, and when prompted press ‘F6’ to install third party RAID or SCSI drivers. Insert the floppy.
9) Install the OS on the boot partition of the RAID array. Make sure you do not format the array during installation, since this will reset the cluster size to the default value.

8. Get more details about Raid, please refer to “RAID Array & Server Glossary” as below:

Posted in

Mac File Recovery

Mac is a series of personal computer designed, developed, manufactured, and marketed by Apple™ which uses its own designed and developed operating system called MAC OS. The original Mac used “Motorola” and “IBM” processors, however recently they have launched their new hardware based on Intel x86 processors. The Mac OS which is used natively on Mac hardware was originally known as “System Software,” the current version of Mac OS is Mac OS X which has been code named like puma, jaguar, panther, tiger and leopard.

Mac OS X saves data using HFS and HFS+ (Extended and Journaled) file system; like all other platforms, Mac users also face data loss, some of the most common causes for data loss which are supported at Disk Doctor Labs have been indicated below.

What are the Symptoms of a Data Device Failure?
Your data device might be displaying any one of the symptoms listed below. This can be due to physical damage to the storage device or logical corruption to the file system or operating system. Below, we have listed many of them.

• Mac Machine won’t boot
• Clicking sound heard from device
• Hard disk drive not spinning up
• Electronics controller card is damaged
• Smoke was observed / smelled
• Virus attack has corrupted the file system
• Accidentally deleted files / directories
• Accidental reformatting of partitions
• Missing or deleted partitions
• Applications are unable to run or load data
• Device firmware has become corrupt
• Hard disk drive components failure
• Fire or water damage
• Inaccessible drives / partitions

What are My Data Recovery Options?
Disk Doctors’ has been serving Mac users as well as printing, graphics design, animation, and entertainment industries that mostly use Mac platforms.

If your device has displayed any of the symptoms listed above, then you may consider any of the following recommendations.

DIY (Do It Yourself):
Although data storage devices in most of the Mac laptops and desktops are not easily accessible, but if one is technically savvy and comfortable in handling the data storage devices, and sure about physical fitness of their data storage device, then they can download demo versions of recovery software to determine whether the issue could be addressed using a recovery utility before spending money to purchase the software. If this helps, then more power to you.

Note: Data storage devices in most Mac machines are not easily accessible; and any attempt trying to get the hard disk drive out may result in unnecessary damage to the machine itself. Therefore, we do not recommend this solution to most; as we have observed the situations getting out of hand while attempting DIY quite often mostly due to inexperience. And often destroying any chances of future recovery attempts.

Get Professional Help:
If your data is vital, then seeking professional help to recover is the only way to go about it. Professional help includes only well established and reputed data recovery companies with a proven track record.

How Much Data Recovery Would Cost?
The recovery cost for a single Mac hard disk drive with HFS or HFS+ can run a wide range (anything from $350 to $3000 depending upon the nature of problem).

Posted in

Free Disk Management Programs

Disktective
Freeware disk reporting tool for Windows. It allows you to find out the size, distribution and structure of used disk space.A folder/directory may contain hundreds of subdirectories each containing thousands of files. Select any folder or disk and Disktective will create a report displaying the real sizes of all directories and all containing subdirectories.

FAT32 Formatter
Although the Fat32 file system supports volumes of up to 2TB (= 2000 Gigabytes), Windows only allows formatting FAT32 partitions when they are 32 gigabytes or smaller.This freeware and open-source “FAT32 Formatter” utility solves this problem by enabling you to format FAT32 drives and partitions of up to 2 TB.

FMT
Free format tools for floppies: 360kb, 720kb, 1.2mb, 1.44mb, 1.68mb & 1.72mb

IDE/ATA diagnostics utilities
Utilities for low level surface scans, detecting drive options, diagnosing IDE drives, detecting associations between physical and logical drives.

mkdosfs
A port of the Linux mkdosfs command line tool to Windows. It allows you to format FAT32 partitions also when they are larger than 32GB (Windows can only format FAT32 up to 32 Gb).

Partition Logic
A free hard disk partitioning program which can create, delete, format, defragment, resize, and move partitions and modify their attributes. It can also copy entire hard disks from one to another.

Ranish PartitionManager
Freeware. Ranish Partition Manager is a boot manager and hard disk partitioner. It gives users high level of control for running multiple operating systems, such as Windows 98/NT/XP, Linux, FreeDOS, and FreeBSD on a single disk.

Posted in

Free Disk Search Engines

Hardisk Search & Stats
Very powerful freeware text-Search Engine for your harddisk. It enables you to conveniently search large numbers of text/ascii-based files simultaneously.

Harddisk Search & Stats is ideal for those who are handling text files, such as programmers, web developers, computer professionals, system managers and other demanding users.

Posted in

RAID Array & Server Glossary of Computer Terms (Letter H)

Host
Any computer system to which disks are attached and accessible for data storage and I/O.

Host adapter
A bus-based (PCI, EISA, ISA) hardware device, such as an add-in card or ASIC, that converts the timing and protocol of a host’s memory bus and an I/O bus.

Hot spare
RAID storage feature that allows a spare drive (or other component) to be configured for automatic (in contrast to hot-swap) replacement and reconstruction in the event of a disk failure. Users can remain on-line and continue to access data.

Hot Replacement of Disks
The design of all Mylex controllers allows for the replacement of failed hard disk drives without interruption of system service. In the event of a SCSI drive failure on a properly configured system (where the data redundancy features of the controller are used), the system generates a message to alert the system operator.

When a replacement drive becomes available, the system operator can remove the failed disk drive, install a new disk drive, and instruct the controller to “rebuild” the data on the new drive, all without interrupting system operations. Once the rebuild is complete, the controller will be brought back into a fault tolerant state. See also Hot Swap.Hot SpareA physical disk drive not part of a system drive that the controller can use to automatically rebuild a critical system drive. The hot spare drive must have at least as much capacity as the largest disk drive in the array or the rebuild may not start. See also Hot Standby and Standby Replacement of Disks.

Hot Standby
A redundant component in a fault tolerant storage system that has power applied and is ready to operate, but which does not perform its task as long as the primary component for which it is standing by is functioning properly. See also Hot Replacement of Disks and Hot Spare.

Posted in

HDD Repair Tools: PC 3000 VS HD Doctor Suite

1. HD Doctor Suite (SalvationDATA Technology, LLC. China)

SalvationDATA HD Doctor Drive Restoration Suite is an integrated hardware-software combined system that fixes firmware issues for drives of all major manufacturers and popular drive families.

By using HD Doctors and our software suite, you can have 50 percent more capability in data recovery, thus have 50 percent more business, which makes you “a professional”.

Get More: HD Doctor Suite

2. PC 3000 Drive Restoration System (ACE Laboratory, Russia)

A drive restoration powerhouse developed by the data recovery experts at ACE Laboratory Russia, PC-3000 drive restoration system is the only system that fixes firmware issues for all hard disk drive manufacturers and virtually all drive families.
With PC-3000 drive restoration system, you can bring more drives back to life before you begin imaging and data retrieval.

Get More: PC 3000 System

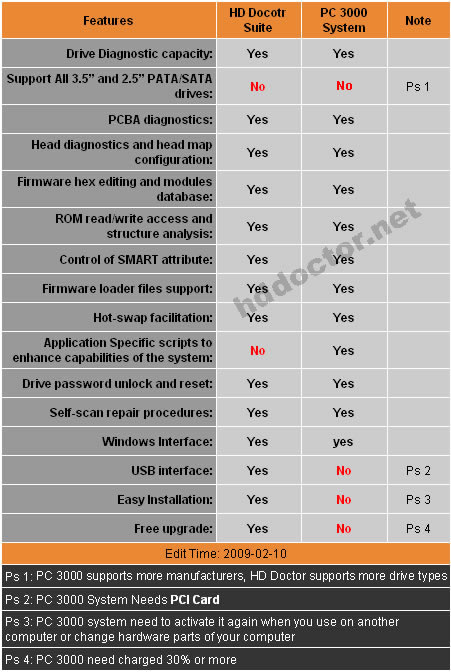
HD Doctor Suite vs PC 3000 System

Note: Whatever you are a PC 3000 System fans or a HD Doctor Suite user, If you are doing a job related to hdd repair or data recovery ,you should know both of them. They all provide great tools for  hdd repair. When you are using either of them. You should compare it with the other one.

This page will help you make a better choice! If you have a different opition. Feel Free to tell me by your comment! Let’ s make it better useful!

Posted in

Free system backup softwares

Freebyte Backup
Freebyte Backup is a very effective freeware backup program for Windows. It enables you to easily backup files from any amount of directories and sub-directories.

Freebyte Backup can backup all files, or a selection of files: you can filter according to file-date, file-type and even perform an incremental backup. Also: support for profiles.Small, simple to use, and simple to install (no dll’s!!).

Easeus Disk Copy
Free program which can create an exact (Mirror Image, Disk to Disk) copy of your old disk, including the operating system, applications, personal preferences, custom settings, data, lost files, and inaccessible data. It can be used for backup, cloning, your original small hard drive to a new larger drive.

TreePad X Enterprise
384 Gigabyte Personal Information Manager and Word Processor.Intuitive and versatile, including Website Generator, spellchecker, thesaurus, attachments, search engine, recycle bin, and much more!

Posted in

Disk Imaging: Image by selective head(s)

Drives presented for recovery sometimes have some heads or surfaces damaged (physical damage). The problem is severe enough for the drive to stop working in its native system. However, with the latest upgraded Data Compass DCEXP utility, it is possible now (before installation of MHA replacement) to create a copy of data using the remaining good surfaces or drive heads; small files can even be recovered directly.

What’s more, this procedure will also be essential in cases:

1. When the drive is having read instability problem: by reading the surfaces one by one, it greatly reduces the seek time & times, smoothes the reading of the data, thus in some cases the original “damaged” head or surface becomes available, and users will then have no need to perform a risky MHA replacement.

2. When users have only a donor MHA with some heads damaged also: we can use the native head to read the available data first and then replace it with the donor one for reading the available data; if these two MHAs happen to be a complement to each other (for example native MHA with head 1 damaged, and donor MHA happens to have head 1 remained good), even in fact we don’t have/use a good MHA at all, we can recover all the data on the drive.

See More: Image by selective heads