How to Fix Windows XP Damaged Boot Sectors?

image The master boot record (MBR) is a small program typically located on the first sector of the hard drive.

It examines the partition table to determine which partition to boot first and then executes the proper commands to run the operating system installed on that partition. If the boot sector becomes corrupt or is overwritten by another operating system, Windows XP will not be able to load. Fortunately, the Windows XP installation CD contains an application that can fix damaged boot sectors.

  • Place the Windows XP CD into the optical drive, and then restart the computer. Enter the BIOS (usually by pressing “F1,” “F2,” or the “Delete” key) and set the system to boot from the optical drive first. Refer to your owner’s manual if necessary. Save the BIOS settings and allow the computer to restart. When prompted, press any key to boot from the Windows XP CD. If you do not press a key at the prompt, the computer will attempt to boot into the hard drive instead of the CD.
  • Click Enter > F8 to accept the Windows XP license agreement. Press “R” to enter the Recovery Console after the Windows XP setup screen appears. Select the drive that contains Windows XP when asked “Which Installation Would You Like to Log Onto?” (usually “1: C:\WINDOWS”), and then press “Enter.”
  • Enter your Windows XP administrator password when prompted, and then press “Enter.” If you do not have a password, leave the box blank and press “Enter.”
  • Type “fixmbr” (omit the quotes) at the command prompt then press “Enter.” The “fixmbr” utility will overwrite and repair the damaged boot sector. After the process is complete, remove the Windows XP CD and restart the computer.

    Note: Some computer viruses are designed to corrupt the master boot record. Keep your antivirus software updated, and set the program to run a full system scan daily.

    How to Create A Windows Xp Boot Record?

  • Place the Windows XP installation CD in your computer’s CD drive and start the computer. The computer will use the information on the CD to start, instead of trying to start using information from the missing boot record on the computer’s hard drive.
  • Follow the prompts in the Recovery Console setup process. Type “R” when the Welcome to Setup screen is displayed. This selects the repair and recovery functions of the Recovery Console.
  • Select the operating system you want to repair and enter the administrator password for that operating system if prompted. The Recovery Console will next display a command prompt.
  • Type “fixmbr” at the command prompt, then press the “Enter” key. This starts the process of creating a new master boot record for your computer’s hard drive.
  • Remove the Windows XP product CD from the CD drive and restart your computer when the repair process is finished.

    How to Restore a Vista Boot Record?

  • Open a DOS prompt. Click the Windows “Start” button and select “Run.” In the textbox, type “cmd” and press “Enter.”
  • Execute Bootsect.exe. In the DOS window, type “Drive:\boot\Bootsect.exe /NT60 All.” Replace “Drive” with the drive letter of your Windows installation. For most people, this location is “C.”
  • Run “Bcdedit.exe” to edit the boot.ini file. To edit the file, type the following into the DOS prompt: Drive:\Windows\system32\Bcdedit /create {ntldr} /d “Description for earlier Windows version”
    “Drive” is the location of the Windows installation files as in Step 2.
    “Description for earlier Windows version” is replaced with any text, but the typical entry is your previous operating system, such as “Windows XP” or “Windows 2003”
  • Restart the computer.
Read More

How to Install A (PATA) Hard Disk Drive?

Step 1. Opening The Computer Case

Important: Each computer has a different way of opening the case and location of the hard disk drive. Refer to the user’s manual of your computer for detailed instructions.

Warning: The following procedure listed below will have you working within the chassis of the system. Following a few simple rules will keep you and your hardware safe.

1. Always power OFF your computer and disconnect the power cable before opening the case.

2. Always use an anti-static wrist strap before connecting or disconnecting anything within your computer.

Step 2. Installing The Hard Disk Drive

3. When the hard disk drive is level with the hard drive rack, gently push it in place without exerting too much force. Tighten the hard disk drive in place using the screws supplied with the product.

Note: If screws other than those supplied are used, the PCB board of the hard disk drive may get damaged and cause the hard disk drive to malfunctio.

Step 3. Making Your Connections

4. Line the key on the UDMA cable with the opening on the hard disk drive.

Note: Make sure the cable is not inserted in reverse since this can damage the connector and hard disk drive. Do not force or rock the connection into it’s socket on the hard disk drive. Push it in straight until it is seated.

Pata UDMA and Power Cable Connections

5. Line the Molex power cable connector with the opening on the hard disk drive.

Note: Make sure the cable is not inserted in reverse since this can damage the connector and hard disk drive. Do not force or rock the connection into it’s sockets on the hard disk drive. Push it in straight until it is seated.

Read More

Free Hard Disk Drive Diagnostic Utility For Samsung Hard Drive

Samsung Free Hdd Diagnostic Tool Note: The following free hard disk drive utilities and diagnostic tools are only for Samsung Hard Disk Drives. Using any of these utilities on a hard disk drive that was not manufactured by Samsung will have adverse effects on that hard disk drive.

Hardware Utilities

Disk Manager provides support for Dynamic Drive Overlay, which will allow older BIOSes to support large-capacity hard drives. Disk Manager can also partition the drive. (Note: Registration information needed for downloading)

  • Disk Manager for FDD
  • Disk Manager for CD Rom

Hardware Diagnostics

There are three utilities depending on the model of your hard disk drive for diagnosing hardware problems and performing low-level formats:

SHDIAG is a hardware diagnostic for older Samsung hard drives. Backing up data before using SHDIAG is strongly advised.

Hard Disk Drive Series

Model Number

Spinpoint V20400

SV4084D, SV3063D, SV2042D, SV1021D, SV0761D

Spinpoint V15300

V3064D, SV2043D, SV1532D, SV0761D

Spinpoint V10200

SV2044D, SV1533D, SV1022D, SV0511D

Spinpoint V9100

SV1824D, SV1363D, SV0842D, SV0431D

Other Older Models

SV2046D, SV1705D, SV1364D, SV1023D, SV0682D, SP1828D, SP1366D, SP0914D, SV1296D, SV0844D, SV0643D, SV0432D

HUTIL is made with the aim of testing a Samsung hard disk drive while it is installed inside a PC, regardless of the status of user’s operating system. It is a good idea to test drive that is having problems with HUTIL to see if it is truly defective to avoid possible unnecessary troubleshooting or factory service. HUTIL includes EraseHDD, a utility that will perform a low-level format including the partition table and Master Boot Record.

Hard Disk Drive Series

Model Number

SpinPoint F1

HD161GJ, HD162GJ, HD251HJ, HD252HJ, HD322HJ, HD501IJ, HD502IJ, HD752LJ, HD753LJ, HD102UJ, HD103UJ

SpinPoint F1 CE

HA251HJ, HA321HJ, HA501IJ, HA751LJ, HA101UJ

SpinPoint F1 RAID

HE322HJ, HE502IJ, HE753LJ, HE103UJ

SpinPoint S250

HD162HJ, HD200HJ, HD250HJ

SpinPoint S250 CE

HA250HJ, HA161HJ

SpinPoint N2

HS030GB, HS031GA, HS040HB, HS041HA, HS04THB, HS060HB, HS061HA, HS06THB, HS080HA, HS080HB, HS081HA, HS082HB, HS10TJB, HS120JB, HS122JB

SpinPoint N1

HS122JC, HS08XJC, HS10XJC/M

SpinPoint M5

HM201JI, HM250JI, HM061GI, HM080GI, HM121HI, HM160HI, HM160HC, HM121HC, HM080GC, HM061GC

SpinPoint MH80S

HM08HHI, HM12HII, HM16HJI

SpinPoint S166

HD041GJ, HD081GJ, HD042GJ, HD082GJ, HD120HJ, HD161HJ

SpinPoint T166

HD251KJ, HD252KJ, HD320KJ, HD321KJ, HD402LJ, HD403LJ , HD500LJ, HD501LJ, HD080GJ, HD160HJ, HD300JJ, HD301JJ, HD320JJ, HD321JJ

SpinPoint T133

HD250KD, HD250KJ, HD300LD, HD300LJ, HD301LJ, HD320LD, HD320LJ, HD321LJ, HD400LD, HD400LJ, HD401LJ

SpinPoint P80SDH

HD121IJ, HD161JJ

SpinPoint P80SD

HD040GJ, HD080HJ, HD120IJ, HD160JJ

SpinPoint M80

HM040GI, HM040GC, HM061HC, HM062HI, HM080HI, HM080HC, HM100II, HM100IC, HM120II, HM120IC, HM160JI, HM160JC

SpinPoint M60

HM020GC,HM021GI, HM030GI, HM030GC, HM040HC, HM041HI, HM042HI, HM060HI, HM060HC, HM061HI, HM080II, HM080IC, HM081II, HM100JI, HM100JC, HM101JI, HM120JI, HM120JC, HM121JI

SpinPoint P80VEM

SP0451N, SP0842N

SpinPoint P80VEA

SP0822N

SpinPoint P80M

SP1243N, SP1253N, SP1644N, SP1654N

SpinPoint P80A

SP0431N, SP0441N, SP0832N, SP1223N, SP1233N, SP1624N, SP1634N

SpinPoint P120

SP2014N, SP2514N, SP2004C, SP2504C

SpinPoint V120

HA250JC, HA200JC, SP2504N, SP2004N, SP1603N, SP1613N, SP1202N, SP1212N, SP1603C

SpinPoint M40

MP0302H, MP0402H, MP0603H, MP0804H,HM040HI, HM060II, HM080JI

SpinPoint P80

SP0211N, SP0401N, SP0612N, SP0802N, SP0812N,SP1203N, SP1213N, SP1604N, SP1614N, SP0812C,SP1213C, SP1614C, SP0822N

SpinPoint V80

SV0401N, SV0802N, SV1203N, SV1604N, SV0211N, SV0612N, SV0802E, SV1203E, SV1604E

SpinPoint VL40

SV0211H, SV0311H, SV0401H, SV0411N, SV0211N

SpinPoint PL40

SP0411N, SP0211N, SP0311N, SP0411C

SpinPoint V60

SV1204H, SV0813H, SV0602H, SV0301H

SpinPoint P40

SP8004H, SP6003H, SP4002H, SP2001H, SP80A4H, SP60A3H, SP40A2H, SP20A1H

SpinPoint V40

SV8004H, SV6003H, SV4002H, SV2001H, SV8014H, SV6014H, SV6013H, SV4012H, SV3012H, SV2011H

SpinPoint V30

SV6004H, SV4003H, SV3002H, SV2002H, SV0802H

SpinPoint P20

SP4004H, SP3003H, SP2002H, SP1001H

SpinPoint V20400

SV4084H, SV3063H, SV2042H, SV1021H, SV0761H

  • HUTIL for FDD       
  • HUTIL for CD Rom

SUTIL is a utility for older Samsung hard drives that will format them and reset their DMA Modes.

Hard Disk Drive Series

Model Number

Spinpoint V20400

SV4084D, SV3063D, SV2042D, SV1021D, SV0761D

Spinpoint V15300

V3064D, SV2043D, SV1532D, SV0761D

Spinpoint V10200

SV2044D, SV1533D, SV1022D, SV0511D

Spinpoint V9100

SV1824D, SV1363D, SV0842D, SV0431D

Other Older Models

SV2046D, SV1705D, SV1364D, SV1023D, SV0682D, SP1828D, SP1366D, SP0914D, SV1296D, SV0844D, SV0643D, SV0432D

  • SUTIL for FDD

Data Advisor®

Data Advisor is a free hard disk drive diagnostic utility available from http://www.ontrack.com/dataadvisor/. Data Advisor quickly assesses the health of your hard disk drive, file structures, and computer memory by identifying problems that could cause data loss. Don’t worry if you can’t boot your system to Windows; Data Advisor is self-booting, so it runs even when your system won’t.

Note: Ontrack DataRecovery is not associated with Samsung, Inc.

Read More

How To Set The Jumper Setting On Samsung (PATA) Hard Disk Drive?

Setting The Jumper On Your Hard Disk Drive

Use the common jumper settings for Samsung hard disk drives that are listed below. Please verify the jumper setting by checking the label on your hard disk drive.

Important: If you partitioned and formatted your hard disk drive, with the General or 32 GB pin setting, and now need to use the opposite pin setting; remember to partition and format the drive again after changing the pin settings.

Configuring your Hard Disk Drive (Master, Slave, or Cable Select) – Setting the Jumper

  • If this is the only HDD in your computer, set the pin setting to Master.
  • If this is the second HDD in your computer, set the pin setting to Slave.
  • If this is the second HDD in your computer, and the first drive is set to Cable Select, set the pin setting to Cable Select.
  • If you are replacing the HDD in your computer, set the jumper setting to match that of the drive you are replacing.

Cable Select:

    • This setting is the default setting for PATA/IDE hard disk drives. With the Cable Select jumper setting, the BIOS determines whether a hard disk drive is Set as Master or Set as Slave by it’s position on the UDMA cable.
    • If the hard disk drive jumper is set to Cable Select and is connected to the black connector on the end of the UDMA cable, it is recognized as Set as Master for that PATA controller.
    • If the hard disk drive jumper is set to Cable Select and is connected to the grey connector on the middle of the UDMA cable, it is recognized as Set as Slave for that PATA controller.Note:When using Cable Select, your system must meet the following conditions:
      • Your systems host controller must support Cable Select.
      • Your hard drives must support Cable Select.
      • Your cable must support Cable Select.

Set as Master:

  • Use this setting if you are installing an additional hard disk drive to a single UDMA cable with a hard disk drive Set as Slave, jumper one hard disk drive to Set as Master, and the other to Set as Slave.
  • Use this setting if you are installing an additional hard disk drive to a single UDMA cable and the Cable Select setting is not recognized.


Set as Slave:

  • Use this setting if you are installing an additional hard disk drive to a single UDMA cable with a hard disk drive Set as Master, jumper one hard disk drive to Set as Master, and the other to Set as Slave.
  • Use this setting if you are installing an additional hard disk drive to a single UDMA cable and the Cable Select setting is not recognized.

32 GB Clip Setting:

Use this on computers manufactured before November 1998 when either you start up your computer and see the message, “Hard disk drive controller failure“, or your system stops responding during the boot process after installing a new drive. This occurs when the hard disk drive is too large for the BIOS to support.

Read More

How To Upgrade Firmware On Seagate Serial ATA Hard Drive?

FreeDOS Update Procedure

Firmware Update This is a walkthrough on how to upgrade the firmware on a Seagate Serial ATA hard drive.

(Firmware Update for STM3500320AS, STM3750330AS, STM31000340AS)

Note:  For best results during system startup, it is recommended to disconnect peripherals such as USB storage devices, printers, scanners, etc.

If your keyboard does not respond within FreeDOS, use a wired rather than a wireless keyboard.

      1. Boot up to the CD. Most systems will automatically boot to the CD if it is bootable. If it does not, please consult your system documentation on how to modify the system boot sequence.
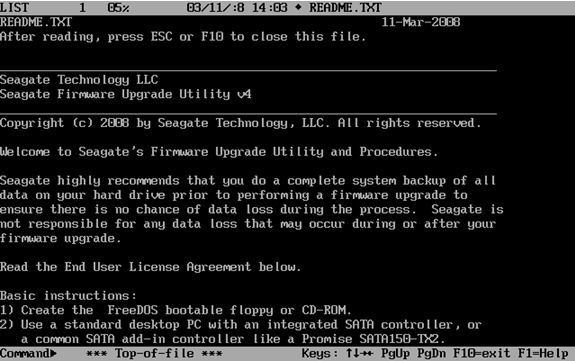
      2. After the system boots to the CD you will be presented with a README file.c
      3. Press ESC or F10 to proceed to the next step.Firmware Update
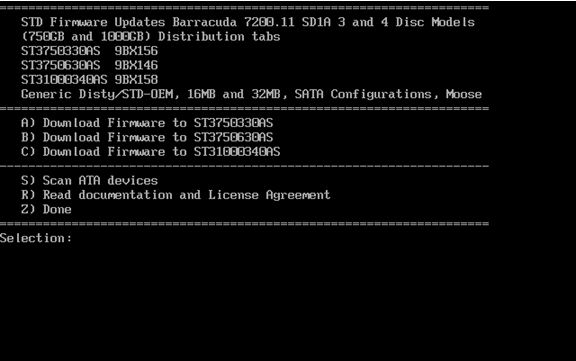
      4. To select the appropriate drive, press the corresponding key. In this example the letter “C” will start the download for the ST31000340AS. Please note that there are different versions of the firmware for each model of drives.Firmware Update
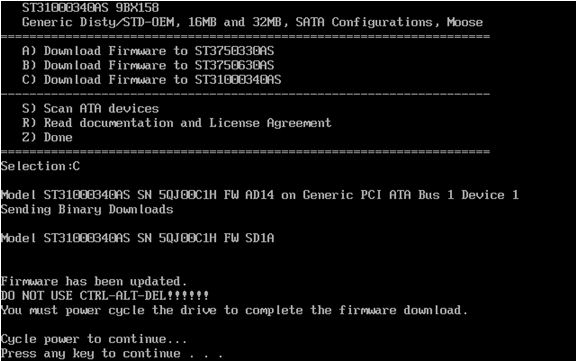
      5. Once the firmware update is complete, you will be prompted to turn your computer off by pressing any key.
        Note:A soft reset (Control-Alt-Delete) is not sufficient.
      6. Turn on your computer and remove the firmware CD to allow your system to boot normally into your operating system. Your drive has been updated.

General information: Scanning for devices

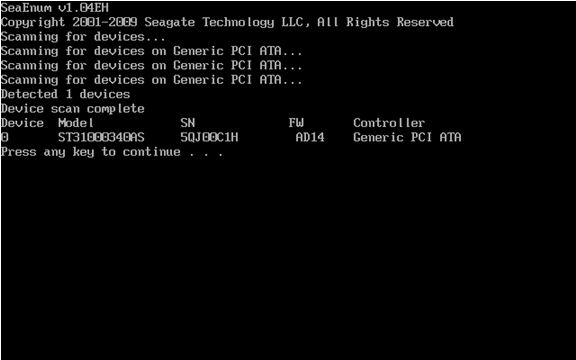
You can use the “Scan ATA device” by pressing the “S” key at the “Selection:” prompt to view Seagate drives which are detected.

The scan procedure will display only Seagate drives, and will display the current firmware revision loaded on the drive.

Firmware Update

Firmware Update for Macintosh

Can I update the firmware on my hard drive if it is installed in a Mac?

Yes, however it must be an Intel-based Mac (i.e. MacPro and iMac – with Intel inside). There are other models of Macs that have Intel processors such as the MacBook and MacBook Pro notebooks as well as the Mac Mini, but these drives have notebook (2.5 inch) drives which are not affected.

I have a PowerMac.  Can I update the firmware on my hard drive?

Older Macs that are PowerPC-based (PowerMac G3, G4, G5 and iMac G3, G4, and G5) are incompatible with the FreeDOS operating system which is required to perform the update.

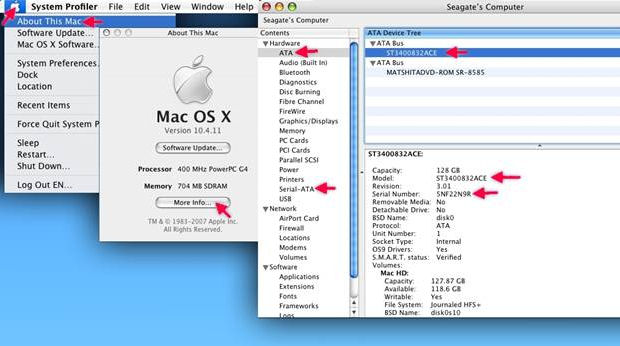
How to find your drive’s serial number and model number in Mac OS X

Firmware Update

  1. Choose the Apple from the menu.
  2. Choose “About this Mac”
  3. Choose ” More Info…”
  4. Choose the drive type: Serial ATA
  5. Highlight  the appropriate drive listed under the bus.
  6. Below you will see the Model and Serial number of the highlighted drive.

Instructions for updating firmware on an Intel based Mac.

  1. Download and burn the Firmware ISO that has been provided to you by Seagate for your drive(s)
  2. Burn the ISO to a CD.
  3. Insert the freshly burned CD back in to your Mac.
  4. Reboot
  5. After the chime, press and hold the Option key on the keyboard.
  6. Once you see the Apple with the spinning gear beneath, release the Option Key.At this point the system will come to a screen with pictures of hard drives and a CD; the CD should be named Seagate.
  7. Click on the CD
  8. Click on the arrow pointing to the right.
  9. At this point FreeDOS will boot. Follow the on screen instructions.

Firmware Download: FirmwareBase.com

Read More

Does Your Hard Drive Need A Firmware Update?

Firmware Update Many thousands of hard drives enter the market with any given version of firmware in common.

Thousands of drives have the same firmware version when they are sold.
External, SATA, and ATA drives that are used in PCs and for personal storage pass through extensive testing before they leave the factory.  Therefore, they are not designed for firmware updates in the field.

Firmware updates

Performing a firmware update can be risky by itself even in the best of situations.  For example, a power outage during a firmware update carries a very good possibility of ruining the drive.  External, Serial ATA, and ATA drives are not designed for field firmware updates by end users.

Very often, system or device driver issues cause symptoms that are incorrectly called “firmware problems.”

What is firmware?

Firmware is defined as a computer program that is hard-coded into the hard drive and contains its basic operational storage programming.  Another way to think of it is that firmware is a software middleman that allows your hardware to talk to software (i.e., Windows operating systems, etc).  For a hard drive, firmware is a program that governs the behavior and factory settings, even the identity, of that drive.  Any drive that comes out of the factory and is in use in a computer or server has firmware installed on it from the factory.

What is the relationship between firmware and drivers?

Drivers tell the operating system how to behave. Firmware tells the drive how to behave. Seagate provides no drivers for most products in any modern Windows or MacOS operating system – the drivers must come from Microsoft, Apple, or the motherboard.

Why not just put firmware updates online with public links?

There are four main reasons:

  1. Field support for firmware updates involves robust and compatible tools, backwards compatibility and data safety.  These features are designed into Enterprise class SAS, Fibre Channel and SAS interface disc drives.Desktop and Mobile SATA and PATA drives are not designed for firmware updates in the field in the vast majority of cases.  Very often what looks like a newer version of firmware, by the number, may actually be incompatible with previous versions.  If incompatible firmware is copied to an earlier version of the same model, data loss or drive ruin will result.  Performing a firmware update can be risky by itself even in the best of situations.  For example, a power outage during a firmware update carries a very good possibility of ruining the drive.  This is why Seagate uses a warranty exchange process, if necessary, to update SATA and PATA drive firmware.
  2. In most cases, when a hard drive is thought to be malfunctioning, it is an operating system (i.e. Windows) issue or a problem with a software program.  Firmware is easy to blame when a hard drive does not perform as a user expects, when its installation does not proceed exactly as expected, or a myriad of other situations, or even when a drive diagnostic reports bad sectors.  In order to protect the user, Seagate restricts access to firmware updates.
  3. Some drives that still bear the Seagate name on the label but are actually the property of an Original Equipment Manufacturer (OEM) (such as Dell or Hewlett-Packard [HP]) might have unique firmware on them.  OEMs purchase large amounts of bare drives from Seagate and put their own firmware on them, at which point the drive is sold as part of a larger piece of equipment, such as a server or a personal or notebook computer.  Often the OEMs load specialized firmware in order to be able to build in performance enhancements that are specific to their product.However, sometimes these servers or computers are disassembled and the hard drives end up being sold separately from a third-party technology reseller or even on eBay, and because these drives have “Seagate” on the label and sometimes even the same model number (the “ST” number) as standard drives sold in a retail store, it can be easy to confuse the two.  The specialized firmware on some of these drives sometimes works outside of their original equipment and sometimes does not.  In very many cases, performing a firmware update with “standard” firmware would violate Seagate’s legal agreements with the OEM, thus voiding both the OEM and Seagate warranty, and carries a good possibility of ruining the OEM drive.
  4. Very seldom does a firmware update increase the drive’s performance. Most firmware updates are made available in order to solve a problem with timing, in order to synchronize with the timing of the system’s communication lines.

In summary, it is always best to seek other avenues of troubleshooting the hard drive and the surrounding system before resorting to questions of firmware.  If you suspect a drive may be defective, test it using Seatools.

Read More

How to install, partition, format, or reformat a WD external hard drive in Windows XP?

To partition and format the external hard drive with Disk Management, follow these steps:

  1. To begin, access Disk Management by right-clicking on My Computer and left-click on Manage. If you don’t have My Computer on your desktop, it should be located in your Start Menu.
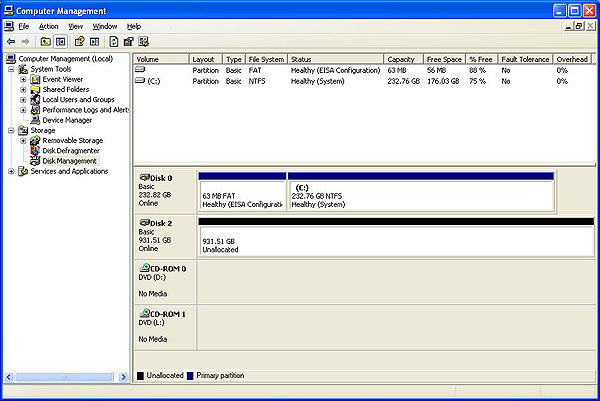
  2. The Computer Management window will open. It will have two panes. On the left pane, there will be a list of items. Under Storage, click on Disk Management. This will load a right pane with 2 windows on the right side. You may need to maximize the Computer Management window to see all your drives.
  3. In the lower right pane, you should see a graphical list of all available drives or devices. Find the drive listing that corresponds to the drive that you want to partition and format. It typically has a black barindicating unallocated space.If there is a blue bar, then the drive has already been partitioned and formatted. Make sure, that if you have data on the drive, you back it up before proceeding. Once you are ready to proceed, right-click on the blue bar and choose Delete Partition… You will get a pop-up window asking you if you really want to delete the partition. Click Yes. The bar should now be black.

    Image

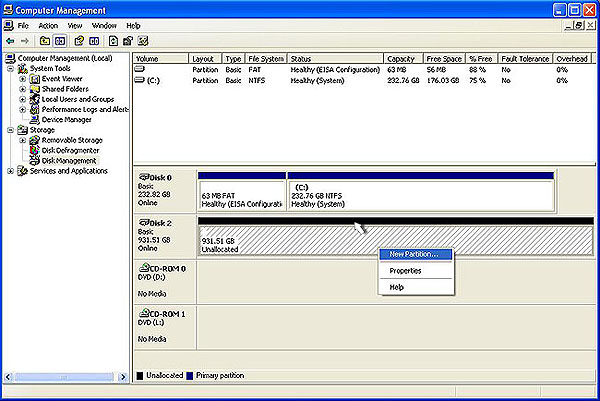
  4. Right-click on the black bar to see a menu of available options. Select New Partition…Image
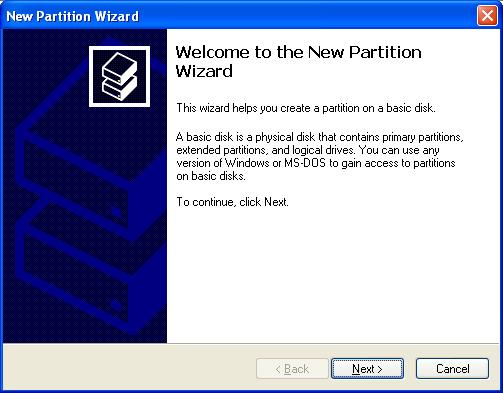
  5. The Welcome to New Partition Wizard will come up. Click on Nextto proceed to the next screen.Image
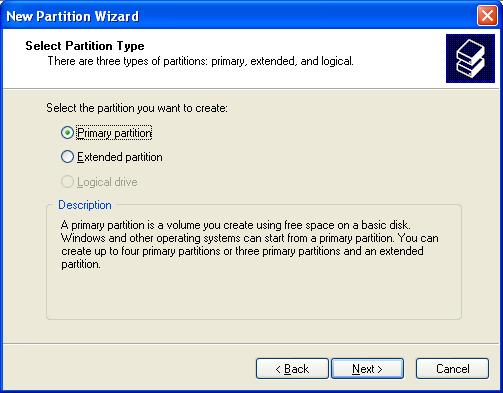
  6. Choose Primary Partition and press Next.Image
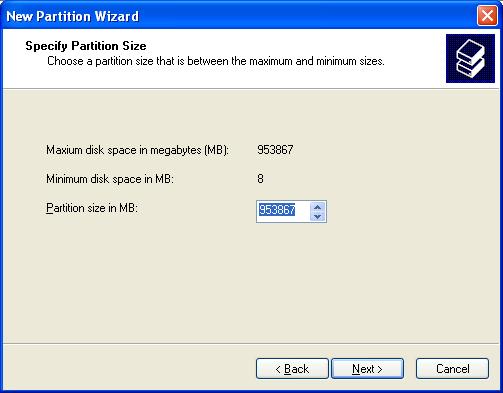
  7. This is where you can set a partition on the drive. By default Windows chooses the whole drive so click on Next.Note: You can also chose to create more than one partition by choosing a smaller size for this partition. Later, you can come back to this window, and create another partition on this drive, by repeating this process.

    Image

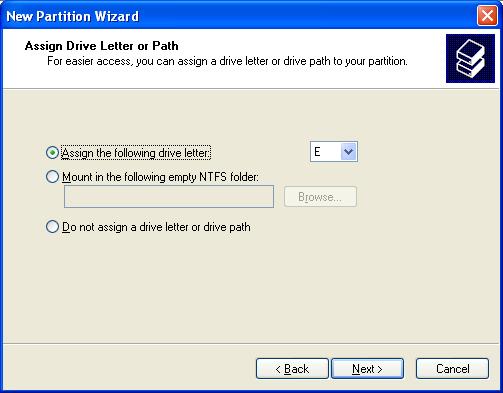
  8. Choose the drive letter that you want the drive to have. By default Windows will choose the next available drive letter. Then click on Next.Image
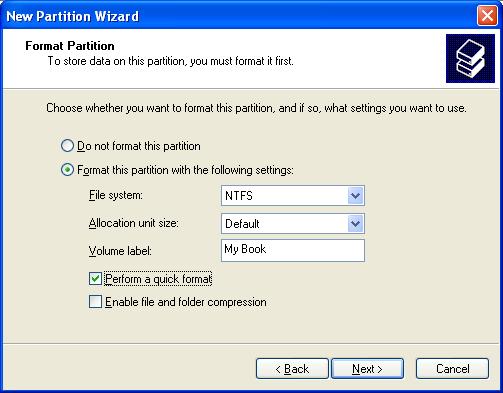
  9. This is the format screen. Make sure that the File System is set to NTFS. In the Volume Label field you can give the drive a name if you want. Check the box that says Perform a Quick Format so that the drive will be formatted quickly. Make sure to leave the Allocation unit size to Default, and then click Next.Image
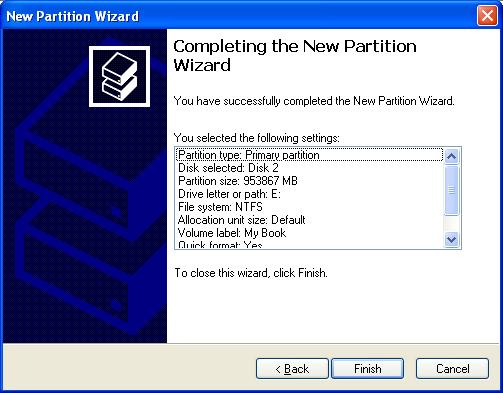
  10. This screen gives you a confirmation of all the steps that you just went through. Click on Next.Image
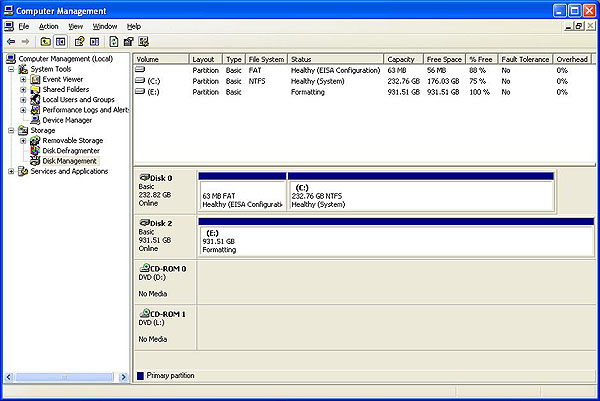
  11. The listing for the drive (Disk 2 in the picture below) will say Formattingas it formats the drive.Image
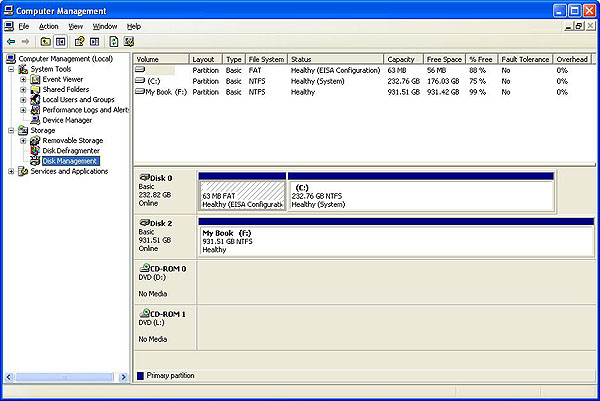
  12. When the drive is done (Disk 2 in the picture below) the bar will be blue and the drive will say Healthy.Image

Note: Once the drivers are installed, you can follow the directions to partition and format the hard drive, if necessary.

Read More

What is Error Recovery Control?

Description:

Error Recovery Control Offered on Barracuda ES and ES.2 family SATA enterprise drives, Error Recovery Control (ERC) is a subset of the Smart Command Transport (SCT) command set, enabling the host to set a soft time limit for specific commands (reads and writes).
Advantages:

  • Ensures hosts don’t mistakenly assume busy drives are dead and need maintenance; averts unwarranted drive swaps and RAID rebuilds
  • Boosts RAID performance by flagging disks slowed by errors; alerts need for data reconstruction and rewrite to resolve disk errors, restore speed
  • Unavailable in desktop-class drives (due to less demanding environment)

Key Component:  Soft Time Limit

Read More

The Easiest Way To Erase A Maxtor OneTouch III HardDrive

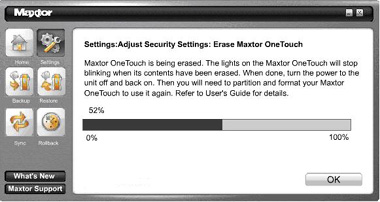
erase harddriveIf you have forgotten your password, you can attempt to reenter it or to recover it, by answering a question that you setup originally when you created your password. You are allowed 5 attempts before you must turn off your drive and turn it back on, to try again at which point you can try an additional 5 times. If you are not able to recover your password, the only other way to unlock the drive is to erase all of its contents.

  1. Click the Settings button. This will open the Settings for My Maxtor OneTouch menu.
  2. Click the Adjust Security Settings button.
    Erase Harddrive
  3. You will see the following. Click Erase Maxtor OneTouch
    The Erase Drive feature is Data Destructive.

    Erase Harddrive
  4. Click Confirm to proceed, and then click Yes to start the Erase process.
    This process can take up to 1 hour to complete. Do not stop the erase process.Erase Harddrive
  5. When finished you will be notified that the drive is erased. Click OK.
    Erase Harddrive
  6. Reconnect the Maxtor OneTouch III drive from the system. Upon doing so, you will be prompted to Format the drive.
    Erase Harddrive

The drive will be formatted into a NTFS format. Once it has been formatted you will need to go back and reset up any backups you might have had setup.

Read More