What’s the difference between duplicating, archiving and backing up data?

An introduction to Backups

Backup Data As applications and hardware can still fail no matter how reliable a PC or server is. It’s vital to have a good backup solution. While once costly and complex, they are now inexpensive, simple-to-use and depending on the solution implemented, completely automated. If your data and your time are truly important, it makes sense to develop a strategy based on those needs to keep your data safe and to choose hardware and software that fits with your strategy.

What’s the difference between duplicating, archiving and backing up data?

Duplication is a 1:1 copy of your data, which means it only keeps one version of each file on your system. You don’t need to open your backup software to access your duplicated data but you can retrieve data through the explorer/finder. Macintosh’s MacOS even gives you the opportunity to boot from your backup drive if you duplicated your complete system.

Archiving is functionally the same as backing up data. The main differences are that backup files are only kept for a short time and NOT DELETED from the original source while archived files are kept for a much longer time, hence the name archive. And archived files are normally deleted from the source, e.g. your system disk or data drive. That’s why with archiving, you would normally use a CD, DVD or tape as storage medium.

Backing up data is faster and more efficient than copying and takes up less space on the storage media because you can make “incremental” opposed to full backups. As a result it’s easier and more cost-effective to make frequent backups of multiple versions of data. Backup software automatically copies data into a single file that can’t be directly read by the original applications. It then compresses this file and prevents unauthorized access by protecting it with passwords or encryption.

Which backup strategy is the right one for you?

You should backup your data as often as it changes. To correlate with Murphy’s Law: “The likelihood of suffering data loss increases in direct proportion to the elapsed time since your last backup “. In layman’s terms, the day you don’t backup your data, something will go wrong. When you start a backup strategy you should backup all data (documents, music, movies, etc.) and applications that you want to protect with a full backup, to be repeated on a more or less weekly basis. In between, you can perform incremental backups to protect data that has changed since the last full backup. The best time to run a backup is when you are not working on your computer, as every file accessed by applications or by the user will be locked and will thus not be backed up. Running your backup can therefore best be done manually when you have finished your work and before you switch off your computer, or it can be scheduled at times when nobody is using the computer in cases where the computer is switched on most of the day or longer.

How many backups do I need?

A good backup strategy should include backups of your backups. The reason for this is that your original data and your backup might be damaged or lost (for example, lightning strikes or a burglary at your home/office). That is why it is wise to use multiple backup media, such as 2 or 3 external drives alternating between them, one of which you always take with you off-site. That is, if this is within your budget.

Other alternatives include CDROM, DVD, online storage, and tape drives.

System recovery

If your system fails completely you will need to do what is called a system recovery. This process calls for reloading the operating system, the backup software, and all applications and restoring the data.

With the aid of a disaster recovery software like Retrospect, where the disaster recovery copy was fully run before the disaster, you would only need to reinstall the operating system and Retrospect.

Once this is done you can restore your system backup, keeping in mind that this only works if your hardware doesn’t change; all applications, system settings and data will be restored to your system. Mac users have one advantage here if they have Retrospect HD, as in this case you can create a bootable backups on your external drive, from which you can boot if your internal system drive fails without first reinstalling the operating system and Retrospect.

Read More

IPod Touch Troubleshooting Assistant

Is your iPod touch frozen or not operating as expected? These tips will help you resolve most common issues.

Recharge

This screen means to keep iPod touch connected so it continues charging.
Note:

  • Use a high-power USB port such as the one on your computer, or use your iPod touch AC adapter.
  • Don’t use the USB port on your keyboard because it is a low-power port and iPod touch will not charge.
  • Make sure you are using USB to charge. Accessories that use FireWire to charge are not supported with iPod touch.
  • If you see the red part of the battery image flash three times and then the screen goes black, it means that iPod touch is not receiving power to charge.
  • If the iPod touch battery is extremely low on power, the display may be blank for up to two minutes before one of the low-battery images appears.

Restart

Try restarting iPod touch. To turn it off, press and hold the Sleep/Wake button until the red slider appears. Slide your finger across the slider to turn off iPod touch. To turn iPod touch on, press and hold the Sleep/Wake button until the Apple logo appears.

Does iPod touch appear frozen or stuck? To reset iPod touch, press and hold the Sleep/Wake button and the Home button at the same time for at least 10 seconds. During this time, a red “power off” slider may appear and the screen may go black, but do not release Sleep/Wake and Home buttons until the Apple logo appears.

Remove Content

If iPod touch is not working as expected, it may be due to some of the content synced to it. Try selectively removing certain content that may be causing unexpected behavior such as contacts, calendars, songs, photos, videos, or podcasts.

To remove content, connect iPod touch via USB and use iTunes to change the sync settings. Click on iPod touch in the Source list, and select each tab to change what content is synced then click apply.

Reset Settings

Tap Settings > General > Reset > Reset All Settings

Note: This will reset all settings. No data or media will be deleted.

Restore

Try restoring iPod touch using the latest version of iTunes.

Connect iPod touch. When it appears in the Source list, click on Restore in the Summary tab.

Read More

Seagate® Barracuda® 7200.11 Hard Drive

image The Seagate® Barracuda® 7200.11 hard drive offers an unmatched combination of reliability, performance and capacity, and is backed by a 5-year limited warranty. The Barracuda 7200.11 drive—the eleventh generation of this award-winning desktop hard drive family—delivers up to 1 TB of reliable digital storage. The drive is the ideal choice for mainstream PCs, performance PCs, gaming and workstations, desktop RAID and external storage devices.

Kit Includes:

  • Hard drive
  • Product Manual
  • 5 years Limited Warranty

Product Highlights:

  • Designed with four disks to provide the optimal balance of advanced technology and low total cost of ownership
  • Eleventh-generation drive in the successful, award-winning Barracuda® product family
  • Enables up to 1 TB of storage capacity (other capacities at 500 GB and 750 GB)
  • Industry’s most reliable hard drive with proven second-generation perpendicular magnetic recording (PMR) technology
  • Leverages best combination of technology (areal density, PMR) and proven components for volume shipping
  • Industry-leading acoustics and power consumption levels
  • 105-MB/s sustained data rate
  • 32-MB cache
Read More

Jumper settings for Seagate and Maxtor ATA hard drives

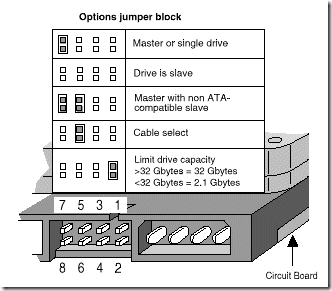
image Master or single drive. If you are installing your Seagate hard drive as the only drive in the system or if it will be the primary boot drive for the system, the jumper should be set as Cable Select. If you are connecting the drive to an older system that has a pre-UDMA Mode 3 ATA controller, or you are connecting this to a cable with a slave device that doesn’t have a cable select jumper setting, jumper the drive as Master instead by putting a jumper on the first vertical set of pins closest to the data cable.

Drive as slave

If you are installing the drive as an additional drive in your system, the drive should be set as Cable Select. If you are connecting the drive to an older system that has a pre-UDMA Mode 3 ATA controller, or you are connecting this to a cable with a master device that doesn’t have a cable select jumper setting, jumper the drive as Slave instead by removing the jumper from the drive.

Cable Select

This setting is the default setting for ATA drives. With the Cable Select jumper set, the BIOS determines whether a drive is a master or a slave by its position on the UltraATA cable. If the drive is jumpered as cable select and is connected to the black connector on the end of the cable, it is recognized as the master drive for that ATA controller. If the drive is jumpered as cable select and is connected to the grey connector on the middle of the cable, it is recognized as the slave drive for that ATA controller.

Drive as master with a non-ATA-compatible slave

On Seagate drives only, set a jumper on pins 5 and 6 and a jumper on pins 7 and 8. Use this jumper setting only if the drive does not work as a master or cable select.

Limit drive capacity (or CLJ)

Use this on computers manufactured before November 1998 when either you start up your computer and see the message, “Hard disc drive controller failure”, your computer does not recognize your newly installed hard drive, or your system stops responding during the boot process after installing this new drive.

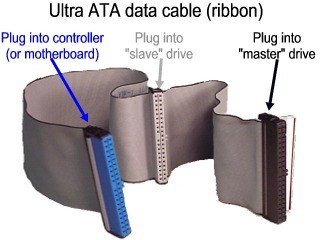
Seagate recommends the use of newer UltraATA cables to achieve the best performance from your new Seagate hard drive. These UltraATA cables have 3 colored connectors, each connector has a specific purpose. Be sure to plug the correct connector into the correct device.

Image

  • The blue connector is for your host bus adapter (using a connector on your motherboard).
  • The black connector at the other end is for your master device, usually the hard drive you boot from.
  • The gray connector is for an optional slave device if you have a second hard drive.

Other devices like CD-ROM drives, tape drives and CD burners are usually plugged into a separate cable which also connects to the motherboard.

Seagate U-Series and Barracuda ATA drive families (ie, most ATA drives above 20 GBytes) follow the jumper configuration noted below:

image

Maxtor (and Quantum) drives follow the jumper configuration noted below:

Image

The drive is configured at the factory for a cable select setting. This allows the drive to assume the proper role of master or slave based on the connector used on the cable (see the UltraATA cable figure above). For the cable select setting to work properly, the cables you are using must support the cable select feature. Current UltraATA cables with the 3 colored connectors do support this feature.

Read More

3 Ways To Determine Seagate Hard Disk Model And Serial Number

To identify your seagate hard disk drive, retrieve the model number, serial number and firmware revision without removing your drive. There are 3 methods:

  1. Seagate DriveDetect.exe method (recommended)Click here to download Drive Detect

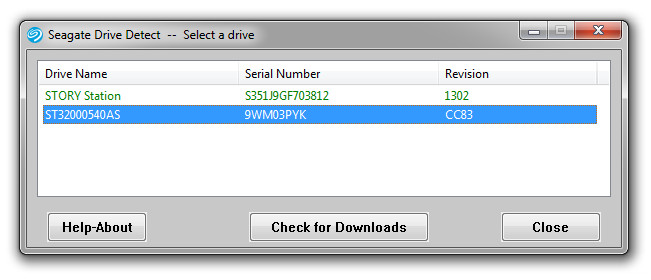
    When running Drive Detect you will see a screen like this.  Look for the drives that are attached:

    Seagate Mode Serial Number

    In the example above the Drive Name is the same as the Model: ST31500341AS, the serial number is 9VS00J20 and the firmware revision is SD1A.

  2. Device Manager Method :

    Use Microsoft Windows Device Manager to see the model numbers of your disk drive.

    • Choose Start | Run | type:  devmgmt.msc
    • Click Ok.
    • Expand the Disk Drive branch to see the model numbers:
      Seagate Model Numbers
  3. Seatools for Windows Method:Download SeaTools for Windows which displays all of the required information.
Read More

Raid Data Recovery Tips

Raid Data Recovery A large number of users had been made into believing that RAID should not fail, as a result of over emphasis of RAID’s fault tolerance functions or auto rebuilt functions. As a result, up to date backups are seldom performed when the data disaster nightmare unfolds.

RAID may be implemented by hardware or software -based method, differentiated by the presence or absence of a RAID controller, Basically, a number of independent hard disks are connected to form a single and often larger virtual volume. Depending on the RAID configuration, there may be an increase in simultaneous reading and writing of drives along with the fault tolerance feature.

Popular RAID manufacturers such as Mylex, Adaptec, Compaq, HP, IBM etc. promotes the idea of extended data availability and protection when a failed hard disk was detected. In a typical RAID 5 configuration, without even power off, the RAID controller could rebuild the data volume from a hot standby drive or a replacement drive through hot swap. The only time it will fail is when two disks failed simultaneously but such probability is one in a million! As a result, one may tend to believe that RAID can not fail.

The reality: RAID fails

In reality and to the surprise of most, RAID could fail and often fail. See some typical scenario below :

When one hard disk fails, very often, there is no hot standby. As a result, the raid array is running on degraded mode. While waiting for the replacement drive which may take a day or two, the likelihood of next drive failure disabling the raid volume is very high. It is reasonable to assume that all the drives in the array are from the same batch and subject to equal amount of working stress. So if one disk fails, the other is also near imminent failure and it often does.

Most raid server has a single controller. Its failure will result in catastrophic single point of failure.

Frequently, due to power surge, the controller or a number of disk elements could fail resulting in total loss of data. It is also found that a power surge may corrupt the RAID configuration setting of NVRAM in the controller card.

It is also commonly found that while replacing a faulty drive in an attempt to rebuild the raid volume to healthy state, wrong procedures are performed resulting in wrong or partial rebuild, or complete system breakdown upon completion of rebuild.

Not to forget that a RAID configuration with fault tolerance at best only intends to protect the physical failure, but not logical corruption such as system corruption, virus infection, or inadvertent deletion.

Types Of RAID failures

To summarize, RAID server often fails as a result of the following situations and frequently, a combination of them :

  • Malfunctioned Controller
  • Raid rebuild error or volume reconstruction problem
  • Missing RAID partition
  • Multiple disk failure in off-line state resulting in loss of RAID volume
  • Wrong replacement of good disk element belonging to a working raid volume
  • Power Surge
  • Data Deletion or reformat
  • Virus Attack
  • Loss of RAID configuration settings or system registry
  • Inadvertent reconfiguration of RAID volume
  • Loss of RAID disk access after system or application upgrade

RAID Pricing

In general, pricing of raid recovery starts from $1500 onwards and will be more as the situations get more complex.

RAID Recovery Process

Though raid disk arrays offer more redundancy, capacity and performance over standard disk systems, once failed, they are often complex and more difficult to recover.

Normally, we only require the hard disks making up the raid volume in order to recover the lost data.

The process begins by looking at the kinds of failure occurred in a RAID volume. If the RAID server failure is due to multiple failed disks, effort will be spent in getting the failed disks backed to ready state.

The disk image or the low level binary contents of each disk are then copied out. Next, analysis is performed on the disk images. A process of de-stripping will be carried out on each of the extracted disk image upon confirming the RAID types, correct orientation of disk elements forming the RAID volume, the raid strip block size, the associated parity location etc. Different manufacturers may have slightly different RAID settings so additional fine tunings may be needed. Very often, file system repair must also be performed before the data location could be mapped out correctly.

Once the data layout pattern making the RAID logical volume has been identified and confirmed, the critical data will then be uplifted into other disk media. The data integrity is then evaluated to ensure that the data is of acceptable quality before a file list is finally produced for customer review.

Raid Data Recovery Software: Getway Raid Recovery V2.1

Getway Raid Recovery is the professional Raid Data Recovery Software which can extract data from multiple Hard disks in a RAID system, and rebuild the correct data. It can get data back from various types of arrays, including RAID 0, RAID 5, RAID 5E, RAID 5EE and RAID 6.

Read More

How To Perform Diagnostics on Maxtor (or Quantum) SCSI Drives

SCSIMax SCSIMax is a diagnostic utility for all Maxtor (and Quantum®) SCSI hard disk drives supporting Self-Monitoring, Analysis, and Reporting Technology (S.M.A.R.T). This test will determine hard drive integrity in a short period of time, with a high degree of confidence. If the program completes without error, the problem remains elsewhere in your system. Check SCSI cables, termination and operating system. Maxtor recommends you use this utility for troubleshooting potential hard drive problems. These problems include, but are not limited to: potential hard drive surface media problems (e.g., bad clusters or sectors, partitioning/formatting problems, etc.) and drive recognition problems (e.g. hard drive that is not recognized by the operating system). SCSIMax uses the SCSI controller’s ASPI driver to route Int13 commands to the hard drive. The utility is not data destructive, but Maxtor recommends that you complete a full backup of your hard drive before running this utility.

Note: Incompatible with Apple® systems, and SCSI Ultra320 controllers. This utility does not run from the Windows desktop.

Use SCSIMax on all legacy (ie, up to Ultra160/Ultra3 speed) Maxtor SCSI hard drives prior to warranty replacement.

Seatools Enterprise may be used for these drives as well, but is particularly well-suited for Serial-Attached SCSI and SCSI Ultra320 drives of the newest generations.

SCSIMax supports all Maxtor and Quantum SCSI drives including:

  • Atlas 15K
  • Atlas 10K, Atlas II, Atlas III and Atlas IV
  • Atlas 7200RPM IV and Atlas 7200RPM V
  • Viking II

Depending on S.M.A.R.T. settings, not all tests are performed on all drives.

ASPI Drivers

ASPI (Advanced SCSI Programming Interface) is a software layer that enables programs to communicate with SCSI devices. Adaptec® ASPI drivers will load from the Windows 98SE, or Millennium (ME) startup disks, when the “Start computer with CD-ROM support” option is chosen at the selector prompt. LSI host adapters load their own ASPI drivers during system startup. If you are using another brand of SCSI host adapter, consult your host or system manufacturer for ASPI driver support. SCSIMax is not currently supported to run on SCSI Ultra320 controllers, due to boot issues.

SCSIMax System Requirements

  • Windows 98SE/Millennium startup disk, or equivalent bootable DOS disk that loads compatible ASPI drivers, in accordance to the model of SCSI host, being used to test the hard disk.
  • SCSIMAX.EXE program copied to a clean formatted floppy diskette.
  • PC-compatible system (Pentium or newer).
  • A supported Maxtor/Quantum SCSI S.M.A.R.T. capable hard drive.

Step-by-Step Instructions

    1. Download SCSIMax to an existing directory on your hard drive (for convenience copy to the desktop). The download version is a self-extracting Zip file. After opening you will be prompted to insert a floppy into the (A:\) drive.
    2. After SCSIMax has been extracted to the floppy diskette, remove the diskette and perform a normal shutdown.
    3. Boot your system to the 98SE or Millennium startup disk, and at the selector prompt choose the Start computer with CD-ROM support option. This will automatically load the ASPI manager drivers for Adaptec branded hosts.
    4. When the 98/Me boot disk reaches the A:\ prompt, remove the disk, and insert the disk with the SCSIMax utility. Type SCSIMAX at the A:\ prompt and hit [ENTER].
      Note: SCSIMax is designed to run on Maxtor/Quantum S.M.A.R.T. capable hard drives (the utility will identify a drive as S.M.A.R.T. capable). As with any system test or diagnostic, Seagate recommends that you have a complete backup of your drive before beginning.
    5. SCSIMax will next display a license agreement. Choose [Continue] or[Accept]. The program will identify all SCSI controllers in the computer. If your system has more than one drive, you will see a menu of recognized SCSI controllers with attached drives. Select a drive to test, enter its number or choose 0 for all.
    6. After the Quick Test, you will be prompted to perform a full surface scan. The full surface scan can take quite some time depending upon the drive’s capacity, but will test every Logical Block Address (user’s data area). Seagate recommends the full surface scan if you suspect that the hard disk may report media errors on areas of the drive that are not normally tested by the Quick Test.
    7. When the test finishes you are prompted to Print, Save and Exit. Press S; to save. Regardless of Pass or Fail, SCSIMax saves a drive information text file to the floppy called TESTLOG.prn. If the drive fails any of the tests performed, SCSIMax will display a 6-digit error code. Please make note of the code, or save the TESTLOG.

Note: Owners of O.E.M systems (HP, Compaq, Dell, etc.) that were originally purchased containing a Maxtor or Quantum SCSI drive must contact the O.E.M. or the place of purchase for warranty service.

File Version: 1.21
File Size: 70.0 kb
Supported Operating Systems: Windows NT, Windows XP Home Edition, Windows 2000, Windows Me, Windows 98, Windows 95A, Windows 95B, DOS, Windows XP Professional
Download: SCSIMax

Read More

Make your own Cleanbox Cheap

image This is a cheap way to make a cleanroom, or rather glovebox for working on drives.  Works well and will get the small jobs done. When it is something important I usually use a cleanroom but you canuse a glovebox. In addition, when the platters spin, the air bearing created will usually spin off small debris. The drive was actually designed this way. However if you touch it, game over.

It took,
18″ x 24″ piece of plexiglass
rubbermaid 44 qt. clear storage bin
(2) 4″ male pvc adapters
1/8″ thick foam tape
1/8″ drill bit and drill
razor knife
#7 x 1/2″ sheetmetal screws (zip screws)

I had planned on finding some long gloves to use with it attached with large hose clamps but had no luck finding any so far. i will try the bait store next. for now i’ll just use latex gloves with open holes.

to cut the holes in the sides i used the 1/8″ drill bit and drilled holes close together around the lines i traced around the PVC fittings and connected the dots with the razor knife. then the pvc fittings were screwed in(don’t make the holes too big!) i then saved the circles that came out and foam taped around them with notches in either side of the tape around the circle so it could be applied w/o ripples. i will use them as hole plugs to keep the box clean when not in use. i will prolly epoxy some sort of handles or knobs on these so they can be removed easily from the outside of the box.

the hole in the lid was easily cut with the razor knife. the plexiglass was scored with the knife then snaped to size. holes were drilled in the plexiglass then wottled out to be oversized so the plexi didn’t crack when i put the screws in. the lid was a softer plastic and was not drilled. plexiglass was applied with foam tape and zip screws manually with a 1/4″ nut driver. the holes have to be close, i.e. 3″, together to ensure the foam tape sealed (silicone could be substituted here for foam tape)

one of these really isn’t essential for making syringes or even grain to grain transfers, but, after trying agar a few times without one, i decided i needed one.

Be careful with flammable disinfectants and flame in a glovebox, they can (and do) explode! Sanitizer fumes are also highly toxic to mycelia

Cleanroom Cleanroom

Cleanroom Cleanroom

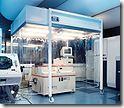
What is a Cleanroom?

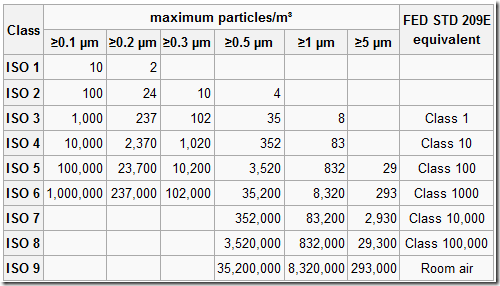
A cleanroom is an environment, typically used in manufacturing or scientific research, that has a low level of environmental pollutants such as dust, airborne microbes, aerosol particles and chemical vapors. More accurately, a cleanroom has a controlled level of contamination that is specified by the number of particles per cubic meter at a specified particle size. To give perspective, the ambient air outside in a typical urban environment might contain as many as 35,000,000 particles per cubic meter, 0.5 μm and larger in diameter, corresponding to an ISO 9 cleanroom.

If the hard disk needs to be opened up, one has to do it within a cleanroom. The gap between the Read-Write head and the data platter is just a few microns. Any dust particles that get into the gap will induce “crashing” of the Read-Write head onto the data platter (where your magnetic data bits are stored) resulting in total and permanent loss of data.

Read More

Data Recovery Equipment: CleanRoom Environment Control

Cleanroom

What is a Cleanroom?

A cleanroom is an environment, typically used in manufacturing or scientific research, that has a low level of environmental pollutants such as dust, airborne microbes, aerosol particles and chemical vapors. More accurately, a cleanroom has a controlled level of contamination that is specified by the number of particles per cubic meter at a specified particle size. To give perspective, the ambient air outside in a typical urban environment might contain as many as 35,000,000 particles per cubic meter, 0.5 μm and larger in diameter, corresponding to an ISO 9 cleanroom.

If the hard disk needs to be opened up, one has to do it within a cleanroom. The gap between the Read-Write head and the data platter is just a few microns. Any dust particles that get into the gap will induce “crashing” of the Read-Write head onto the data platter (where your magnetic data bits are stored) resulting in total and permanent loss of data.

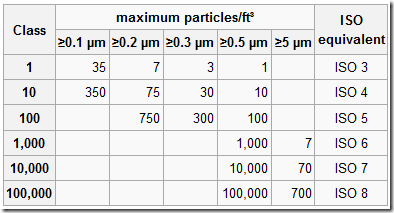
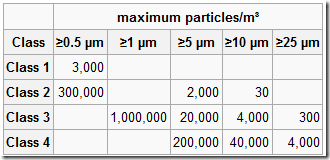
Cleanroom Standards

1. US FED STD 209E was officially cancelled by the General Services Administration of the US Department of Commerce November 29, 2001, but is still widely used.

Cleanroom Standard

2. ISO 14644-1 cleanroom standards

Cleanroom Standard

3. BS 5295 Class 1 also requires that the greatest particle present in any sample does not exceed 5 μm.

Cleanroom Standard

Cleanroom air flow principles

Cleanroom air flow principles Cleanroom air flow principles

picture 1: Air flow pattern for “Turbulent Cleanroom”
Picture 2: Air flow pattern for “Laminar Flow Cleanroom”

What makes cleanroom environment fail?

* Facilities

Walls, floors and ceilings

Paint and coatings

Construction material (sheet rock, saw dust etc.)

Air conditioning debris

Room air and vapors

Spills and leaks

* People

Skin flakes and oil

Cosmetics and perfume

Spittle

Clothing debris (lint, fibers etc.)

Hair

* Tool Generated

Friction and wear particles

Lubricants and emissions

Vibrations

Brooms, mops and dusters

* Fluids

Particulates floating in air

Bacteria, organics and moisture

Floor finishes or coatings

Cleaning chemicals

Plasticizers (outgasses)

Deionized water

* Product generated

Silicon chips

Quartz flakes

Cleanroom debris

Aluminum particles

Cleanroom Control Regulations for reference

1.  All personal items such as keys, watches, rings, matches, lighters and cigarettes should be stored in the personal locker outside the gowning room.

2.  Valuable personal Items such as wallets may be permitted in the cleanroom provided they are NEVER removed from beneath the cleanroom garments.

3.  NO eating, smoking or gum chewing allowed inside the cleanroom.

4.  Only garments approved for the cleanroom should be worn when entering.

5.  NO cosmetics shall be worn in the cleanrooms. This includes: rouge, lipstick, eye shadow, eyebrow pencil, mascara, eye liner, false eye lashes, fingernail polish, hair spray, mousse, or the heavy use of aerosols, after shaves and perfumes.

6.  Only approved cleanroom paper shall be allowed in the cleanroom.

7.  Approved ball point pens shall be the only writing tool used.

8.  Use of paper or fabric towels are prohibited. Use of hand dryers equipped with HEPA filters are suggested.

9.  Gloves or finger cots should not be allowed to touch any item or surface that has not been thoroughly cleaned.

10. Only approved gloves, finger cots (powder-free), pliers, tweezers should be used to handle product. Finger prints can be a major source of contamination on some products.

11. Solvent contact with the bare skin should be avoided. They can remove skin oils and increase skin flaking.

12. Approved skin lotions or lanolin based soaps are sometimes allowed. These can reduce skin flaking.

13. All tools, containers and fixtures used in the cleaning process should be cleaned to the same degree as the cleanroom surfaces. All of these items are a source of contamination.

14. NO tool should be allowed to rest on the surface of a bench or table. It should be place on a cleanroom wiper.

15. Only cleanroom approved wipers are allowed to be used. The wipers must be approved for the Class of cleanroom being cleaned.

16. ALL equipment, materials and containers introduced into a sterile facility must be subjected to stringent sterilization prior to entrance.

17.NO ONE who is physically ill, especially with respiratory or stomach disorders, may enter a sterile room. This is a good practice in any cleanroom environment.

Personal Actions Typically Prohibited in Cleanrooms

1. Fast motions such as running, walking fast or horseplay.

2. Sitting or leaning on equipment or work surfaces.

3. Writing on equipment or garments.

4. Removal of items from beneath the cleanroom garments.

5. Wearing the cleanroom garment outside the cleanroom.

6. Wearing torn or soiled garments.

Read More

Download Data Recovery Software: Digital Rescue Premium

image

Software: Digital Rescue Premium
Price: $49.99
Publisher: Data Transfer. LLC
Catalog: Data Recovery Softwares

An easy-to-use interface and “Smart Wizard” make finding and restoring your accidentally deleted photos, videos, music, emails and other files easier than ever before.

Main Features:

  • Recover deleted photos, music and videos.
  • Recover deleted Microsoft Office files, tax documents and more.
  • Restore deleted email messages and attachments from Windows Mail, Outlook Express, Outlook and Thunderbird email programs.
  • Recover deleted Outlook Calendars, Tasks, Notes, Journal Entries, Addresses and More.
  • Recover files deleted after the Recycle Bin has been emptied.
  • Search for recoverable files by name, file type, file extension and more.
  • Preview files before performing a recovery.
  • Recover multiple files at the same time (Batch Recovery).
  • Recover files from PCs, external hard disk drives, USB Flash Drives, SD Cards and more.

Minimum System Requirements

  • Microsoft® Windows Vista™, Windows XP, or Windows 2000 Operating System
  • Intel® Pentium® (or equivalent) 350MHz processor
  • 32MB of RAM (256MB recommended)
  • 800 x 600, 16-bit color Graphics Card
  • 10MB of Available Disk Space
  • CD/DVD ROM drive

FAQS:

1. Why Can’t Digital Rescue see my drive I want to recover?
The device may be showing in the selection menu, just labeled differently. Usually it is called “volume 1”. If you still cannot see the drive, restart your computer and try again. If you continue having issues with Digital Rescue not recognizing your drive please identify the file system for that drive. This can be accomplished using the following steps:

  1. Double Click on “My Computer”
  2. Right Click on the Drive you are identifying (ie “F:”)
  3. Select Properties
  4. Locate the Line on the Properties Page that says “File System”

If the drive has a files system “RAW” you will need to perform a “Quick Format“.
Quick Format can be accomplished using the following Steps:

  1. Double Click on “My Computer”
  2. Right Click on the Drive you are formatting
  3. Select “Format”
  4. Select “Quick Format”
  5. Proceed with Format

Quick format does not erase the drive, it will only place an appropriate file system header on the drive such as “NTFS”. Once your drive has an appropriate file system, Digital Rescue will be able to access the drive.

2. Why can’t Digital Rescue see my SD card?
If you are directly connecting you SD card into the SD card reader in your computer, Digital Rescue may not be able to detect it. Please use either your camera or a USB card reader to access your SD card through the computer. Please make sure your USB reader appears in Windows Explorer as a “Removable Storage Device”

3. I accidentally formatted my drive and I don’t see any files when I perform a scan. Why can’t I see them?
Formatting your drive deletes your old file allocation table and creates a new one. Digital Rescue will not be able to locate those files because they belonged to the old file allocation.

“For the best in data recovery, we recommend the “Top Ten REVIEWS Gold Award” Digital Rescue Premium. This software offers the unbeatable combination of a user-friendly design, a hefty feature set and one the most effective data recovery capacities we’ve seen.”

Download/Buy data recovery software: Digital Rescue Premium

Read More